HF dust collector upgrade

Signed-In Members Don't See This Ad

Mike

Member
Joined
Oct 23, 2022
Messages
549
Location
Albuquerque
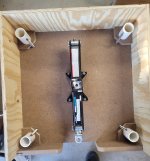
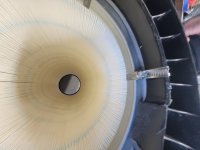
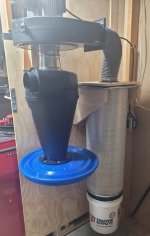
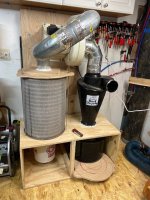
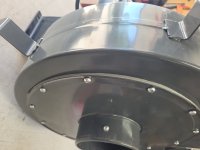
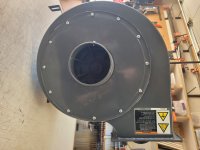
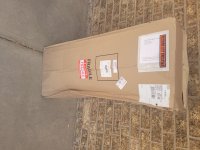
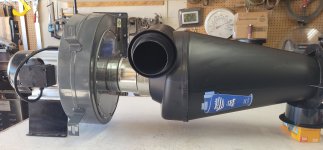
I am in the process of upgrading my HF DC. I already have the Wen impeller and have ordered the Oneida Super Dust Deputy.

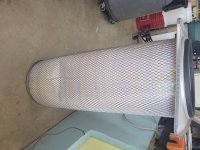
I am waiting on the SDD before I order the Wynn filter.
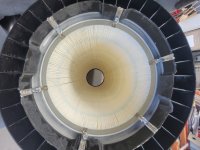
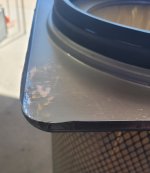
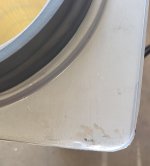
They have one that is 222 sq ft, 17.5" diameter and 23" tall.
Another is 230 sq. ft, 12.75" diameter and 34" tall.
Both are MERV 15.

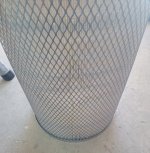
After I receive the SDD I will see how to best fit this thing in my available space. The tall skinny Wynn filter might make that easier, does anyone know of a reason not to use it?

I see on YT, etc. that some people are still using the separator section from the original machine. It seems that is not needed with the SDD and Wynn filter??

I am thinking of getting rid of a couple of power tools taking up space in the shop. One is an old but still in great shape Dayton 1.5 HP 6x48 inch belt and 12 inch disc sander. I haven't used it in over a year. I also have a Bosch dual miter sliding miter saw I haven't used in over 2 years. I have a nice 4x36 Porter Cable belt sander I use a lot. Still trying to make up my mind. Should get enough cash for those to pay for the DC upgrade.

Any advice, pros, cons, etc. welcome.

Mike
 
Signed-In Members Don't See This Ad
Make sure you leave room under the Wynn filter for a catch bucket. Even with the SDD you will have some fines get through and when you clean the filter, you will want it there to catch stuff.
 
I've got a similar setup to @d_bondi but mine is based on a Jet DC. I used the larger Wynn filter, a SDD, and eliminated the metal separator that came with the DC. My issue was the blower direction and the airflow in the SDD were opposite each other, so I needed to make some adjustments to the design which made the unit a bit larger but more efficient.

Design must accommodate a lot of airflow versus air velocity, so be sure your piping is as large as possible, minimizing bends, and use ridgid pipe as much as you can for longer runs versus flex pipe. I also have a 5 gal spackle bucket on the end of the filter to collect stuff and it needs emptying at times, so plan the filter length as filter plus catch bucket.

Here is mine -
dust collector.jpeg
 

Attachments

  • dust collector.jpeg
    dust collector.jpeg
    86.2 KB · Views: 36
I have the Gamma seal lid and bucket for under the Wynn from Tractor supply and a 35 gallon plastic barrel for under the SDD. I think D. Bondi's layout will work best with my HF DC. Mine will be very similar.
Thank you both for the comments and pictures.

Mike
 
I think D. Bondi's layout will work best with my HF DC. Mine will be very similar.

Mike - Please let me know if you have any questions.

NOTE: The bearings on my HF Blower's Motor are going out. I do not know if the fact that I have mounted the motor rotated 90 degrees from its intended orientation has contributed to this or not, but I wanted to share that with you. One of my next shop projects will be disassembling the dust collector so I can replace them. I will look for replacement bearings that are heavier duty and/or for the vertical orientation.

When you look at the photo of my setup, you will see the black box under the 30 gallon drum. This is a lift that allows me to lower the drum to empty it.
I didn't notice the lift. That is a good idea, I was pondering how to support the drum. I was thinking of a pair of wedges to raise and lower it. Where did you source the lift?
I have seen several HF DC mods where the blower was rotated 90°. I wonder if that happens often? There are definitely bearings designed for side thrust as you said. Probably look at McMaster Carr?? The last bearings I bought were for my Jet mini. I don't remember where I got them, but they have to take a side load.

Thanks again,
Mike
 
I built it with a cheap car jack from amazon. Definitely over engineered and over built, but I am an enginerd! Here are a few pictures. I hope they help.

View attachment 387869 View attachment 387870 View attachment 387871 View attachment 387872
Oh goodness....... You all probably noticed the piece of plywood under the catch bucket in my pic - my 'engineering' was to draw some circles on it so I would know when it was fully under the bucket.....lol. My lift is 4 pieces of wood, that I stack, with the circle board on top to hold the barrel up. I am lowering my head in shame......

My barrel came with the SDD. It is a true pain in the butt to latch, as it has a classic steel barrel latching assembly that has to be put into the recesses of the barrel and lid before you lever it closed. It works well, came pre-drilled for the SDD, but if you have space I wouldn't use it. I had about 2 inches of clearance between the modified DC and the cabinets above, which are also snugged below the floor joists, so not much room to play. If you have the cash, you might want to consider an alarm they sell that tells you when the bucket is approaching full. I don't have one, so I do waste some time emptying the somewhat full bucket.

Like David's, I originally had the SDD directly connected to the horizontal blower on mine, but the direction of flow required me to flip and stack the SDD and blower differently. It takes up more room, but the DC is probably 20 + years old now and still going strong. Maybe the orientation helps?

Small shops are challenging!

Kevin
 
Kevin,

The plywood looks like it works fine. I may end up doing that depending on space under the barrel. My barrel is one of the blue 35 gallon ones that have the ring latch too. I am planning to change that somehow, maybe with a piece of plywood on the SDD and one on the barrel with a gasket and bolts or something.
I may put a slit window in the barrel so I can see the dust level. I have seen them attached with silicone and screws.

Mike
Mike -
I like the idea of the slit window - I think that would work great! Since the barrel really isn't under a great amount of pressure, I've almost given up on the ring latch and thinking of just wedging the barrel up into the lid, which is screwed down to the framing I made. There is a pretty good flexible seal on my lid and if your barrel is similar, an alternate latch might be perfect - maybe just a touch more of dense foam weatherstrip. Same would go for the slit window - needs to not leak, but it's not under lots of force, unless the filter clogs badly causing some back pressure.

The only time I have found things are really put to the test with some amount of force is if the intake of the DC can't take in any air (think dropping it when on and the suction sticks it to the floor - don't ask, lol). The force of the vacuum kinda puts a reverse pressure (vacuum) on the works and weird things happen. I've lost a barrel, collapsed a duct pipe, and broke some seals on piping in my old shop where the feed duct was fairly long between the intake and the actual DC intake. Not sure how to prevent it other than insuring your intake hose can't make a perfect seal if it comes in contact with something flat and strong - like the floor. In the new setup, my intake hose is one of those Rockler collapsible blue flex pipes - not ducting. On the occasion that something blocks the air, that flex hose becomes jet propelled and collapses and writhes around incredibly fast - so there is a bunch of force on it.

Kevin
 
I never thought about pulling a vacuum on the whole system if the intake was plugged. I could see collapsing the barrel. I worked a few years in the oilfield and saw a collapsed 1000 barrel tank after the fact. Those tanks have a "thief hatch" that is a valve. Here is a description of the operation from the web: "When the tank's internal pressure or vacuum exceeds safe limits, the spring-loaded pallet inside the hatch lifts or pulls down to open a valve, allowing vapor to escape or air to enter." You could possibly put a valve that pops in if there is a vacuum in the outlet side of the system. Have to think about it a little, a light spring to hold it closed when under pressure and it would open if a vacuum is present.

Mike
 
I used photoelectric switch that is mounted in the lid of my 30 gallon barrel. I set it so that as long as the debris is below the 8" from the top limit I set, a green light lights and if it gets above that 8" limit a red light lights. It was pretty easy to build and didn't cost too much money.

If you are interested in this, I think I have a wiring diagram and can probably make up a parts list base on my purchases from ebay and amazon.

I don't really have any problems with the locking ring for my drum/lid. I just unlatch it, slide it down on the neck of the drum and then lower the drum with the jack in my lift stand.
 
Today I disassembled the blower and installed the new impeller. The blades fit very close to the front cover. If I lay the assembly on the intake port, it touches in one place. I did not turn it on, just turned thru the exhaust by hand. I think I am going to find a 1/4" thick by 1/2" wide gasket and install with the original gasket. After some compression, I believe that there will be enough space for the cover to flex a little and not scrape.
I rotated the blower housing 90° so the outlet is oriented where I need it while I had it apart.
My Wynn filter will be here Friday, depending on UPS??? Then I can finally get started on the final design of the configuration. I am going to hang everything on the wall with french cleats and copy the leveler that Dave Bondi built for his barrel. Thanks again Dave for the design.

Mike
 
Found the 6" to 5" reducer for adapting the blower to the SDD. Local big box and HF stores don't have the 5" flange, had to order from Amazon.
I found 1/2" thick by 3/4" wide weather stripping that worked great for a spacer between blower cover and housing. I compressed it to about 1/8" and there is plenty of clearance now. Required a clamp and some bad words, but I got there.
Probably continue planning stage Friday when the Wynn filter arrives and I can place everything together on my bench and get a plan for cutting holes in the barrel and all that stuff.

Mike
 
OK, I will post some pics later today. Not very exciting so far. I put the HF DC remnants on CL for free and someone is coming to get them today.

Mike
 
I was expecting a fight when I removed the impeller yesterday but it came off easily using a puller. New one went in easily as well. I was happy with that.
Pics will be tomorrow. I will have the Wynn filter and more time. I was busy today with getting things moved around pending the permanent installation of the DC. I have been getting rid of things I haven't used in years and some literal junk I have been keeping around. Also got rid of the HF DC skeleton. I kept the plastic collection bag. May try to figure out how to use it in the new barrel to make it easier to clean out.

Mike
 
Wynn filter showed up via UPS this morning and it is crushed. It's not usable. I am going to straighten it and use it for measuring and building my supports anyway. Wynn is sending me a new filter Monday.
Pics of new blower seal and damaged filter.

Mike
 

Attachments

  • 20251002_141108.jpg
    20251002_141108.jpg
    177 KB · Views: 18
  • 20251002_141124.jpg
    20251002_141124.jpg
    238.8 KB · Views: 19
  • 011.jpg
    011.jpg
    382.3 KB · Views: 21
  • 001.jpg
    001.jpg
    379.3 KB · Views: 20
I straightened the flange and pulled the expanded steel surround out on the damaged filter. It might even be usable. I can definitely use it for my structure build this weekend. I took a picture of the blower and SDD on its side on the workbench too. I found 4 leveling screws/feet and some T-nuts I already had. Picked up most of the parts for the leveler/lift I am going to shamelessly copy from Dave Bondi. I am going to work on that tomorrow. The leveling screws/feet are way longer than I need, but I will cut them when I am sure of the total height needed. My son is coming over Sunday to help with the heavy stuff.

Mike
 

Attachments

  • 20251003_145818.jpg
    20251003_145818.jpg
    200.7 KB · Views: 19
  • 20251003_145929.jpg
    20251003_145929.jpg
    405.9 KB · Views: 15
  • 20251003_145912.jpg
    20251003_145912.jpg
    173.6 KB · Views: 14
  • 20251003_145901.jpg
    20251003_145901.jpg
    219.5 KB · Views: 17
  • 20251003_145410.jpg
    20251003_145410.jpg
    250.7 KB · Views: 18
Nice progress Mike! Sorry about the filter - you would think Wynn would have packaged that a bit better.

Second on the swivel port recommendation from David - I use the same the swivel and the Rockler expandable hose - works great. One also add I would consider is Woodcraft's magnetic duct connectors Link. I move the hose between two fixed lathes as well as cleaning the shop. Moving it without having to undo a clamp is pretty sweet. Just click and done!
 
Oh... When you buy the Dust Right 4" Hose, just buy the 28' one first. I convinced myself that the 21' was going to be long enough and I was wrong. 😭 The 28' one is currently on sale for the price of the 21' (which is not on sale).

Buy Once Cry Once!

I second the magnetic connectors. I do not have experience with the Woodcraft ones. I 3D printed my own before they were commercially available.
 
So, I have been in the garage most of the day and am almost done with the leveling jack. I got the leveler bottom made with the holes drilled and matched up to the top (the part that moves up and down). I bought a HF screw jack, only $23. It had a swivel thingy on the top and I cut it off with the grinder and now it looks like Dave's.
Dave, I have a question about the jack. Is it bolted to the bottom? And/or the top? Can't really tell in the picture showing the jack. I have the hardware to do whatever I need to and a welder if needed.
Thanks for the suggestions everyone. I already have hoses and connectors, but I like the swivel and the mag hookup. I may look into those in a week or two.

Mike
 
Hi Mike,

I am not currently at home so I can't look for sure, but...

I am pretty sure that the jack is not attached to the base or lift plate with any type of fastener. Here is a better photo of base that shows the two shaped pieces of wood, one on either side of the base of the jack. It is possible that I used fasteners but I cannot see them in the photo.

DDE4E9B4-757F-41FB-98A5-33F7C794820E_1_105_c.jpeg

I don't have any photos of the underside of the lift plate, but my guess is that I cut a piece of wood with a center cutout the shape of the top of the jack and that it simply sits on that. The large dowels inside the PVC pipe guides is what keeps everything aligned.

I can check to be 100% sure when I am back home later this week.

David
 
David, thank you for your help. I used the PVC and dowel guides like yours. I drilled the base of the jack and bolted it to the lift base. I know in the past on the rare occasion I used a screw jack, they tend to flop around and fall over when you are raising them until they have weight on them and I didn't want that. I am going to finish the leveler this morning and hopefully get the system attached to the wall by end of day. It definitely won't be as pretty as yours, but should be functional. After I put the Wen impeller in blower, it moves a lot more air. And I verified the AC circuit 20 amp.

Thanks again,
Mike
 
My son came over Sunday and Monday and we got all the heavy stuff done. Not only is he a great help, we also have a good time hanging out. Installed 3/4" plywood on the wall, blower bolted to wall and positioning of the Wynn filter. Tuesday and today, I mostly finished the leveler and got some guide rails installed in the left, right and back. It is finished except for paint and it has been raining and sprinkling here and I don't like to use rattle cans in the garage. I installed the Gamma seal on the bottom of the Wynn filter and made an interface for the 5" flange on the top. Also built the bracket to hang the Wynn filter on the wall and got it installed and the filter on it. Here are some pics, I will take some more in the next couple days after I get things cleaned up. I am going to put the barrel on the leveler and do a test run tomorrow and hopefully get the garage cleaned up. The replacement filter should be here tomorrow.

Mike
 

Attachments

  • 001.jpg
    001.jpg
    505.9 KB · Views: 13
  • 002.jpg
    002.jpg
    286 KB · Views: 12
  • 003.jpg
    003.jpg
    380.4 KB · Views: 9
  • 004.jpg
    004.jpg
    279.5 KB · Views: 9
  • 005.jpg
    005.jpg
    309.4 KB · Views: 9
  • 006.jpg
    006.jpg
    380.5 KB · Views: 9
  • 007.jpg
    007.jpg
    323.6 KB · Views: 9
  • 008.jpg
    008.jpg
    255.2 KB · Views: 13
Back
Top Bottom