Help with Woodcraft Accord twist mechanism

Signed-In Members Don't See This Ad

Jmaxcy

Member
Joined
Mar 28, 2021
Messages
179
Location
Pittsburgh, Pennsylvania
Hi all

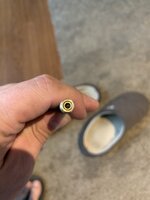
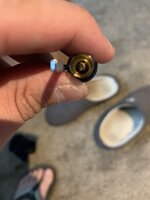
I bought some accord pen kits from a fellow IAP member. First I love the kit. Looks great, heavy feel to it. Problem is I cannot get the twist mechanism to work. The directions say "turn the body to retract". That's about it. It looks like the twist mechanism attaches to the cap, but the cap seems very much fixed. I can get the refill to project by twisting the nib, but can't get it to retract because the nib unscrews for refills so when you try to retract by twisting the nib, the nib just comes apart rather than twisting the mechanism.

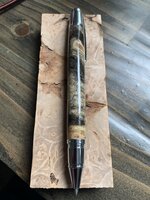
worst part is I think I did my best job yet on the sizing and the finish and I love the look of this pen (pic below). Any help would be amazing, really hoping I can keep the pen whole without too much disassembly...

link to assembly instructions as well....


Attachments

  • 6569584C-E888-40CB-9E58-3930E623C9A9.jpeg
    6569584C-E888-40CB-9E58-3930E623C9A9.jpeg
    366.6 KB · Views: 118
Signed-In Members Don't See This Ad

magpens

Member
Joined
Feb 2, 2011
Messages
15,911
Location
Canada
That's a beautiful pen you have made !! . I hope you get it to function properly. . If the kits that you bought from another member are quite old, then the twist mechanism might be somewhat "sticky" and may need a few practice twists to loosen it up.

I made some of these Accords a few years ago. . Kinda forget. . But I don't recall any problems.

The instructions say ....

"Next thread the Nib (A) onto the Twist Mechanism (B). "

The Nib has to be fairly well tightened ... so that it does not become unscrewed when you twist to retract. . Of course, it then requires quite a hefty twist when it comes to removing the nib to replace the refill. . Going by fuzzy memory here.

I might have one of these pens still lying around. . I will try to find it.

BTW ... looking at the instructions it seems that the Trim Collar (C) and the Cap/Clip Assembly (E) are probably firmly attached to opposite ends of the barrel. . The Trim Collar (C) would then be slipping against the Nib (A) when you do the twist action to extend or retract the refill.

It must be that there is a friction fit between the Twist Mechanism (B) and the Cap/Clip Assembly (E). . So you should be able to pull off the whole barrel plus Cap/Clip Assembly in order to get access to the Twist Mechanism to give it a few practice twists while holding the nib. . The refill would be inside the long cylindrical part labelled B.

As I said, I forget some details, so I stand to be corrected if necessary.
 
Last edited:

Jmaxcy

Member
Joined
Mar 28, 2021
Messages
179
Location
Pittsburgh, Pennsylvania
That's a beautiful pen you have made !! . I hope you get it to function properly. . If the kits that you bought from another member are quite old, then the twist mechanism might be somewhat "sticky" and may need a few practice twists to loosen it up.

I made some of these Accords a few years ago. . Kinda forget. . But I don't recall any problems.

The instructions say ....

"Next thread the Nib (A) onto the Twist Mechanism (B). "

The Nib has to be fairly well tightened ... so that it does not become unscrewed when you twist to retract. . Of course, it then requires quite a hefty twist when it comes to removing the nib to replace the refill. . Going by fuzzy memory here.

I might have one of these pens still lying around. . I will try to find it.
Thanks! That's why I'm so upset it's not functioning properly....

yes I could get it to project and retract initially but it was very difficult. It's now to a point where I cannot get it to retract. Should I try to remove the twist mechanism And oil it up a bit or do you think that will mess it up for good?
 

Jmaxcy

Member
Joined
Mar 28, 2021
Messages
179
Location
Pittsburgh, Pennsylvania
That's a beautiful pen you have made !! . I hope you get it to function properly. . If the kits that you bought from another member are quite old, then the twist mechanism might be somewhat "sticky" and may need a few practice twists to loosen it up.

I made some of these Accords a few years ago. . Kinda forget. . But I don't recall any problems.

The instructions say ....

"Next thread the Nib (A) onto the Twist Mechanism (B). "

The Nib has to be fairly well tightened ... so that it does not become unscrewed when you twist to retract. . Of course, it then requires quite a hefty twist when it comes to removing the nib to replace the refill. . Going by fuzzy memory here.

I might have one of these pens still lying around. . I will try to find it.

BTW ... looking at the instructions it seems that the Trim Collar (C) and the Cap/Clip Assembly (E) are probably firmly attached to opposite ends of the barrel. . The Trim Collar (C) would then be slipping against the Nib (A) when you do the twist action to extend or retract the refill.

It must be that there is a friction fit between the Twist Mechanism (B) and the Cap/Clip Assembly (E). . So you should be able to pull off the whole barrel plus Cap/Clip Assembly in order to get access to the Twist Mechanism to give it a few practice twists while holding the nib. . The refill would be inside the long cylindrical part labelled B.

As I said, I forget some details, so I stand to be corrected if necessary.
Could it be too much friction between B and C as well? That would make the twist more challenging. I remember giving the twist mechanism a couple turns prior to assembly and it did not seem to be an issue.
 

magpens

Member
Joined
Feb 2, 2011
Messages
15,911
Location
Canada
I can't imagine there being too much friction between B and C .... does it feel that way to you ?
C is designed to slip around B. . But I suppose if there has been some corrosion they could get sticky.

I little tiny bit of WD-40, carefully applied to the right place on the twist mech, could help if you are able to try that.

What stage are things at .... is the pen fully assembled ? .... can you pull the barrel plus cap/clip assembly right off the twist mech. (B) ?

You should pull that assembly off before trying to use the WD-40.

I suspect that the actual twist mech. is right up at the brass end of B. . You should inspect that end to see if there is a place to apply the WD-40.
It looks like the actual twist mech. is fully enclosed in the chrome plated cylindrical part of B.
So I am thinking that the small brass end is a friction fit into E.
And that the small brass end is the part that does the twisting with respect to the chrome plated cylindrical part of B.

Please tell me if I have got my thinking screwed up in some way.
 

Jmaxcy

Member
Joined
Mar 28, 2021
Messages
179
Location
Pittsburgh, Pennsylvania
I can't imagine there being too much friction between B and C .... does it feel that way to you ?
C is designed to slip around B. . But I suppose if there has been some corrosion they could get sticky.

I little tiny bit of WD-40, carefully applied to the right place on the twist mech, could help if you are able to try that.

What stage are things at .... is the pen fully assembled ? .... can you pull the barrel plus cap/clip assembly right off the twist mech. (B) ?

You should pull that assembly off before trying to use the WD-40.

I suspect that the actual twist mech. is right up at the brass end of B. . You should inspect that end to see if there is a place to apply the WD-40.
It looks like the actual twist mech. is fully enclosed in the chrome plated cylindrical part of B.
So I am thinking that the small brass end is a friction fit into E.
And that the small brass end is the part that does the twisting with respect to the chrome plated cylindrical part of B.

Please tell me if I have got my thinking screwed up in some way.
I was able to disassemble piece B. You're right the brass at the very end of piece B Is the twist mechanism. It doesn't seem to be sticky or taking much to twist. It seems like piece B connects to the cap through the end of twist mechanism. Seems like the cap has a male piece that goes into a female piece at the end of piece B (attached photos). So either the cap is suppose to twist the twist mechanism, the nib is suppose to twist. The cap isn't moving at all and it would be weird to me if the cap was used for twisting given it has a clip. So it must be the nib is used to twist the B piece, and the twist mechanism is held in place through the male/female connection. It definitely takes a good bit of muscle to get piece B flush against piece C. But it could be a problem with friction in the cap as well.

might just take the cap off and replace that and see if that fixes it
 

Attachments

  • 48E592EA-4237-4D13-AA4D-1677CAE79874.jpeg
    48E592EA-4237-4D13-AA4D-1677CAE79874.jpeg
    128.2 KB · Views: 103
  • FA807B43-98CA-44A6-B3D2-D956350D4660.jpeg
    FA807B43-98CA-44A6-B3D2-D956350D4660.jpeg
    123.8 KB · Views: 83

Jmaxcy

Member
Joined
Mar 28, 2021
Messages
179
Location
Pittsburgh, Pennsylvania
I was able to confirm with another kit I have that piece B and piece c should have no friction, and I don't think they do on the assembled pen. I think there is friction in the cap. I can hear it when I put piece B in part way.
Ugh looks like I have to disassemble that now and try using a cap from one of the other accord kits I have...
 

magpens

Member
Joined
Feb 2, 2011
Messages
15,911
Location
Canada
I am not sure what I'm looking at in the pics you show. . Here's what I think ...

I think the first pic is the bottom end of Part B that screws onto Part A, the nib.

And, I think the other pic shows something to do with the internals of Part E, the cap/clip assembly. . I can't match up your words with the pic.

As I have it figured, Part E should provide a fairly tight grip on the brass end of Part B.

I don't have any Accord kits to inspect/handle and I can't find a pen made from the Accord kit.

" Ugh looks like I have to disassemble that now and try using a cap from one of the other accord kits I have..." ... not sure what you might disassemble.

"The cap isn't moving at all and it would be weird to me if the cap was used for twisting given it has a clip." ... don't get what you mean.
The cap plus clip and barrel all rotate/twist together, as I understand it. . The cap grips the brass end of B, which is the rotating end of twist mech. .

The only relative motion that you will see is the whole barrel, including cap/clip assembly, rotating with respect to the nib A.
 

Jmaxcy

Member
Joined
Mar 28, 2021
Messages
179
Location
Pittsburgh, Pennsylvania
I am not sure what I'm looking at in the pics you show. . Here's what I think ...

I think the first pic is the bottom end of Part B that screws onto Part A, the nib.

And, I think the other pic shows something to do with the internals of Part E, the cap/clip assembly. . I can't match up your words with the pic.

As I have it figured, Part E should provide a fairly tight grip on the brass end of Part B.

I don't have any Accord kits to inspect/handle and I can't find a pen made from the Accord kit.

" Ugh looks like I have to disassemble that now and try using a cap from one of the other accord kits I have..." ... not sure what you might disassemble.

"The cap isn't moving at all and it would be weird to me if the cap was used for twisting given it has a clip." ... don't get what you mean.
The cap plus clip and barrel all rotate/twist together, as I understand it. . The cap grips the brass end of B, which is the rotating end of twist mech. .

The only relative motion that you will see is the whole barrel, including cap/clip assembly, rotating with respect to the nib A.
Thanks, and agreed. I think we're saying the same thing I'm probably doing a poor job of explaining it hahah. So I took part E off the barrel and it is realized it is definitely friction between C and B that is Causing the issue. I took another accord kit I have and on that part C and part B do not touch each other whereas I can tell they are rubbing in my current pen. Guess I'll try to sand down the inside of C until it's no longer touching or just replace it with a different part C from another kit if that doesn't work....
 

magpens

Member
Joined
Feb 2, 2011
Messages
15,911
Location
Canada
Good plan ... I think that "reaming out" the suspect Part C should cure the problem.

Be careful when you are sanding the hole that you don't damage the plated outer finish.

If you have a small knife like and Exacto Knife, you might try cleaning the inner surface of the hole with that.
Could be that a little bit of glue got on that inner surface, altho' I don't know how !! ... there is no reason for glue to contact that part.
 

Jmaxcy

Member
Joined
Mar 28, 2021
Messages
179
Location
Pittsburgh, Pennsylvania
Good plan ... I think that "reaming out" the suspect Part C should cure the problem.

Be careful when you are sanding the hole that you don't damage the plated outer finish.

If you have a small knife like and Exacto Knife, you might try cleaning the inner surface of the hole with that.
Could be that a little bit of glue got on that inner surface, altho' I don't know how !! ... there is no reason for glue to contact that part.
Success!!! Thanks for your help. My head hurts....
 
Top Bottom