Help - Paint Bubbling With PR Cast

Signed-In Members Don't See This Ad

skerekes

Member
Joined
Dec 30, 2009
Messages
7
Location
Jacksonville, FL
First time poster, so please be gentle.:) I need some help.

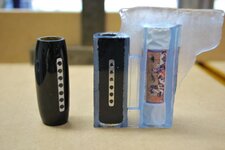
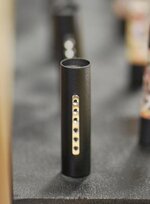
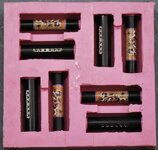
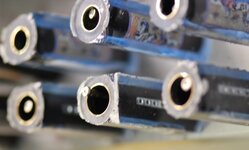
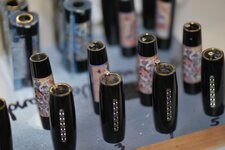
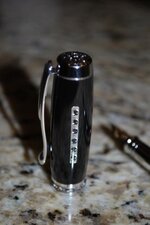
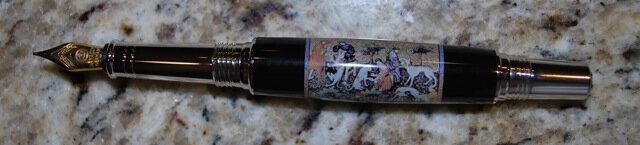
I am custom casting these for a friend of mine and thought I had it all figured out. My prototype (on left) was made with the following process:

1. Scuffed brass tubes with 220, wiped clean with denatured alcohol.
2. Sprayed 3 light coats of Rust-Oleum Painter's Touch Gloss Black spray paint.
3. Let paint cure 24 hours.
4. Mixed up/poured Castin' Craft resin per instructions (5 drops cat/per oz. resin)
5. Turned/polished (I left it a little fat due to the size of the item I was casting, I'm using a smaller version of the item for the production pens)

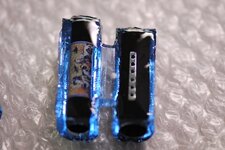
Based on the advice of some the members, I ordered some Silmar 41, thinking it would produce the same or better results for less $$ and everyone seems to be using it. I poured a tester production blank (on right) with the same steps as above and you can see what happened (not good). I tried another pour with 3 drops of catalyst to 1.5 oz of resin, thinking it was getting too hot and peeling the paint. Still no good. Bubbling and separation occurred within 20 minutes of pouring.

I've done some searching up here in between pours and it looks like others are using Krylon quick dry (which, I believe, is essentially the same paint) and not seeing this problem. I plan to go buy a can today to try.

Any other suggestions on paint or technique would be much appreciated.
 

Attachments

  • BubblePaintBlank.jpg
    BubblePaintBlank.jpg
    32.7 KB · Views: 507
Signed-In Members Don't See This Ad

jttheclockman

Member
Joined
Feb 22, 2005
Messages
19,143
Location
NJ, USA.
Go to Home Depot or Lowes and get the paint they use on barbaques. It is made for high heat. Also make sure you scuff your tubes, I like to use 100 grit paper. Then wipe dust off. Paint and wait till dry to cast. Maybe longer than 24 hours to cure. If you have a toaster oven. After 24 hours of air drying stick in oven at lowest setting 150 degrees and bake for an hour. Take out and let cool.

Another sure way to get good results is to powdercoat the tubes. Good luck.


By the way welcome to the site. Stick around. Alot of interesting things happening here.
 
Last edited:

sekach

Member
Joined
Dec 31, 2008
Messages
93
Location
San Diego, CA
Yep, it's the type of paint that you are using. I had the same problems when I first started my pourings but I strictly used PR from Michaels. I went to Pep Boys and bought their high-heat engine paint. They have a few different colors to choose from (red, black, white, etc) so you will have a little variety. I have switched almost exclusivly to full labels now and only paint the tubes to hide the brass from showing through the label. You won't have near the issues doing that...
 

its_virgil

Member
Joined
Jan 1, 2004
Messages
8,124
Location
Wichita Falls, TX, USA.
I use Rustoleum Painter's touch (primer) and have never had a problem with the paint. But, I've only used white and flat black. Other colors may behave differently. I also use Rustoleum deep forrest green ultra flat camo paint with no problems. I also use only 3 drops per ounce. I also allow the paint to dry longer than 24 hours. Sanding the tubes is a good thing to do, but sanding with a fine grit seems not to work as well as using a coarser grit. I use 80 or 100 grit to rough the tubes to give the paint some tooth. Be sure the tubes are clean. handling them after painting can leave finger prints that may cause some problems with the paint sticking. Good luck and I hope you get your problems solved. Casting is much more fun once the kinks are worked out...
Do a good turn daily!
Don


Yep, it's the type of paint that you are using.
 

skerekes

Member
Joined
Dec 30, 2009
Messages
7
Location
Jacksonville, FL
Do you know where I can get black powder coated tubes for Jr Gent/Statesman series? Or is there an IAP member out there that I can pay to powder coat? If the price is right, that may be the way to go on this one, since I am burning up a lot of time with trial and error (and error, and error, etc.).
 

skerekes

Member
Joined
Dec 30, 2009
Messages
7
Location
Jacksonville, FL
Yep, it's the type of paint that you are using. I had the same problems when I first started my pourings but I strictly used PR from Michaels. I went to Pep Boys and bought their high-heat engine paint. They have a few different colors to choose from (red, black, white, etc) so you will have a little variety. I have switched almost exclusivly to full labels now and only paint the tubes to hide the brass from showing through the label. You won't have near the issues doing that...
Sekach,
That may be a good route to go. I'm just not sure how dark the black will be. Have you done ink-jet labels with all black? Do you use any particular labels or just standard peel and stick Avery labels? How long do you wait after painting to apply the labels and cast? I may give that a try as I am starting to run out of time.

Thanks Again,
Steve
 

skerekes

Member
Joined
Dec 30, 2009
Messages
7
Location
Jacksonville, FL
I use Rustoleum Painter's touch (primer) and have never had a problem with the paint. But, I've only used white and flat black.

I also allow the paint to dry longer than 24 hours.

Good luck and I hope you get your problems solved. Casting is much more fun once the kinks are worked out...
Do a good turn daily!
Don

Are you saying that you prime and then paint? Or are you using a black or white primer and that's it?

How long do you wait for the paint to dry before casting?

I hope so too. I look forward to casting when I don't have a deadline looming. :)
 

NewLondon88

Local Chapter Leader
Joined
May 15, 2008
Messages
5,077
Location
Claremont NH
Definitely use a primer. Even if you use nothing else, use a primer. The paint
may not stick to the metal otherwise. A self etching primer is good. See if you
can get an automotive primer, those work well. Spray a zillion tubes at once and
put them aside.

You also need to give the paint time to fully cure, not just dry to the touch.
Depending on the paint, it might be a day or a week or more. Some of the solvents
in the resin can eat the paint.
 

its_virgil

Member
Joined
Jan 1, 2004
Messages
8,124
Location
Wichita Falls, TX, USA.
I use primer only as indicated in the previous post. I allow the paint to dry for two days minimum and longer if possible. As Charlie suggested, I paint lots of tubes at one time and and then I have them ready to use when I need them. Black or white primer and that's it. Or, for the snake skins I use the camo paint.

deadlines always seem to make bad things happen, especially when I wait way too long and the deadline is tomorrow.:biggrin::biggrin:
Do a good turn daily!
Don

Are you saying that you prime and then paint? Or are you using a black or white primer and that's it?

How long do you wait for the paint to dry before casting?

I hope so too. I look forward to casting when I don't have a deadline looming. :)
 

skerekes

Member
Joined
Dec 30, 2009
Messages
7
Location
Jacksonville, FL
So, after much testing it came down to my impatience causing the bulk of my problems. I sprayed 4 sets of tubes with different combinations of primers & paints on Monday night. I poured them this morning and had no problems with paint bubbling. Here are the 4 I tried:

1. Painter's Touch Black (Gloss)
2. Rust-Oleum Auto Primer--->Painter's Touch Black (Gloss)
3. Rust-Oleum High Heat BBQ Paint (Dries Flat)
4. Rust-Oleum Auto Primer (Flat)

The primer/paint combo (#2) definitely looks the best.

Thanks for all of you help. Hope this exercise save someone else some time. :)

Steve
 

sekach

Member
Joined
Dec 31, 2008
Messages
93
Location
San Diego, CA
Sekach,
That may be a good route to go. I'm just not sure how dark the black will be. Have you done ink-jet labels with all black? Do you use any particular labels or just standard peel and stick Avery labels? How long do you wait after painting to apply the labels and cast? I may give that a try as I am starting to run out of time.

Thanks Again,
Steve


Steve, I have an Epson 600 Workforce Inkjet printer and as long as I use the name brand Epson ink cartridges I am good. I went with some bought off of ebay and I thought my printer was broke for good after everything went to crap. I re-installed the Epson cartridges and my printing problems cleared up.

I bought full sheet sticker labels with a glossy finish from a company called Merax. I bought them at either Office Depot or Staples...can't remember which. 50 sheets per package and I can get about 20 labels (Sierra size) from each sheet. I have only done Sierra and Cigar labels so far. As for the colors... I have done lables that were just about all black and they came out pretty nice after the pouring.

I wait as short as maybe 30 minutes after painting the tubes (if I am in a hurry) before putting the labels on, and then put them in the mold maybe 30 minutes later...so it's really quick. So from time of painting to the final finished product could be as short as 5 hours. This is not the norm and I have a problem with procrastinating as well...but it has been done that quickly.

The biggest problem I have with the labels is that the they come up at the seam sometimes. I have resorted to dabbing a small portion of CA glue on the extreme edges where they overlap, just enough to hold it down during the initial stages of curing. This is usually on the part of label overlap that is cleaned off when I trim the barrels.

I have also had very few separate from the paper, maybe 1-2 % overall...so no big issue.

Hope this helps...
 
Last edited:

skerekes

Member
Joined
Dec 30, 2009
Messages
7
Location
Jacksonville, FL
Thanks for all of your Help!!!!

Here are some photos from the process and the final product. The metal brackets applied to the barrels are actually surgical implants for animals. They're used to brace broken bones while healing. My friend has some of the smallest in the business, so he wanted to do some marketing around them. The decal applied to the lower barrel is a tapestry which he uses for his logo. They get delivered tomorrow (all 30 of them). So glad it's over. Thanks again for all of your help. I'm looking forward to doing some creative casting now.
 

Attachments

  • Implants1.jpg
    Implants1.jpg
    19.4 KB · Views: 247
  • Implants2.jpg
    Implants2.jpg
    40.9 KB · Views: 251
  • Implants3.jpg
    Implants3.jpg
    78.1 KB · Views: 250
  • Implants4.jpg
    Implants4.jpg
    53.9 KB · Views: 243
  • Implants5.jpg
    Implants5.jpg
    66.6 KB · Views: 252
  • Implants6.jpg
    Implants6.jpg
    22.9 KB · Views: 241
  • Implants7.jpg
    Implants7.jpg
    39.2 KB · Views: 246
Top Bottom