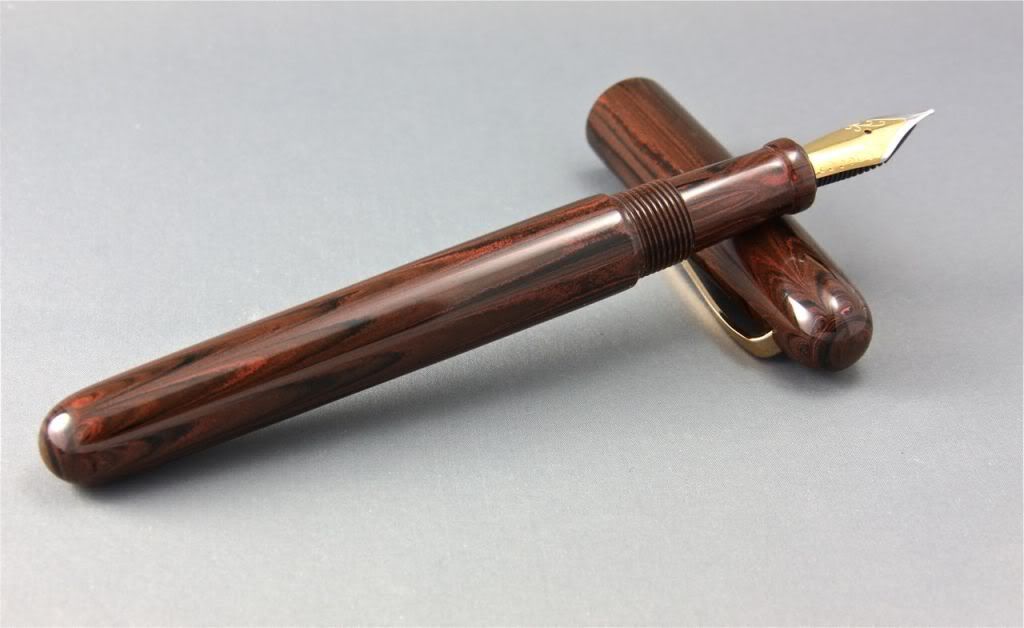
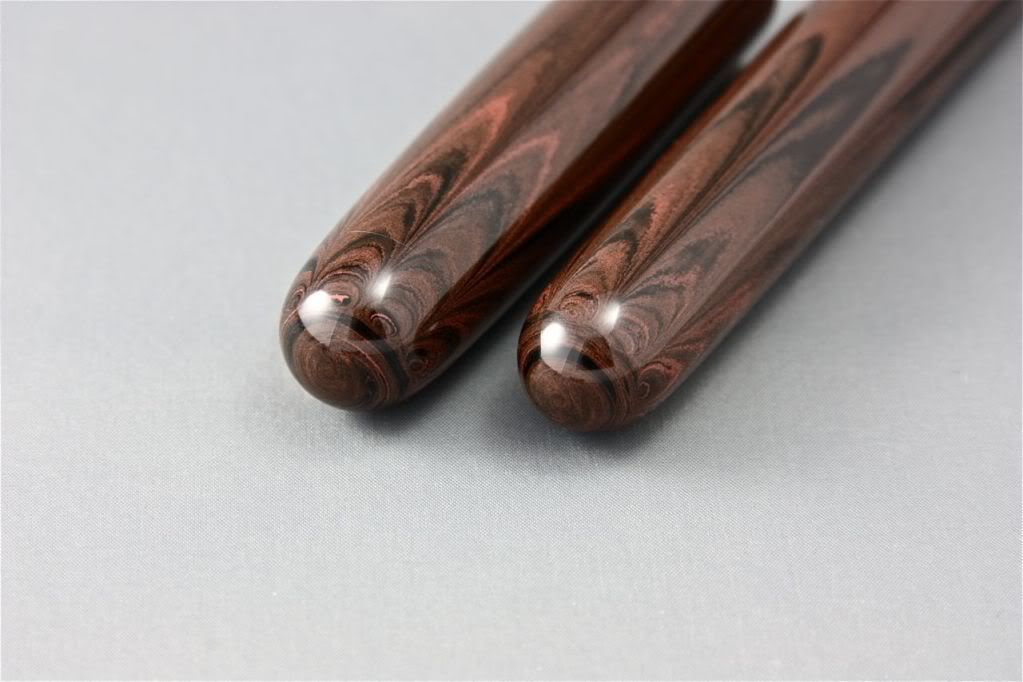
Grain or Pattern Matching from Cap to Finial

Signed-In Members Don't See This Ad

Robert111

Member
Joined
Apr 12, 2011
Messages
1,127
Location
Saratoga Springs, NY 12866
I wonder if anyone has a suggestion for getting the pattern or grain to match when doing the clip joint (cap/finial).

Here's the process I've tried with little success:

1. Start with a round blank for the cap, about 18 mm in diameter, drilled out and threaded for the barrel (body).
2. Part off the top 3/4".
3. Drill both the finial piece and the cap piece with 9mm bit.
4. Thread both with 10 x 1 tap.
5. Make a shallow recess for the clip ring in the cap piece.
6. From another piece of material (black ebonite), I make a tenon 1/2" long and .8mm in diameter and thread with 10 x 1 die.
7. Cut slot in one end of threaded tenon for a screwdriver.
8. Assemble finial to cap using tenon and with a screwdriver, TRY to adjust the finial so that it mates to the cap grain or pattern.


I fiddle with adjusting the finial and eventually I can get the grain just right so that I can proceed to turn the assembly to shape and finish. Then I have to disassemble, fit the clip, and try to reassemble the finial, clip, and cap and get the grain to align again. Drives me NUTS!!!!!
 
Signed-In Members Don't See This Ad
Personally I don't bother b/c I don't think it's important.
What I usually do is to flip the grain/pattern. If the swirl on the cap goes up, the finial swirl goes down, or whatever.

My first thought when reading the title to this thread, is to make an insert for the finial and thread that.
You'd have the cap piece, part off or cut off the end that will become the finial, and drill it out and glue in a plastic or whatever for insert. When cured thread it. Then you'll have a pretty close fit for grain. Or make the insert, get it ready to glue in, and glue finial to insert after insert is threaded into the cap top so you know where it will line up. Adjust a little to take into account the travel of the finial when it's torqued down.
Or put in the threaded insert, put the finial in place until grain lines up, then put a mark on the finial and the insert so you can glue them together apart from the cap.
I hope that makes sense.
 
I've done similar to yourself Robert. If it is swirls etc I won't try, but will use the clip ring to separate the cap and finial. If it's stripy or long grain then I have done what you have done up to point six, but I have glued the tenon into the finial so that when tight it is about a quarter turn short of lining up. After turning to size I check alignment and using my skew as a scraper take a tiny bit off the cap end until it lines up....it's surprising how little needs to be removed. I then sand and finish letting the sanding even the join by using a piece of wood under the arbranet. Hope that's clearer than mud! Most times I don't make a separate tenon if the material will allow it.
Incidentally, in point 6 I think you meant 9.8MM.
Cheers
John
 
This is easier than you think. Here is how i grain match an entire pen. Before i start a pen, i put a black sharpie mark down the entire length of the rod before i cut it into pieces. I start with the front section. Cut the tenon polish and thread. Turn around and drill and tap for the feed. Now on to the barrel. If i am grain matching, i make my tenon just a bit longer then usual, polish and thread. Now screw in the front section, you should be able to see the sharpie marks and where they should line up. Unscrew the front section and part off a tiny bit off the barrel threads. Screw the section back in and see where your marks line up. Do this until the marks are perfect. Now on the the cap and finial. I do the finial first. Cut the tenon, polish and thread. Remove and do the cap. Drill and tap for the barrel threads. Now screw the barrel in and see where your sharpie marks line up. Unscrew the barrel and part of a tiny bit of he cap threads. Try the barrel again and do this until they line up. Now remove and turn around and do the finial end. Drill, tap and screw the finial in. Look at the sharpie marks, remove and part off a tiny bit of the cap finial threads. Try the finial again, and repeat until perfect. :)
 
Robert, I would say DON'T thread the cap AND finial, but just the cap. Then, only thread half of your black ebonite tenon and epoxy that end into the finial (after you have threaded it into the cap and line it up)...
 
Here is a technique I have done in the past. Turn down the blanks to round.

2. Use a thin kerf pull saw in a small miter box to cut off the top of the blank.

Because you are going to use the clip, I turn off the finial top from the original kit pen to act as a base for the finial. I don't thread the parts. I CA glue the inside metal piece to the finial, then put CA glue on the inside of the tube and press in the clip and cap. Leave it set in the clamp for a few minutes (or longer)
 
D'oh. I promised to add my 2 cents to this, and totally forgot. Well, better late than never, I suppose.

Here's a pic of my 'grain matched final':

IMG_6824.jpg


IMG_6825.jpg


The reader's Digest version of what follows is that I simply use another material to make a threaded tenon on my finial.

Here's how I do this, starting with the cap and finial as one piece. I will be using a 5/16 x 24 thread for my finial, so feel free to adjust these instructions to whatever thread you use:

- make a cut at the finial to cap joint. Be sure to allow enough 'waste' on the end of the finial that it can be turned separately and threaded etc...see below...
- fix the finial into the collet, freshly cut face out, and trim it flat, carefully so you don't lose a lot of material (e.g. a mm or so).
- Drill a shallow hole (maybe 5mm or so deep) into the freshly trimmed face of the finial. Diameter not crucial. I use maybe 1/4" or maybe 5/16". (sorry for the mixed units. I'm Canadian :roll eyes:)
- next, mount up in the chuck a piece of any other stuff - acrylic, ebonite, whatever. Or matching material if you want to get really detailed.
- Turn a tenon about 3/4" long, and 5/16" OD. Detail the end 5mm of that tenon to fit into the hole you drilled in the finial. Must fit near perfect to sit straight.
- CA glue the tenon into the finial hole, and when cured, cut off the waste, leaving the tenon itself mounted in the finial.
- Mount the finial into the chuck, and thread the tenon.

- Now, onto the rest of the cap. I'll be brief here as this is not really the focus of this post.
- Drill the freshly cut face of the cap (that matches the finial) with a 1/4" drill bit, and most of the way, or all the way through the cap.
- Thread this with the 5/16 x 24 tap.
- cut a ring shaped depression around the hole to fit the clip ring.
- Turn the cap around in the chuck, drill out the other end to whatever ID you use for caps (I most often use a 29/64"). Be sure to figure out how deep you need it to accommodate the nib and front section.
- Match the grain by trimming just a tiny bit off the cap section at a time until the grain matches when you screw it tight. I'd advise going just a hair short of this, as it might not be as tight by the time you finish turning it.

- On to turning the whole cap.
- screw the finial onto the cap, and mount the whole thing onto a jam chuck mounted in the collet. The other end can be live centred.
- Turn to close to size and shape, leaving a bit of waste on the finial end.
- Next up, use a small file to cut a channel in the clip ring channel to accommodate the clip arm.
-reseat the finial into the cap, and finish turning the cap until final shape achieved. cut off the waste segment on the final, and finish the cap, sand, polish etc.
- unscrew the finial, add the clip, and put the finial back on.

- If all goes well, you now have a grain-matched finial on the cap.
- if it didn't go well, you now have another 'practice pen' for your collection :mad: And we all have a few of those...

I hope this is of some help.

Cheers,

Ken
 
Dr. G, Beautiful pen... but...
I looked up jam chuck and still don't understand.
:)

Sorry, you are quite right about it being hard to follow without pics.

A jam chuck is a pretty common woodturning technique in which you shape a piece of wood to hold the item which you are turning, by friction. Quite literally, you 'jam' the item into or onto the pice of wood which is being held in the headstock.

In this case, picture a 3/4" dowel held by my 3/4" collet chuck. The dowel is turned to an OD that matches the ID of the cap you are turning. If you have turned the dowel carefully, with a slight ramp in OD near the edge of the cap, it should sit nice and tight on the jam chuck, allowing you to turn your cap. Of course, the more aggressive the turning, the more likelihood of cap slippage on the jam chuck, and the more flex on the jam chuck, leading to chattering or even catching. So, when turning to shape, ensure there is support from the tailstock (eg in the form of live centre snugged up to the waste end of the finial).

Hope that helps.

If I get a chance/some free time, I will try to add pics :rolleyes:

Ken
 
OK, here's the question.... If you can still see the mismatch at all then why bother to begin with?

For those who think this is desirable, I applaud your attempt to hide the grain between pen joints, and while some have come pretty close, I have yet to see a pen posted on this forum where the joint wasn't visible at all with pens having a grain or some sort of a a pattern.

The way I see it, having a "slight" mismatch is just something for a customer to see and think.... you ALMOST did a good job and they might see the mismatch as a flaw!

Imagine missing a sale because the customer saw your extra time and effort as a flaw! :eek:

Here is one George....:biggrin:

http://www.penturners.org/forum/f13/red-stripe-89081/

Great Job Justin! Hope you don't mind! :biggrin:

The way I see it is if you can get it close, it shows proficiency. I can't say nothing will ever be perfect because Justin proved that wrong. :biggrin: But you can at least get as close as possible given that some amount of material will be removed and you can't always recover from that..... Just my thoughts......

Thanks!
 
OK, here's the question.... If you can still see the mismatch at all then why bother to begin with?

For those who think this is desirable, I applaud your attempt to hide the grain between pen joints, and while some have come pretty close, I have yet to see a pen posted on this forum where the joint wasn't visible at all with pens having a grain or some sort of a a pattern.

The way I see it, having a "slight" mismatch is just something for a customer to see and think.... you ALMOST did a good job and they might see the mismatch as a flaw!

Imagine missing a sale because the customer saw your extra time and effort as a flaw! :eek:

Well George, why ask, since you ask this same question in every single thread that someone asks about this? But here is the answer. Because not everyone likes just plain old colors with sparkles in it, like all of your pens. Some people, everyone of my customers, dont like plain old colors, with plain old black ends and sections that look every bit like the pen the guy before him bought other than a different front section shape or whether it has bands or not. And to them, it doesnt have to be perfect, like you think it should be or not even do it. They like every bit of the pen to be the same material and for it to be grain matched as much as possible, even if its a little off. The way i see it, having pens all look the same and no different than the one before, Is just something for the customer to think, you can only make pens with these colors and they all will look the same as the one before.

Imagine missing a sale because the customer saw your lack of extra time to line something up that only takes a few minutes or only using plain colors as a lack of your skill or a flaw!

And just as a side note. I dont think anyone is trying to hide the JOINT, they are just trying to line up the grain so it looks matched. Im not trying to hide any joints, if there visible i dont care, and neither do my customers. Im just trying to line up the grain pattern.

EDIT: Please dont get into an argument, as you make great pens and i know that you have the skill to do this, you just wish not to, so no need for any eye poking. :) Just let people who want to do this do it, and you can do your thing.

OK, here's the question.... If you can still see the mismatch at all then why bother to begin with?

For those who think this is desirable, I applaud your attempt to hide the grain between pen joints, and while some have come pretty close, I have yet to see a pen posted on this forum where the joint wasn't visible at all with pens having a grain or some sort of a a pattern.

The way I see it, having a "slight" mismatch is just something for a customer to see and think.... you ALMOST did a good job and they might see the mismatch as a flaw!

Imagine missing a sale because the customer saw your extra time and effort as a flaw! :eek:

Here is one George....:biggrin:

http://www.penturners.org/forum/f13/red-stripe-89081/

Great Job Justin! Hope you don't mind! :biggrin:

The way I see it is if you can get it close, it shows proficiency. I can't say nothing will ever be perfect because Justin proved that wrong. :biggrin: But you can at least get as close as possible given that some amount of material will be removed and you can't always recover from that..... Just my thoughts......

Thanks!

Thanks Fred! Dont mind at all!

And just to add, It can be perfectly done, grain matched, not joint hiding, you just have to have the will to take a few extra minutes to line them up. Im in no hurry, so i have a few extra minutes.
 
Last edited:
I guess there are two different thoughts a customer could have about this that could cause him not to buy...

"He didn't get it right, must not be very good."

"He didn't even try, must not be very good"

Both are plausible. Having seen some very good matching done by several here, I find it worth the extra effort. I agree that it's not about joint hiding, but about making a clean joint that looks like the person who did it did his best.

Dan
 
Well George, why ask, since you ask this same question in every single thread that someone asks about this? But here is the answer. Because not everyone likes just plain old colors with sparkles in it, like all of your pens. Some people, everyone of my customers, dont like plain old colors, with plain old black ends and sections that look every bit like the pen the guy before him bought other than a different front section shape or whether it has bands or not. And to them, it doesnt have to be perfect, like you think it should be or not even do it. They like every bit of the pen to be the same material and for it to be grain matched as much as possible, even if its a little off. The way i see it, having pens all look the same and no different than the one before, Is just something for the customer to think, you can only make pens with these colors and they all will look the same as the one before.

Imagine missing a sale because the customer saw your lack of extra time to line something up that only takes a few minutes or only using plain colors as a lack of your skill or a flaw!

And just as a side note. I dont think anyone is trying to hide the JOINT, they are just trying to line up the grain so it looks matched. Im not trying to hide any joints, if there visible i dont care, and neither do my customers. Im just trying to line up the grain pattern.

EDIT: Please dont get into an argument, as you make great pens and i know that you have the skill to do this
, you just wish not to, so no need for any eye poking. :) Just let people who want to do this do it, and you can do your thing.

Geeze Justin......... I ask a simple question and you get all riled up and spend over half your post bashing the pens I make. Can't a discussion about matching up grain between pen parts be held without bashing another pen makers work!

While I don't recall asking this same question in every single thread about this subject, I am curious why some spend the extra time so I DO ASK. Different people participate in different threads and I like to see what others think, who knows, perhaps someone can give a new perspective.

I really don't understand why you felt the need to single my work out and bash the pens I make just because I asked about aligning grain patterns! Did I say anything about your pens?

As far as your edited comment.... a little too late for your disingenuous remark, I think you did a pretty good job of bashing my work in the paragraph above it!

Im sorry you feel i singled you out, but i was replying to you. Why would i mention Kens, Chucks, Roberts, or any one elses pens? I mentioned you because you dont grain match and the others do. Im also sorry that you feel the words plain and look the same as the next are bashing you. Many old vintage pens are plain and all look the same and they are beautiful, just like your pens. But they are just that, plain(Not your castings, they are beautiful) but plain in that they are all the same in color, between color of course(because you are so consistent with your casting), they all use the same black top and section, and 5 pens made the same sitting side by side would look identical. Ugly no, Beautiful. And not bashing. I love your pens George, but to me they are plain. Again im sorry if you take this word as bashing. I make some plain pens to, so there, take that as a bash to myself.

As for your first post in this thread. I think you were quite rude telling everyone "Why Bother" if they cant get it perfect, which they cant, no one can and we all no why. But you procceded to tell them, and me "Why bother". Then you tell us the way you see it, having a "slight" mismatch is just something for a customer to see and think.... you ALMOST did a good job. Well i think i did a Great job, thanks for the pep talk though. Then you tell us to imagine missing a sale because of our time and effort. I take that as "Why Bother" again and that i should just do it your way with solid colors and contrasting end caps. You told us long ago how you have tried this and since you could never get it perfect( as we never will either) that you decided to just do solid colors and contrasting end caps(does this sound familiar????) it does to me, so we have all heard why you dont do it, but you do make these same comments in multiple threads saying basically the same thing. So to me, you werent looking for a new perspective, you were just looking to put in your "Bash" the way i see it against people who take the time and effort to line up the pattern. Me being one of them. So thats why i bother to do it.
 
Last edited:
Now back on topic. If you are wanting to get as close as possible, then Kens way would be the best, as you are only losing the width of the blade you use to cut it. If you use a very fine saw blade you will loose a minimal amount and the pattern will be as close as humanly possible. The way i do it i loose more of the pattern, but if i do it right, i can do it with a minimal amount and keep it as close as possible, but not as close as Ken. That is really good!!
 
Dr. G, Beautiful pen... but...
I looked up jam chuck and still don't understand.
:)


And a pic of some lovely Waterman's. My own inspiration for how to treat the grain or pattern on pens.

http://www.gopens.com/images/Catalog52/wc52x.jpg

You can see they don't really try to make the grain line up. They flip it. I think it looks wicked sweet.

This is what i do with certain materials. I flip it, but not between the final and cap, but between the cap and barrel. Everything else, blind cap, section, finial are all grain matched along with this flip.

http://www.penturners.org/forum/f13/brown-ripple-88483/
 
Back
Top Bottom