Fountain pen parts, getting started

Signed-In Members Don't See This Ad

mredburn

IAP Activities Manager
Staff member
Joined
Jul 5, 2009
Messages
8,754
Location
Fort Myers FL
I have been meaning to start making fountain pen parts and I kept putting it off. There was always something else going on or had to be done. Recently I was given enough motivation to get started on them. I have posted earlier about the first part, the nib holder its self but thought I would throw this out there for your consideration or amusement.
completedparts1.jpg


In the first picture there is the feed and the three parts that fit together.
right behind the feed is the feed and nib holder. it is contoured on the inside and tapped to match the feed. The internal threads are tapped 7.4x.05mm the outside threads are 10x.05mm I cut the diameter down to about 9.8mm to allow a little play in the threads as they fit together.
completed%20parts2.jpg

Next the piece that is epoxied into the tube, IT is threaded inside for the nib holder and on the outside for the cap lower piece.
there is very little room for error on this piece. I tapped the inner threads first and then the outer threads. Then I had to re thread the inner threads because threading on the outside pushed the inside diameter slightly smaller. Next time I will thread the outside first.
completed%20parts4.jpg

You can see the threads on the inside of the piece for the upper cap.
completed%20parts5.jpg

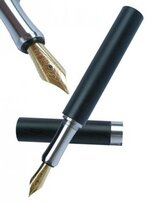
Here it is assembled.

I made up two sets and it took a couple of tries to get it right. I sometimes have to stop and build a tool/fixture to hold the piece in order for me to be able to work on that piece.

Edited in. THis feed is from Meisternib.com I picked up a few pieces from Lou and will be using them on the next ones.

Mike
 
Last edited:
Signed-In Members Don't See This Ad

BRobbins629

Passed Away Dec 28, 2021
In Memoriam
Joined
Mar 8, 2006
Messages
4,037
Location
Richmond, VA, USA.
I tapped the inner threads first and then the outer threads. Then I had to re thread the inner threads because threading on the outside pushed the inside diameter slightly smaller. Next time I will thread the outside first.

Very nice stuff. I like the design. If you made an hard insert to screw into the inner threads while you tap the outside, it may hold them in place.
 

mredburn

IAP Activities Manager
Staff member
Joined
Jul 5, 2009
Messages
8,754
Location
Fort Myers FL
I will make one for the next go round. I had to make a brass threaded insert for the cap piece,I also cut it so that it would work to chase the threads. That was the only way that I could hold the cap and turn the innner and outer dimensions. The upper part that epoxies into the tube is only .020th thick. I caught the first one I make on my cutter and yanked it out of the chuck and through it across the room.
 

DCBluesman

Passed Away Mar 3, 2016
In Memoriam
Joined
Aug 22, 2004
Messages
7,679
Location
WOODBRIDGE, VIRGINIA
The work is beautiful and technically excellent, but I will warn you about fountain pen geeks. They tend to hate metal sections. Read over on the Fountain Pen Network forum or on Richard Binder's site for lots of discussion on this.
 

mredburn

IAP Activities Manager
Staff member
Joined
Jul 5, 2009
Messages
8,754
Location
Fort Myers FL
The work is beautiful and technically excellent, but I will warn you about fountain pen geeks. They tend to hate metal sections. Read over on the Fountain Pen Network forum or on Richard Binder's site for lots of discussion on this.


Thank you I will look into it.
 

workinforwood

Member
Joined
Mar 1, 2007
Messages
8,173
Location
Eaton Rapids, Michigan, USA.
First off Mike...I totally get where you are coming from. I have learned to thread the outside first before I even do any drilling. Nice to hear I'm not the only one.

Then..yea, I saw you making one of these. I was over at your site just a week ago looking to see if you were selling any of them and you were not. I would have bought a couple right then, so I could just tap my pen and go. I prefer the .75 threads on the section. No need for a coupler. Yea..I can a do make all the parts myself..but if the price was decent, I'd pay to save the work time. If you haven't made this before..it looks simple, but give it a go and there's nothing simple about it.

Far as the fountain pen snobs go...yea, sure Lou is right..a good portion of them don't care for metal sections. I give them metal sections anyhow. I tell them what I think about their plastic sections, and I walk over to the next guys table and start pulling out pens from the parts bins with broken plastic sections and say look...this is where your pen will be some day..but not mine! If you don't like it...you don't buy my pens..see if I care...I'll see your junker in the parts bin next year, that's how I roll! :biggrin:
 

mredburn

IAP Activities Manager
Staff member
Joined
Jul 5, 2009
Messages
8,754
Location
Fort Myers FL
I am currently working on Gentleman/Statesman size parts. as well as the Jr series and the Baron sizes. Im working on designing them around the K&S engineering Tube that are readily available. I will supply bushings to be able to use them as well as making the parts that will replace the ones n the kits we use now. I not only have to design the parts but build the tools to hold them and figure out the steps to get them from cast to finsih. Lots of fun I love the challenge.

Mike
 

skiprat

Passed Away Mar 22, 2022
In Memoriam
Joined
Oct 19, 2006
Messages
7,812
Location
In a Skip in Wales
I am currently working on Gentleman/Statesman size parts. as well as the Jr series and the Baron sizes. Im working on designing them around the K&S engineering Tube that are readily available. I will supply bushings to be able to use them as well as making the parts that will replace the ones n the kits we use now. I not only have to design the parts but build the tools to hold them and figure out the steps to get them from cast to finsih. Lots of fun I love the challenge.

Mike

Mike, when you say that you will make the silver parts to replace those in kits,does this mean that we'll be able to use your silver cap coupler ( for example) with the existing plastic cap inserts? That will be cool!!!
I'm also glad you are basing them around the K&S tubes as they are readily available everywhere.

Are you casting the parts individually or into blanks (ingots) and then machining parts from the blanks?

I wish you the very best of luck with your venture and if you ever have a mailing list,then please put me on it.:biggrin:
 

mredburn

IAP Activities Manager
Staff member
Joined
Jul 5, 2009
Messages
8,754
Location
Fort Myers FL
I can make them postable the current ones im devoloping are not but that is a minor detail I just need to add 5mm length to the lower cap and thread it to match the cap.

Skip, I have to devolope a master that is oversized by a WAG. Not only do I have to accomadate shrinkage in the mold but guess at the total out of round it will be by the time it comes out of the casting. SO the answer is I cast them oversize ant then machine them to final size. Then you have to takein to consideration the physical properties of the silver for holding threads and wall thickness.
 

Dan_F

Member
Joined
Nov 8, 2007
Messages
959
Location
Spokane, WA, USA.
Lou has a good point. There are two reasons to avoid metal sections in FP's, one is the "feel", which I agree is uncomfortable, but the main one is weight. I used to like a heavy pen, but now appreciate large but lightweight pens. I can't use anything like a full sized Gentleman, simply because it is so heavy that it's painful to use for any length of time. Your competition from the big manufacturers are pretty much all going to be lightweight, which is what the vast majority of users want. I say that based on personal experience as well as spending a lot of time on The Fountain Pen Network.

By all means, keep making your own parts, but I would at least have a plastic or ebonite option. Most of the high priced FP buyers will not like metal. I have never had a plastic section break, and have plenty of pens over fifty years old. You can make something that is indestructible, but if it isn't comfortable as well, people won't use it.

Dan
 
Last edited:

mredburn

IAP Activities Manager
Staff member
Joined
Jul 5, 2009
Messages
8,754
Location
Fort Myers FL
The difference between the front section I made for a gentlemans pen and the original is .5g, 13.8grams for the original and 14.3 for the silver replacement. Thats the nib holder, nib connecter, and spacer ring that the pen body matches to. I could shave that if I needed to. I wont discount making a non silver nib holder but the client whos building the pen could just as easily order the parts in silver he wants and then make the rest out of the material of their choice. there is a little bit of weight difference over the entire pen kits. Mostly the clip is heavier by design and the custom center band is longer. By making the nib holder 16mm instead of 20mm long I can reduce the front weight to less than the original parts.

Mike
 
Top Bottom