First try at table saw chevrons.

Signed-In Members Don't See This Ad
See more from KenB259

KenB259

Member
Joined
Dec 24, 2017
Messages
4,222
Location
Michigan
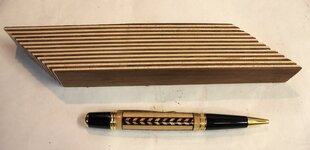
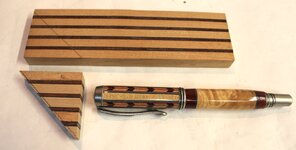
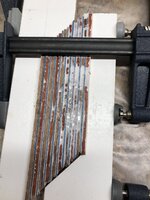
Sierra super button click. Woods are maple, bloodwood, osage orange, santos rosewood and olive green vaneer. Chevrons have been a little elusive to me, finally came up with a method that works for me.
IMG_1730.JPG


Sent from my iPhone using Penturners.org mobile app
 
Signed-In Members Don't See This Ad
Whatever techniques you tweaked, the results are great. Very nice. While there were many incremental issues to overcome, the most difficult for me was to get thiner slices.

Well done 👏 . Stay safe 😷
 
Whatever techniques you tweaked, the results are great. Very nice. While there were many incremental issues to overcome, the most difficult for me was to get thiner slices.

Well done [emoji122] . Stay safe [emoji40]

My method is just cutting infill, instead of gluing a lot of little strips together. I tried it before by gluing thin strips together and then cutting them again into strips at an angle. I was wasting a lot of material. I realized, while typing this, if I glued those thin strips offset a little every time, I would have very little waste.


Sent from my iPhone using Penturners.org mobile app
 
Reply to post #6 above.

YES! SteveJ visited me a few years ago and gave me that suggestion. If I make a 1" (H) x 2" (W) x 6" (L) on the angle, I get 2-3 more pen materials (4 sided). It was a great suggestion (thanks, Steve).

Not to hijack your thread, but I'll attach pictures for those that are unsure of what we are chatting about.

(Gluing up the rectangular blocks leave the corner as waste (Pic 1 & 3). Gluing up blocks on an angle greatly reduces the waste... 2-3 more pens for each block).
 

Attachments

  • IMG_3518.JPG
    IMG_3518.JPG
    266.5 KB · Views: 217
  • IMG_1031.jpg
    IMG_1031.jpg
    151.7 KB · Views: 241
  • IMG_1033.jpg
    IMG_1033.jpg
    137.6 KB · Views: 196
  • IMG_0250.JPG
    IMG_0250.JPG
    325.8 KB · Views: 234
Reply to post #6 above.

YES! SteveJ visited me a few years ago and gave me that suggestion. If I make a 1" (H) x 2" (W) x 6" (L) on the angle, I get 2-3 more pen materials (4 sided). It was a great suggestion (thanks, Steve).

Not to hijack your thread, but I'll attach pictures for those that are unsure of what we are chatting about.

(Gluing up the rectangular blocks leave the corner as waste (Pic 1 & 3). Gluing up blocks on an angle greatly reduces the waste... 2-3 more pens for each block).

Yes that's exactly what I was thinking. Now my method only uses one pen blank and whatever I'm using as infill. Your method allows for more elaborate chevrons. Looks to me like there is a place for both methods.


Sent from my iPhone using Penturners.org mobile app
 
Yes that's exactly what I was thinking. Now my method only uses one pen blank and whatever I'm using as infill. Your method allows for more elaborate chevrons. Looks to me like there is a place for both methods.


Sent from my iPhone using Penturners.org mobile app

The more the merrier. Designs propagate more designs. Your recent jigs/blanks have me wishing to get back home to hide in the basement and play... ;)
 
Ken, It may be obvious to chevron makers but since I haven't started yet, . . . do you size your strips with a thickness planer? I can't see how it can be done without a thickness planer. Just curious.
 
I just use my thin rip jig. Once I get it dialed in, usually only takes 2 or 3 adjustments, I'm good to go. On the pen I showed here, the maple was one pen blank, the blood wood was put in as infill, exactly as you would with a Celtic not. The blood wood is exactly, or actually slightly under my blade kerf, which is .102, the infill is .100 thick. Adding a bearing to my thin rip jig, suggested by John, increased the accuracy to a degree I wouldn't have believed possible.


Sent from my iPad using Penturners.org mobile app
 
Last edited:
Back
Top Bottom