First Pen

Signed-In Members Don't See This Ad
See more from PBorowick

PBorowick

Member
Joined
Sep 23, 2019
Messages
264
Location
Portland, Oregon
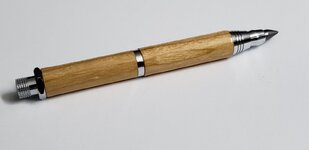
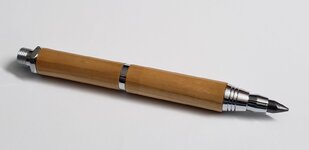
OK, so it's not a pen, it's a shop pencil.... But it's still my first. The lower barrel is a bit to big and doesn't come down flush at the transitions but I'm pretty happy with it despite that.
I turned this between centers and found it to be a pretty easy process.
Finish is 3 coats thin and 5 coats of medium stick fast. I followed JT's method.
Please let me know what your thoughts are. I don't mind criticism at all. Need to improve and that's the best way to get there in my book.
 

Attachments

  • 20191121_194005.jpg
    20191121_194005.jpg
    74.3 KB · Views: 211
  • 20191121_193933.jpg
    20191121_193933.jpg
    61.7 KB · Views: 223
Signed-In Members Don't See This Ad

Sly Dog

Member
Joined
Nov 16, 2018
Messages
417
Location
Boise, Idaho
Frankly, apart from the "proud" lower barrel you mentioned, it's a terrific job. The finish looks nice and you matched the grain of the upper and lower barrel - very nice!!
 

magpens

Member
Joined
Feb 2, 2011
Messages
15,911
Location
Canada
Nice going !! . That's an enviable first !!!

It is particularly noteworthy in that you jumped right in to turning between centers from the get-go !!!

With the money you will incrementally save from not buying bushings (and mandrel) you can acquire more useful stuff and additional pen kits !!!
 

1shootist

Member
Joined
Dec 2, 2018
Messages
818
Location
Frisco,Tx
Very good job !
Made even moreso having been TBC for your very first one.
Now you need (if you dont already have) calipers...so on the next one you can get a perfect fit.
 

FGarbrecht

Member
Joined
Aug 22, 2019
Messages
618
Location
NY
Very nice first pen(cil)! As has been said, get and use some calipers, especially if you are turning between centers. Measure the endpiece and center band diameters and turn down to those measurements or slightly below if you are going to apply a 'thick' finish like CA. Multiple coats of CA have definite thickness, and you can tune your sanding/polishing of the finish coats of CA to bring the piece exactly down to the proper diameter for a perfect fit with the hardware. This looks like a fairly open pore wood, and I would have put on a layer of Mylands cellulose sealer after initial wood sanding to help seal up the pores and give the wood a nice soft patina. From there you can finish sand and apply CA or some other finish. I like the look / feel of the wood without a glossy finish, so for my personal stuff I just put on an application of microcrystalline wax.
 

PBorowick

Member
Joined
Sep 23, 2019
Messages
264
Location
Portland, Oregon
I do have digital calipers that I used....I thought I would take more wood off with sanding but that didn't happen. Ah well, live and learn....
The wood is cherry that I have had laying around the shop for many years.
@FGarbrecht I am going to turn another one tonight and will try the sanding sealer.

Thank you all for the great feedback and information. I greatly appreciate it and I will master the skew!! I currently have a love/hate relationship with that tool but we are getting to be better friends as we go.
 

howsitwork

Member
Joined
Jul 9, 2016
Messages
2,323
Location
Thirsk
Good job and YOU enjoyed it , that's what it's all about. I still have some of the first bowls I ever made, or doorstops as they should be known.

You take off less than you think when sanding! I find vernier calipers one of the most useful tools for checking at speed as you can directly compare the fittings with the balance diameter on the lathe. It pays to just round over the external jaw tips with a diamond stone so they won't mark the work if you're heavy handed ( practical experience taught me that one ).

The reverse jaws are great for checking internal tube diameters too.

Keep up the enthusiasm
 
Top Bottom