Filming Video Techniques and Equipment?

Signed-In Members Don't See This Ad

SmokeGSU

Member
Joined
Apr 18, 2019
Messages
25
Location
Georgia
Let me preface this by saying that I do some videography for work, and I own several nice dslr cameras that I use. I'm not a professional, more of a "prosumer" when it comes to filming. At work, I always shoot from a tripod. This question may be geared more towards those users who have an active Youtube channel or who have done a lot of social media filming... what's your go-to setup for filming in-progress lathe work? This has been my thought process...

Setting up a tripod is going to limit the angles that I can film from. I see a lot of pro or semi-pro guys on Youtube who film shots where they're looking directly down on the top of the lathe and turned piece, or from similarly placed angles where you're viewing really great angles of the literal work in progress where the person's arm or body isn't blocking the shot.

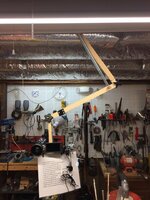
I think that a lot of these guys are using GoPro's for the close-up angles and some type of articulating arm mount to get to angles that a regular tripod couldn't feasibly get to. I don't own any "action cameras", so I'm curious if any of you are using dslr or similar professional camcorders for filming and how you're mounting your equipment to get nice angles. I'm trying to not spend an arm and a leg on new gear if I can help it...
 
Signed-In Members Don't See This Ad

elyk864

Member
Joined
Jun 12, 2017
Messages
354
Location
Phoenix, AZ

ed4copies

Local Chapter Manager
Joined
Mar 25, 2005
Messages
24,523
Location
Racine, WI, USA.
I've spent literally HUNDREDS of pennies for the wood, "L" bracket, etc. Not to mention the signage to remind me to start the
audio (that's new in the last month)!! Hope this gives you some ideas!! IMG_9109.JPGIMG_9110.JPGIMG_9111.JPGIMG_9112.JPGIMG_9113.JPG
 

raar25

Member
Joined
Mar 29, 2011
Messages
770
Location
Glastonbury CT
I like Eds idea, I build an articulating arm that clamps on to the ceiling beams. The problem I had with arms that clamp on to the table is the lathe and table do shake a little during turning and I didn't want shaky video. I will get a picture for you when I get home later, however this will be the subject of one of my next youtube videos which will probably be done in a week or so after my current project.
 

leehljp

Member Liaison
Joined
Feb 6, 2005
Messages
9,314
Location
Tunica, Mississippi,
1. A good set up is necessary, and that is what you are headed with this thread; Thanks for this. I don't see many people focusing on the setup for filming you-tubes.
It could be just me, but there are videos that to me - show that thought was put into simple camera layout and movement to keep the focus on the point of the media presentation. Too many just put the camera where it is the most handy for the moment. AS to Ed's. videos, it appears to me that Ed mounted his camera and then moved the lathe to allow the camera to catch the right video/picture! (That is a meant as a compliment, Ed.) đź‘Ť

2. Good light, getting the light without shadows or hands in the way (causing shadows) helps focus where the point is to be.

This next note should be in the foot notes of this thread, but it ultimately is what determines if I watch or not:
3. Too much talking head intro before the "point, purpose or action" begins, drives some people away. Life is too short to listen to 2 - 4 minutes of redundant explanations on the title every time one opens a you-tube.
 

Dalecamino

Local Chapter Leader
Joined
Jan 2, 2008
Messages
14,568
Location
Indianapolis, In.
I totally agree with Hanks points. Especially #3. I don't make videos, but watch a lot of them. I was amazed at the number of kitless videos on youtube.
Another thing that will drive me away, is the repetitive use of "I", "My" or "Me" Example: I use MY calipers to measure MY tenon. I would rather hear,
YOU can use YOUR calipers to measure YOUR tenon. Sorry, off your topic, but you are making videos for others to watch. It should be about the
viewers, and not just you. JMO
 
Last edited:

ed4copies

Local Chapter Manager
Joined
Mar 25, 2005
Messages
24,523
Location
Racine, WI, USA.
Actually, the L bracket and wood base have been mounted at a couple different spots. When I got the new lathe and it went to Chicago to be used for the MPG, it had to have a stand.
When it got home, I liked the stand, so it was relocated at a 90 degree angle to the original spot on a tool chest. That gives me the tool chest top for working area--I am growing to like that!!
Point is, the angle iron and wood arrangement can be mounted on a wall behind your lathe, you just have to dream up a way (I do not like to add holes to my walls if I can avoid it).

And yes, having the camera on that shelving unit does hold it steady. The stand for the lathe holds IT fairly steady. So, usually the picture is good for YouTube.
 

SmokeGSU

Member
Joined
Apr 18, 2019
Messages
25
Location
Georgia
Thank you all so far for the comments! You guys are awesome! I've been slowly coming to the realization over the past couple of days that I'm likely going to have to build a setup to fit my needs. I haven't really found a camera slider on Amazon or eBay that appears to be giving me my money's worth for my needs. My wife and I are just getting into promoting a facebook page of our work after our last arts and crafts show, and we both realize that some "in progress" videos of wood turnings would be beneficial, just so people can really see what the process involves going from a block of wood to a final product. I think I'm going to build my own articulating arms and hope they don't catastrophically fail and ruin hundreds of dollars worth of equipment.
 

raar25

Member
Joined
Mar 29, 2011
Messages
770
Location
Glastonbury CT
Here are some pictures of my set up. The camera mount turned out to be the simplest part of producing videos. A lot more effort goes into post editing the raw video so the end product accomplishes communicating the message you want to. I have only done about a dozen videos but I am learned the two most critical elements which are very hard to correct in post processing are crisp clear audio and proper lighting/color of the focus and any people in the shot. Turns out correcting skin tone is actually not very easy with the wrong lighting in doors. I agree with your comment you will probably end up making your own camera mounts unless you want to spend big dollars. The clamp I used for the arm is a basic welding clamp which you can buy from amazon for about $19. The rest was hardware and scrap material I had around the house except the screen door springs which cost a couple bucks at home depot. The clamp I used for the arm is a basic welding clamp which you can buy from amazon for about $19. The rest was hardware and scrap material I had around the house except the screen door springs which cost a couple bucks at home depot. There is also a picture of the gray handle I use to reach up to the clamp because my ceilings are too tall to reach. When I do multi camera shots I can usually find an angle to put the second camera on a tripod which give me the shot I want.

Hope this sparks some ideas, good luck.

Ray
 

Attachments

  • IMG_0477.JPG
    IMG_0477.JPG
    301.1 KB · Views: 239
  • IMG_0476.JPG
    IMG_0476.JPG
    146.7 KB · Views: 221
  • IMG_0475.JPG
    IMG_0475.JPG
    164.5 KB · Views: 216
  • IMG_0473.JPG
    IMG_0473.JPG
    194.9 KB · Views: 252

SmokeGSU

Member
Joined
Apr 18, 2019
Messages
25
Location
Georgia
Ray, I really like the wood arms you've fabbed. My worry with using something similar to this has been how much weight the arms can support and still hold the angle. Are you using anything where the knobs are at your connections other than simply a pure friction fit? I'm referring to where one wood arm is actually contacting the next wood arm in line.

I've got an $800 Panasonic Lumix GH4 and a Blackmagic Micro Design Camera that was also about $800. My intention is to use both of those, but again, want to make sure that 1. they're safe in the arms of the... wooden arms.... and 2. that the angle will support the weight and not slip over time.
 

raar25

Member
Joined
Mar 29, 2011
Messages
770
Location
Glastonbury CT
Understood, I would use plywood or metal tubing instead of scrap pine like I did. The springs are adjustable so if the knobs come loose it lifts the camera up a little. This took a little trial and error to get it balanced so the friction is what holds the camera arm from going up. Lastly the "L" brackets allowed me to put some weight on the other side to keep the camera from causing the vertical arm from tipping. So I essentially have 2X the cameras weight on the end of the arm. I just use some washers to keep the knobs tight. The vertical arm hanging on the eye hooks allow me to pivot the camera right and left and the "L" brackets are on one bolt which allows me to point the camera down as well. The one thing I have found I need to keep in mind is to remove the camera before I relocate the bracket because I got lazy once and the whole thing nearly plummeted to the floor as I was undoing the clamp. So if you try something like this, make sure you remove the camera first and don't be like me
:rolleyes:. So good luck and let us know what you end up with.
 

raar25

Member
Joined
Mar 29, 2011
Messages
770
Location
Glastonbury CT
Producing my next video and the sound is driving me nuts. I got my new sony wireless microphone and when I have the lav mic near my mouth I get this loud and harsh low pitch noise like I am blowing on the mic, however the mic is a foot below my mouth. Any every use audacity to remove harsh microphone noise? Also what microphones have people had good luck with. I have definitely realized the solution is getting it correct to start because post processing is never that great or easy.
 
Top Bottom