budnder
Member
My casting contest entry was sort of an homage to the Visconti Divina. In trying to work out how I might do something similar I went down the path below, trying to be smart about some simplifications that would give it a chance to work and not comprise the look too much:

When I first attempted this a couple of years ago, I used alumilite and had some issues with the wire coming loose when I turned it. When I picked this idea back up for this years contest, I decided to try Liquid Diamonds, and I think that worked better. I still had to be super light/careful at the nib end, where the wire gets thin. On a couple of the pens I did, the wire did pop up on that end, but I was able to press/tap it back into place and with a little CA it didn't really affect the appearance.
While you could certainly make these end caps and center rings to hold the wire on the lathe, I 3D printed them, which made it easy to do a bunch of them. I did four of these pens in total, all with different labels.
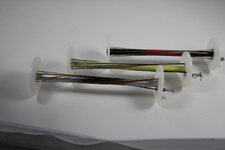
I inserted all four wires parallel with the tube and tightened them with an end bend. Then I twisted the end caps in opposite directions to get the wire to revolve around the tube. This also pulled the end caps into the tube for a better seal I suppose. The wire still had a little wobble in it at this point, but I found this was far less noticeable when it got turned down.
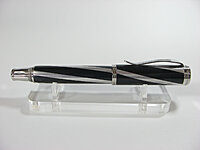
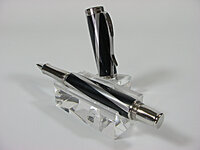
I also have a fondness for the old Shaeffer fountain pen striated material, so for fun, one of the labels I designed was an homage to that. That ended up being the look I liked the best and went with in the contest.
I ended up printing the waterproof labels on a color laser, as I couldn't get the same color intensity with my inkjet (too washed out look). I coated the labels with warm, thin Solarez UV resin to make sure they were sealed from the Liquid Diamonds. They sat in the pressure pot for a day, and then hardened further for a day or two after that.
By the way, I don't know if this is dangerous or not, so attempt at your own risk. That wire is spinning around at a few thou RPM, so if it came completely detached, that might be bad.
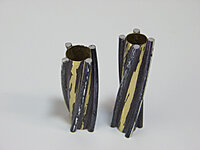
Here's a couple others from the set of these that I did:


- Wrap the tube with a label to allow experimenting with a few different colors and patterns to try and get the look right. Use a vertical pattern with periodic black features to allow the seam to be hidden. Blacken the tube and label edges and experiment to get the size exactly right so the ends meet and don't overlap.
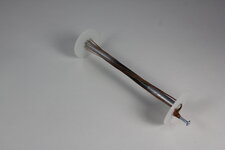
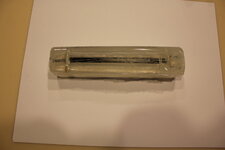
- Create end caps for the tube to hold the wire at the right height, so it would be intersected, but not completely turned away. Insert that assembly into a clear tube and cast vertically. Each end cap has four holes to anchor a 12 gauge aluminum wire.
- Use a cigar kit, which would allow a single 10mm tube to be cast, and then cut in the middle to form upper and lower bodies. Slip a 4 holed sacrificial ring in the middle to hold the wired to be the right position in the center. The heights on the end caps ended up being more or less right up against the tube, but the wire needs to float higher in the middle, at the junction between the upper and lower barrel. By cutting/sanding the middle with some thought, you can match the distance the upper and lower barrel will be when they are finished, so the wire will flow "seamlessly" between the upper and lower barrel. Using an all chrome kit helped merge the look of the wire with the kit hardware.
When I first attempted this a couple of years ago, I used alumilite and had some issues with the wire coming loose when I turned it. When I picked this idea back up for this years contest, I decided to try Liquid Diamonds, and I think that worked better. I still had to be super light/careful at the nib end, where the wire gets thin. On a couple of the pens I did, the wire did pop up on that end, but I was able to press/tap it back into place and with a little CA it didn't really affect the appearance.
While you could certainly make these end caps and center rings to hold the wire on the lathe, I 3D printed them, which made it easy to do a bunch of them. I did four of these pens in total, all with different labels.
I inserted all four wires parallel with the tube and tightened them with an end bend. Then I twisted the end caps in opposite directions to get the wire to revolve around the tube. This also pulled the end caps into the tube for a better seal I suppose. The wire still had a little wobble in it at this point, but I found this was far less noticeable when it got turned down.
I also have a fondness for the old Shaeffer fountain pen striated material, so for fun, one of the labels I designed was an homage to that. That ended up being the look I liked the best and went with in the contest.
I ended up printing the waterproof labels on a color laser, as I couldn't get the same color intensity with my inkjet (too washed out look). I coated the labels with warm, thin Solarez UV resin to make sure they were sealed from the Liquid Diamonds. They sat in the pressure pot for a day, and then hardened further for a day or two after that.
By the way, I don't know if this is dangerous or not, so attempt at your own risk. That wire is spinning around at a few thou RPM, so if it came completely detached, that might be bad.
Here's a couple others from the set of these that I did: