Electropolishing Stainless steel, Aluminium, Titanium, and copper alloys

Signed-In Members Don't See This Ad

BradG

Member
Joined
Jul 10, 2011
Messages
1,733
Location
Blackpool -UK
I know we have a few turners amongst us who turn occasionally in stainless steel, and i thought i would share a process with you.

By electropolishing a piece of stainless, we in effect dissolve the entire surface area of the piece but only by a micron or too so we are not to Jeopardize any of our dimensional tolerances. because of this, all those tony blemishes and faint scratches dissapear giving you a finish with a gleam like its coated in water.

So, how does it work?

attachment.php


Well very much in the same way as anodising. The same equipment and setup is used, with the workpiece being connected to the anode. only this time rather than gowing a microscopic layer of crystals over its surface like aluminium does, its outer layer begins to break down atom by atom literally just skimming a layer off.

you need an anodising tank, and i would recommend any LDPE plastic container. i use one of those household plastic storage containers with the blue clip on lid and its great picked up at my local diy store. keep away from glass fish tanks please.. tanks of acid and glass isnt a good idea. and even if you make a plastic tank, spend $20 on a acid spill kit. i can assure you its one of those things you never realise the importance of until you spill a load of acid everywhere... on my occasion it was a concrete floor luckily not indoors. only took a few secondsfor the concrete to start smoking. Cleaned it well though :redface:

for your cathodes, you can use lead flashing, or just a bar of aluminium 6061T6 alloy or similar which is the industry standard.

your electrolyte is made in a stronger form than what is used in anodising. this is the solution which will conduct electricity and of course aid dissolving the part.

Place the water in the tank first, and then pour the acid's into the tank carefully and slowly one by one.. you dont want this splashing everywhere.

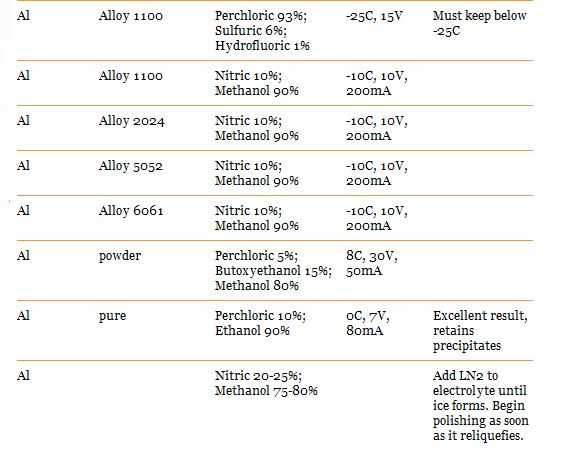
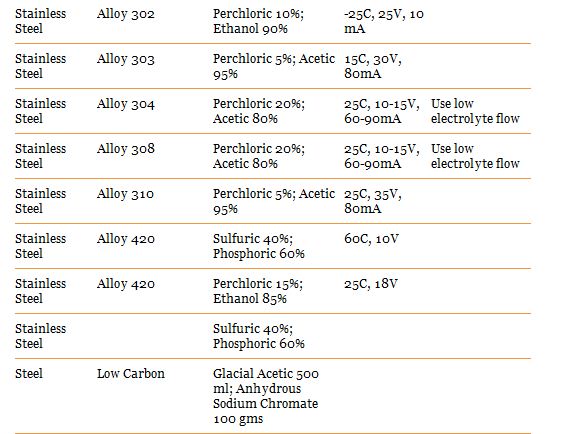
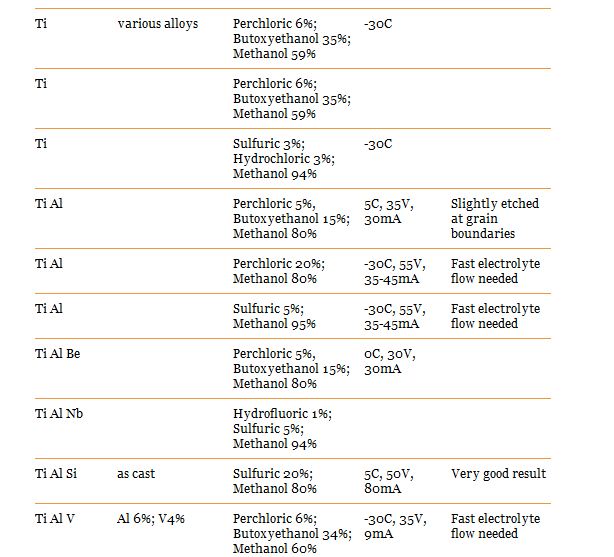
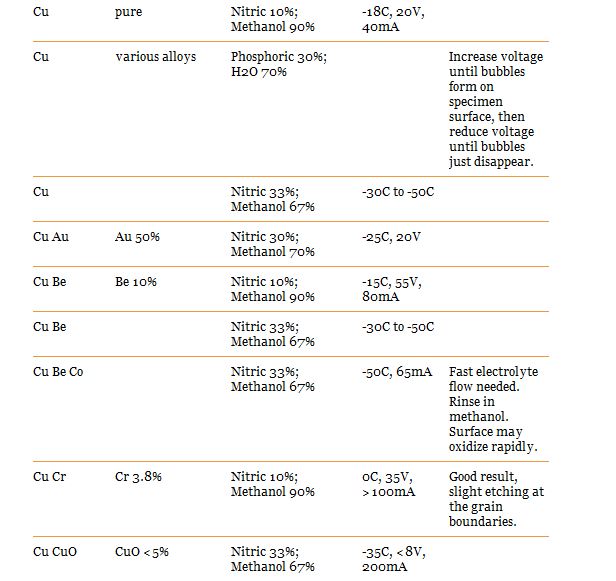
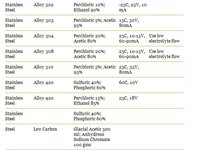
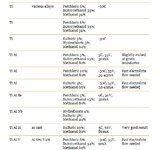
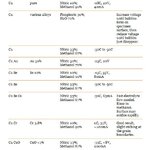
Here are recipes for the type i think we would use:
attachment.php

attachment.php

attachment.php

attachment.php


Wear eye protection and a lab coat while doing this as it makes a mess of clothes

ALWAYS add acid, ... Dont put the acid in first then pour all the water onto it causing it to splash everywhere and flashboil. A violent reaction occurs when it is done in this manner causing the temperature of it to flash up which can make it spit more.


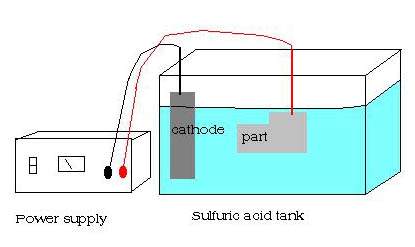
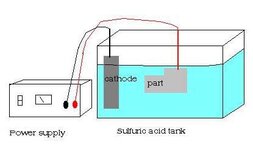
with your Cathodes in and wired together. connect this to the negative of your power supply. your workpiece, becomes the anode by having the postive lead attached to it. lower it and suspend it in the middle of the tank taking care that your part is clear from the sides and wont short out by touching a cathode.

Voltage and mA to set your power supply on can be found above on the charts. You should start seeing a nice difference after 10 minutes, its up to you how long you let it run for. i suggest you do some experimentation with a scrap piece and a caliper.

Lots of gases are produced doing this too albeit most of it hydrogen. setup some good ventilation to get those corrosive fumes out of your shop and lungs.

once you are finished, turn off your power supply and remove your piece wearing your chemical rated gloves and give the part a good rinse down.

Then, admire your shine :cool:

tank-before-after.jpg


after electropolishing, rinse your part in dilute nitric acid which will dissolve the sulfates and other residues left on the surface from the polishing process. if these are left on over time they will crumble to white powder ruining the look of your shine. Dont forgetto wash in water after any process step
 

Attachments

  • tank.jpg
    tank.jpg
    11.9 KB · Views: 13,456
  • a1.JPG
    a1.JPG
    54.3 KB · Views: 6,874
  • a2.JPG
    a2.JPG
    58.5 KB · Views: 7,120
  • a3.JPG
    a3.JPG
    67.3 KB · Views: 7,813
  • a4.JPG
    a4.JPG
    60.5 KB · Views: 7,796
Last edited:
Signed-In Members Don't See This Ad

theidlemind

Member
Joined
Mar 13, 2010
Messages
506
Location
Berea, Kentucky 40403
That tutorial really makes me want to give this a whirl.

I make biodiesel so I'm a little familiar with the chemicals and the safe handling of them.
Thank you very much for sharing this kind of information. :beer:
 
Joined
Aug 5, 2009
Messages
3,227
Location
Millersburg, OR
I like the idea of anodizing and electropolishing, just not sure if I want to keep those kinds of acids in the shop. Is there any other ways to harden aluminum or get stainless to that level of shine? I have a few days off this week and bought some stainless bolts and washers and was going to try a thing or two.
 

skiprat

Passed Away Mar 22, 2022
In Memoriam
Joined
Oct 19, 2006
Messages
7,812
Location
In a Skip in Wales
Dunno about the other softer metals, but I find that wet 'n dry up to 2000 grit combined with some elbow grease works fine for stainless.
But I do have forearms like Popeye!!! :)
Are you talking about the light surface scratches that you always seem to get with polished ally, or deeper scratches?
 

mredburn

IAP Activities Manager
Staff member
Joined
Jul 5, 2009
Messages
8,752
Location
Fort Myers FL
You dont collect the hydrogen gas for other fun things to have show and tell with?
 

BradG

Member
Joined
Jul 10, 2011
Messages
1,733
Location
Blackpool -UK
I like the idea of anodizing and electropolishing, just not sure if I want to keep those kinds of acids in the shop. Is there any other ways to harden aluminum or get stainless to that level of shine? I have a few days off this week and bought some stainless bolts and washers and was going to try a thing or two.

To be honest so long as you have a plastic container with a sealable lid you dont have much to worry about. anodising baths are only dilute to around 15-20% sulphuric which is only half as strong as what is in your car battery.
I agree, the other chems for electropolishing and plating are a little more toxic though.

With regards to hardening, you could look into precipitation or age hardening. Here is an article i have on it. not sure where i picked it up from, but never the less its a good reference about the process.

******************************************************

Precipitation hardening, or age hardening, provides one of the most widely used mechanisms for the strengthening of metal alloys. The fundamental understanding and basis for this technique was established in early work at the U. S. Bureau of Standards on Duralumin.

The importance of theoretical suggestion for the development of new alloys is clear from the historical record. At the end of the 19th century, cast iron was the only important commercial alloy not already known to western technology at the time of the Romans. When age hardening of aluminum was discovered accidentally by Wilm, during the years 1903 -1911, it quickly became an important commercial alloy under the trade name Duralumin.
The strength and hardness of some metal alloys may be enhanced by the formation of extremely small uniformly dispersed second-phase particles within the original phase matrix in a process known as precipitation or age hardening. The precipitate particles act as obstacles to dislocation movement and thereby strengthen the heat-treated alloys. Many aluminum based alloys, copper-tin, certain steels, nickel based super-alloys and titanium alloys can be strengthened by age hardening processes.
In order for an alloy system to be able to be precipitation-strengthened, there must be a terminal solid solution that has a decreasing solid solubility as the temperature decreases. The Al-Cu (Duralumin is an aluminum alloy of 2XXX group) phase diagram shown in Figure 1 shows this type of decrease along the solvus between the α and α+θ regions. Consider a 96wt%Al – 4wt%Cu alloy which is chosen since there is a large degrease in the solid solubility of solid solution α in decreasing the temperature from 550°C to 75°C.
attachment.php

Figure 1: The aluminum rich end of the Al-Cu phase diagram showing the three steps in the age-hardening heat treatment and the microstructures that are produced.

In an attempt to understand the dramatic strengthening of this alloy, Paul D. Merica and his coworkers studied both the effect of various heat treatments on the hardness of the alloy and the influence of chemical composition on the hardness. Among the most significant of their findings was the observation that the solubility of CuAl2 in aluminum increased with increasing temperature.
Although the specific phases responsible for the hardening turned out to be too small to be observed directly, optical examination of the microstructures provided an identification of several of the other phases that were present. The authors proceeded to develop an insightful explanation for the hardening behavior of Duralumin which rapidly became the model on which innumerable modern high-strength alloys have been developed.
They summarized the four principal features of the original Duralumin theory:
  • age-hardening is possible because of the solubility-temperature relation of the hardening constituent in aluminum,
  • the hardening constituent is CuAl2,
  • hardening is caused by precipitation of the constituent in some form other than that of atomic dispersion, and probably in fine molecular, colloidal or crystalline form, and
  • the hardening effect of CuAl2 in aluminum was deemed to be related to its particle size.

The precipitation-hardening process involves three basic steps:
1) Solution Treatment, or Solutionizing, is the first step in the precipitation-hardening process where the alloy is heated above the solvus temperature and soaked there until a homogeneous solid solution (α) is produced. The θ precipitates are dissolved in this step and any segregation present in the original alloy is reduced.
2) Quenching is the second step where the solid α is rapidly cooled forming a supersaturated solid solution of αSS which contains excess copper and is not an equilibrium structure. The atoms do not have time to diffuse to potential nucleation sites and thus θ precipitates do not form.
3) Aging is the third step where the supersaturated α, αSS, is heated below the solvus temperature to produce a finely dispersed precipitate. Atoms diffuse only short distances at this aging temperature. Because the supersaturated α is not stable, the extra copper atoms diffuse to numerous nucleation sites and precipitates grow. The formation of a finely dispersed precipitate in the alloy is the objective of the precipitation-hardening process. The fine precipitates in the alloy impede dislocation movement by forcing the dislocations to either cut through the precipitated particles or go around them. By restricting dislocation movement during deformation, the alloy is strengthened.
Age Hardening – Precipitation. The strongest aluminum alloys (2xxx, 6xxx and 7xxx) are produced by age hardening. A fine dispersion of precipitates can be formed by appropriate heat treatment.
A general model for decomposition is given, followed by details of the precipitation sequences in 4 specific alloy systems: Al-Cu, Al-Cu-Mg, Al-Mg-Si and Al-Zn-Mg. The Al-Cu system is used as the main example of decomposition, i.e.
a0 (SSSS) → GP zones → θ'' → →θ' → θ or, more fully:
a0 (SSSS) → α1 + GP zones → α2 + θ'' → α3 + θ' → α4 + θ
Age Hardening – Strengthening. The 3 main mechanisms are:
  • Coherency strain hardening;
  • Chemical hardening;
  • Dispersion hardening

Coherency strain hardening results from the interaction between dislocations and the strain fields surrounding GP zones and/or coherent precipitates. Chemical hardening results from the increase in applied stress required for a dislocation to cut through a coherent (or semi-coherent) precipitate. This in turn depends on a number of factors, including:
  • the extra interfacial area - and hence energy - between precipitate and matrix;
  • the possible creation of an anti-phase boundary (APB) within an ordered precipitate and
  • the change in separation distance between dissociated dislocations due to different stacking fault energies of matrix and precipitate.

Dispersion hardening occurs in alloys containing incoherent precipitates or particles - i.e. typically those that have been overaged. This hardening results from the increased shear stress required for dislocations to by-pass these obstacles.
As mentioned above, the precipitation reactions in Al-Cu are quite complex. The equilibrium phase CuAl2 is difficult to nucleate so its formation is preceded by a series of metastable precipitates. Guinier and Preston first discovered many of the age hardening phenomena. The first two precipitates to form in the sequence are, therefore, known as GP zones. GP1 consists of 10 nm diameter copper-rich plates on {100}Al planes. These develop into GP2 zones which are also coherent plates 10 nm thick and 150 nm diameter. These lead to maximum hardening. Theta' /θ'/ precipitates then replace the GP zones as semi-coherent particles, a stage known as over-aging because the hardness begins to decrease. The equilibrium phase CuAl2 has a tetragonal crystal structure and contributes little to hardness.
In the field of 6000 series precipitation hardening aluminum alloys, for instance, process models have been able to describe the effect of quench-induced precipitation on structural defects on the hardening potential during isothermal low-temperature aging.
The fracture toughness of 7000 series alloys has been related to some elements of the microstructure resulting from the thermo-mechanical treatment in phenomenological models. The general strategy of process modeling is to use individual equations which have been developed for well defined experiments and try to integrate them in an integrated manner for the more complex practical situations where coupled effects operate.
However, a good description is still lacking when several of these phenomena are simultaneously operative. The understanding of competitive precipitation of several phases (metastable and stable) on several nucleation sites (e.g. homogeneous and on structural defects) is very limited, as well as the understanding of the shearing/by-passing transition leading to the maximum strength for precipitation hardening materials. The strain hardening behavior of materials containing precipitates (and thus necessarily a solid solution) is poorly understood, and predicting the fracture toughness in cases where several fracture modes are simultaneously operating is not possible in the present state of the art.

**************************************

As Skippys quite rightly said, theres always good old fashioned elbow grease and polishing wheels

Dunno about the other softer metals, but I find that wet 'n dry up to 2000 grit combined with some elbow grease works fine for stainless.
But I do have forearms like Popeye!!! :)
Are you talking about the light surface scratches that you always seem to get with polished ally, or deeper scratches?

Steve if you think what you are doing with sand paper, you start with a course grit and work your way up to 1500, 2500 right up to around 12000 if you want to, each time making a finer and finer set of scratches removing the larger ones from before. With electropolishing its dissolving all the scratch marks so you could finish your work off with a 400 grit then electroform and it will look better than it would have been if you sat there and went through all the grits.... as even the finest of scratches the micromesh is leaving, there just isnt any when you electropolish.

Though i would like to put it to the test.. would you be up for polishing a stainless nut, and one unpolished up for my to electropolish? it would be good to see them side by side and see if its really that big of a deal how you do it :wink:

You dont collect the hydrogen gas for other fun things to have show and tell with?

no my wife banned me from most things flammable and explosive some time ago
 

Attachments

  • pic.jpg
    pic.jpg
    79.1 KB · Views: 6,551

walshjp17

Member
Joined
Jul 29, 2012
Messages
3,416
Location
Weddington, NC
For those who may not be squeamish around chemicals that could cause potentially catastrophic consequences (you can put me in the squeamish category) it might be a good idea to take the bulk of this thread and put it into a tutorial format for the library.

Might have to have a new category though -- Making and Finishing Metallic Pens with Caustic Substances :wink::biggrin::wink:
 

D.Oliver

Member
Joined
May 10, 2011
Messages
3,531
Location
Faith SD
I've got to quit reading your post Brad. Everytime I do, I feel like what I do to make a pen is equivilent to a cave man hitting one rock against another!
 

skiprat

Passed Away Mar 22, 2022
In Memoriam
Joined
Oct 19, 2006
Messages
7,812
Location
In a Skip in Wales
Mmmm ok, I'll take up your challenge, but how are we going to decide which is better as we already know that you cheat like your feet stink!!! :)

I think it's time we Brit members had another knees up!!
We've had two great fun all nighters and must be due another one by now!!

A great day would be with you showing your alchemy, me showing how to 'properly' shine a bit of stainless, Mark Ligget doing a CA finish and PhilB (I think) showing how to take a good pic. (Mind you, Mark takes a mean photo too)

You're the loudest Brit on the block, so you can try and set it up!!! :)
 

BradG

Member
Joined
Jul 10, 2011
Messages
1,733
Location
Blackpool -UK
I've got to quit reading your post Brad. Everytime I do, I feel like what I do to make a pen is equivilent to a cave man hitting one rock against another!

Ah but on the other hand ive seen many a piece of wood with no finish applied at all be far more beautiful than a piece of metal, however its finished. Tales an eye to get that right and a skilled hand for a good finish. I was never too successful with CA glue.

I just want to explore other techniques we can use in the pen world in a chance of expanding our horizons as to what we can acheive with some of these methods when they are combined with the talent of turners on this forum. some amazing metal pens have been made.. those talents with different ways of finishing metal other than matte or shine opens so many doors for them to get out their artistic fair :cool:


Mmmm ok, I'll take up your challenge, but how are we going to decide which is better as we already know that you cheat like your feet stink!!! :)

I think it's time we Brit members had another knees up!!
We've had two great fun all nighters and must be due another one by now!!

A great day would be with you showing your alchemy, me showing how to 'properly' shine a bit of stainless, Mark Ligget doing a CA finish and PhilB (I think) showing how to take a good pic. (Mind you, Mark takes a mean photo too)

You're the loudest Brit on the block, so you can try and set it up!!! :)

Every time i work with stainless i burn my fingers :biggrin:. no fun without a coolant system.

and i cheat?? you was borderline a kit pen by using that nut :tongue: B&Q Kit Jr

if you take two identical stainless nuts and post me one, i will electropolish it and post it back and you can decide. How about that :wink:

Yep i think a meet on the calendar would be good! just hope i dont get stopped with a suitcase full of chemicals :rolleyes: Its not wht it looks like officer... yes i know thats cyanide, but you can use it for more than posioning people.
 
Joined
Aug 5, 2009
Messages
3,227
Location
Millersburg, OR
Mmmm ok, I'll take up your challenge, but how are we going to decide which is better as we already know that you cheat like your feet stink!!! :)

I think it's time we Brit members had another knees up!!
We've had two great fun all nighters and must be due another one by now!!

A great day would be with you showing your alchemy, me showing how to 'properly' shine a bit of stainless, Mark Ligget doing a CA finish and PhilB (I think) showing how to take a good pic. (Mind you, Mark takes a mean photo too)

You're the loudest Brit on the block, so you can try and set it up!!! :)

I know that was in english, but I didn't understand a word of it. :biggrin:
 

SteveG

Member
Joined
Dec 21, 2009
Messages
2,985
Location
Eugene, Oregon 97404
You dont collect the hydrogen gas for other fun things to have show and tell with?

no my wife banned me from most things flammable and explosive some time ago

So Brad...what does your wife have against an occasional fire or explosion?:eek: Maybe she never heard of the "Big Bang Theory". Do you feel your creativity is being stifled by all these rules?:cool::eek:
 

BradG

Member
Joined
Jul 10, 2011
Messages
1,733
Location
Blackpool -UK
Similar things are said when I go snowboarding, though she snowboarsa too so the claim goes both ways. That reminds me.... I need to book that hiking holiday where you hike along the ridges of active volcanos
 

BradG

Member
Joined
Jul 10, 2011
Messages
1,733
Location
Blackpool -UK
So Brad...what does your wife have against an occasional fire or explosion?:eek: Maybe she never heard of the "Big Bang Theory". Do you feel your creativity is being stifled by all these rules?:cool::eek:

I think the issue was more the scale of it lol
 

Joe S.

Member
Joined
Jan 11, 2012
Messages
2,000
Location
South Lyon, MI
I just learned about these redox reactions in my chemistry! I was planing on trying some electroplating projects over the summer, this sounds great too! I will definitely be looking into your site later. I get so excited about these things, but then I never have enough time... :frown:
 

BradG

Member
Joined
Jul 10, 2011
Messages
1,733
Location
Blackpool -UK
I just learned about these redox reactions in my chemistry! I was planing on trying some electroplating projects over the summer, this sounds great too! I will definitely be looking into your site later. I get so excited about these things, but then I never have enough time... :frown:
Hi Joe
Think you may be suprised as to how much time you actually need doing these processes. you spend 10 - 15 mins doing some prep work cleaning etc then you put it in a tank for an hour. can get alot done around the home with an hour spare, then take out of tank and rinse. Job done

Give it a go when you can :)
 

Joe S.

Member
Joined
Jan 11, 2012
Messages
2,000
Location
South Lyon, MI
Ok, I went to the hardware store and got a rod of stainless. I have NO idea about different varieties of metals (stainless steal is an alloy of a few metals to prevent it from reacting with water and corroding, right?). Assuming I can get it into a pretty shape (I may wait until I get a pen wizard, and use some carbide burrs) what to I need to do to make it shiny? I know you have that great list, but I need a little help reading it. :biggrin: I would dive right into this, but it IS a tank of acid! :eek:
 

Attachments

  • image-4020475440.jpg
    image-4020475440.jpg
    34.4 KB · Views: 337

BradG

Member
Joined
Jul 10, 2011
Messages
1,733
Location
Blackpool -UK
Hi Joe
Skippy may well be your man for that. certainly when it comes to working with stainless, and as you have nbo idea what type of stainless you have, i would recommend learning how to polish it manually too :wink:

I don't do guesswork with chemistry. and as the concentrations vary with every type of stainless i wouldn't like to say.

Electropolishing produces the most spectacular results on 300 series stainless steels. The resulting finish often appears bright, shiny, and comparable to the mirror finishes of "bright chrome" car parts. On 400 series stainless steels, the cosmetic appearance of the parts is less spectacular, but deburring, cleaning, and passivation are comparable.
 

skiprat

Passed Away Mar 22, 2022
In Memoriam
Joined
Oct 19, 2006
Messages
7,812
Location
In a Skip in Wales
Brad, I think it's only fair if you state what this process can't achieve.
If all scratches and imperfections up to say 600 grit need to be sanded out first, then to be honest, it's not such a big deal to continue to the rest of the way with finer grits.
Please tell us the limitations of the process before people think this is really the Holy Grail to bare metal finishing. :)
 

BradG

Member
Joined
Jul 10, 2011
Messages
1,733
Location
Blackpool -UK
well, none at all is required, though generally i would give it a rough 400 as a starter but i wouldnt go OTT with it. you could in effect cut a piece of your bar stock and start the process and it will come out like a mirror. i guess what i am trying to say is if its a poor finish from chattering tooling then you should take some time to sand it flat and uniform. Sure it will get rid of deep scratches, but it will need to dissolve the rest of the piece to the depth of the scratch in order for it to go! so a bit of common sense has to be used as to if its practicle to remove that amount of material in order to get rid of it (most probably not) tooling marks etc will vanish

This process can be used for deburring metals, as it works by the pieces sticking out the furthest having a higher current density therefore dissolving them more than the rest... hence the deburring appeal of the process. edges will be softened though marginally.

I think a demonstration will speak louder than any paragraph i can type, and i need some nitric acid anyway so il do some examples of stainless, aluminium, and brass and post them. for test purposes i will just cut them off bar stock leaving the rough saw burr on it and just go at it.

PS, and it is the holy grail of metal finishing :tongue: thats why its the industry standard. though possibly due to the sheer amount of less labour required to do it and time. this isnt to say you couldnt get a like for like result by the way you do it

How long does it take you before you are happy with your polishing?
 
Last edited:

BradG

Member
Joined
Jul 10, 2011
Messages
1,733
Location
Blackpool -UK
Its also worth noting with regards to stainless thats its far more superior than passivation and is replacing the process.

Take a read here :)
http://www.ableelectropolishing.com/Corrosion_Protection_WhitePaper.pdf

Edit: also the point that if you have grooves and patterns cut into your work, it will be difficult to polish manually... electropolishing will cover all those hard to reach areas
 
Last edited:

skiprat

Passed Away Mar 22, 2022
In Memoriam
Joined
Oct 19, 2006
Messages
7,812
Location
In a Skip in Wales
Thanks for that reply Brad.
So, while the process eats away at the surface ABOVE the scratch why isn't also eating the bottom of the scratch too?
Does this mean that I could end up with a mirror finish orange peel finish?
For shiny finishes to 'work' they need to be flat.
I can easily spend many hours getting 'drawn' or 'extrusion' marks out, let alone machining marks. I mostly kinky work in stainless and I really would appreciate several hours less graft. :)
 

BradG

Member
Joined
Jul 10, 2011
Messages
1,733
Location
Blackpool -UK
Thanks for that reply Brad.
So, while the process eats away at the surface ABOVE the scratch why isn't also eating the bottom of the scratch too?
Does this mean that I could end up with a mirror finish orange peel finish?
For shiny finishes to 'work' they need to be flat.
I can easily spend many hours getting 'drawn' or 'extrusion' marks out, let alone machining marks. I mostly kinky work in stainless and I really would appreciate several hours less graft. :)

The theory behind it is the bottom of the scratch is further away from the cathode, therefore the current density is less. because of that yes it will still dissolve but obviously alot slower than that of the surface. it will balance out, and should be slick and smooth, not that orange peel finish what i know you are referring to (chrome looks terrible like that doesnt it :biggrin: )

It should remove all that graft for you. i still have a couple of pieces of stainless you sent me so lemme process them once ive got my nitric and il post some pictures. the only process i will give them before electropolishing will be alkaline cleaning... no sanding at all.

i noticed on the aluminium you are supposed to run the process at -35 degrees.... ive no idea how to chill nitric acid down to that.. i know it freezes at around -43 ... but im drawing a blank at finding the right laboratory equipment for chilling down to that level.
 
Last edited:

skiprat

Passed Away Mar 22, 2022
In Memoriam
Joined
Oct 19, 2006
Messages
7,812
Location
In a Skip in Wales
Where the hell did that word 'Kinky' come from??
It must be the Predict Text on my Kindle......


I promise!!!! :)
 

BradG

Member
Joined
Jul 10, 2011
Messages
1,733
Location
Blackpool -UK
and there was me thinking you were just really into your stainless :biggrin:

so what do you wear when you kinky work in stainless?? haaaaaaa
 

BradG

Member
Joined
Jul 10, 2011
Messages
1,733
Location
Blackpool -UK
pmsl, just be sure you watch where those stainless red hot chips end up

Check this out" apologies for quality of blurriness.. biggest image on the net i could find of this advert from 1953
attachment.php
 

Attachments

  • parker2.jpg
    parker2.jpg
    45 KB · Views: 1,418

BradG

Member
Joined
Jul 10, 2011
Messages
1,733
Location
Blackpool -UK
proofs in the practicle :biggrin:

just makes me smile that parker have been up to it for the past 60 years
 

Joe S.

Member
Joined
Jan 11, 2012
Messages
2,000
Location
South Lyon, MI
Maybe this is a bit beyond me right now... How do you tell what stainless series you have? This may end up as a loooooong summer project, most of it being a lot of reading!
 

BradG

Member
Joined
Jul 10, 2011
Messages
1,733
Location
Blackpool -UK
Maybe this is a bit beyond me right now... How do you tell what stainless series you have? This may end up as a loooooong summer project, most of it being a lot of reading!

well the simplest approach is buy it from a metal dealer and they will generally have it labelled. if you are not sure ask them before buying as to what type it is.. like with aluminium... i like to work with 6061 T6 aluminium, which is a general engineering alloy, which has a hardness of T6 :wink: look into the different codes and series.. you can learn alot from them. things such as if they will smut alot when exposed to caustic substances can be determined
 

Joe S.

Member
Joined
Jan 11, 2012
Messages
2,000
Location
South Lyon, MI
So with this rod from the hardware, I can't do anything (chemically) with it unless I ask and find out what it is? It would seem sanding/buffing might be better until I get some labeled metals! :biggrin::eek:
 
Signed-In Members Don't See This Ad

BradG

Member
Joined
Jul 10, 2011
Messages
1,733
Location
Blackpool -UK
Steve
Word of caution with stainless steel though :wink: to electro polish it you use Perchloric acid, which is a superacid... a lot stronger than sulphuric or nitric, and it is an oxidising acid, hence why it is used in the manufacture of rocket fuel.

Admitedly, the below is from a 1000L bath of the stuff. But never the less due care and attention has to be made when even using small quantities of it.

attachment.php


Given its strong oxidizing properties, perchloric acid is subject to extensive regulations.[10] It is highly reactive with metals (e.g., aluminium) and organic matter (wood, plastics).

On February 20, 1947, in Los Angeles California, 17 people were killed and 150 injured when a bath, consisting of over 1000 litres of 75% perchloric acid and 25% acetic anhydride by volume, exploded. The plant, 25 other buildings and 40 automobiles were obliterated and 250 nearby homes were damaged. The bath was being used to electro-polish aluminium furniture. In addition, organic compounds were added to the overheating bath when an iron rack was replaced with one coated with cellulose acetobutyrate (Tenit-2 plastic). A few minutes later the bath exploded.

Work conducted with perchloric acid must be conducted in fume hoods with a wash-down capability to prevent accumulation of oxidisers in the ductwork.
 

Attachments

  • Capturedla.jpg
    Capturedla.jpg
    83.2 KB · Views: 1,477
Top Bottom