mikespenturningz
Member
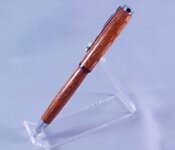
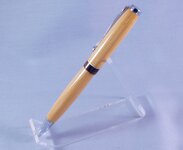
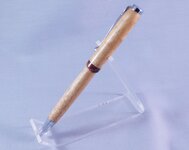
Ok I have been doing allot of pen finishing with this finish. I have been telling folks about it for months. I really like this finish and have burned through an entire bottle of it and am on my second. I have done allot of experimenting and will recount below what I do in hopes that it will help others who are allergic to CA like I am. I have also had allot of people ask me so here it is this is what I do.
1. Finish turning a pen then go into sanding mode
2. 240 grit dry sand I always use forward and reverse
3. 320 grit dry sand in reverse then switch to forward and sand some more
4. 400 forward then reverse
5. 600 reverse and then switch to forward and sand some more. This is the end of dry sanding. I use Abranet so I don't wet sand with it.
6. 4000 MM wet sand with Walnut oil forward then reverse
7. 6000 MM wet sand with Walnut oil reverse then forward
8. 8000 MM wet sand with Walnut oil forward then reverse
10. 12000 MM wet sand with Walnut Oil reverse then forward.
11. Use paper towel to really heat things up and buff the walnut oil. It will set the oil.
12. Fold up a paper towel and add a nice drop of Doctors Wood Shop Pen finish on it and apply to the blank don't buff yet I use about 1100 rpm for this
13. Reverse the lathe and apply another drop and apply. Now buff with the other end of t paper towel.
14 Apply another drop to the paper towel I use exactly the same spot every time so I get a soaked spot on the towel this is important and you will see why later.
15. Set the lathe to forward and apply another drop to the same spot again and apply then buff out with the same spot on the other end of the paper towel. You are smoothing the paper towel and it seems to do a better and better job on the finish.
16. Reverse the lathe again and apply another drop and apply and buff
17. Forward again and apply another drop and buff. By now you have noticed that when you apply you see a nice shiny blank but when you buff it dulls just a bit. You need to keep repeating this procedure until you see very little difference between buff and apply once this is achieved.
18. I use the wet spot that I created and leave the lathe in forward and speed things up just a bit maybe 2000 rpms and give a few more applications with what is in the wet spot and buff between. You should see very little difference between the wet and buffed when done. Make sure the last time that you buff that you heat things up a bit to make sure all is set.
I find that with really hard woods you won't need as many applications but with softer woods you may need more. I hope this little tutorial helps you out. Here is a link to Doctors Wood Shop Pen Finish
I hope this helps you all.
Last edited: