
Marmotjr
Member
So after murdering my tools for the last six months, I finally built a sharpening system based on the Wolverine system.
I do have my own 3d printer, so that played big part in it, but there's nothing you couldn't make out of wood. In fact, I based the Verigrind design on a youtube video of a guy making his own from plywood. My verigrind posting on thingiverse includes a link to the video. VeryGrind by marmotjr - Thingiverse
Including the 8" grinder from amazon (https://www.amazon.com/gp/product/B015U2STNM/), I used a 24" piece of 3/4x3/4" stock as the arm, a piece of "scrap" 3/4" shelving that was converted in the base, some 1/4-20 nuts and bolts. All said, it's cost me around $125 (grinder included) to get a working sharpening system up and running. The grinder comes with both a course and fine grit wheel. That's about a third of the cost of a after market system.
It's so nice to finally have consistent edges on my tools. Although, my small spindle gouge was so ground up, the flute was now too shallow to make an edge . Time for a new gouge.
So, if you want to build your own:
If you have access to a 3d printer, You can print off the parts and assemble them as I describe on thingiverse. Or you can use a service like shapeways to print the pieces and mail them too you.
Or, as most of us have at least minimal access to a woodshop, make the jig as described in the video out of plywood. I included a pdf of the design I based this on.
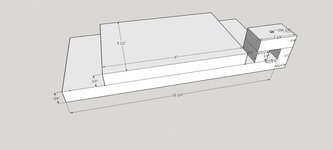
For the base, follow the drawings I included to cut out the base from 3/4" ply. There needs to be a hold down on each corner, 4 total. The drawing only shows one. The under side of the top piece has a place for a 7/16"-20 nut to be held in with CA. Glue and screw each of the small parts together, and then glue and screw the entire assembly onto the base.
Make a small (thin) knob for the 1" bolt that feeds down through, as the guard on the grinder does not leave a lot of clearance. Bolt the grinder to the base so each wheel is centered on the slots.
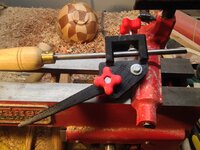
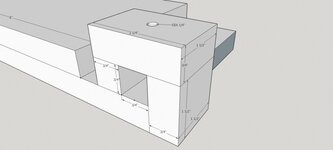
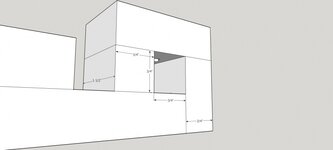
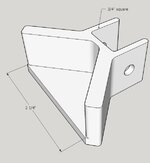
Cut a length of 3/4x3/4 stock to the length you need. Create an end cap that fits over or around the end of the stock. This cap will nest the arm of the verigrind in it. It should also be able to hold a tool handle. I Included a drawing of the endcap I made, but it is 3d printed, but you can get the idea from it and make something similar out of scrap wood.
I'm working on the adjustable table that slides into the slots. The ones that come on the grinder are toothed, and don't like to line up to the bevels I want.
I do have my own 3d printer, so that played big part in it, but there's nothing you couldn't make out of wood. In fact, I based the Verigrind design on a youtube video of a guy making his own from plywood. My verigrind posting on thingiverse includes a link to the video. VeryGrind by marmotjr - Thingiverse
Including the 8" grinder from amazon (https://www.amazon.com/gp/product/B015U2STNM/), I used a 24" piece of 3/4x3/4" stock as the arm, a piece of "scrap" 3/4" shelving that was converted in the base, some 1/4-20 nuts and bolts. All said, it's cost me around $125 (grinder included) to get a working sharpening system up and running. The grinder comes with both a course and fine grit wheel. That's about a third of the cost of a after market system.
It's so nice to finally have consistent edges on my tools. Although, my small spindle gouge was so ground up, the flute was now too shallow to make an edge
. Time for a new gouge.So, if you want to build your own:
If you have access to a 3d printer, You can print off the parts and assemble them as I describe on thingiverse. Or you can use a service like shapeways to print the pieces and mail them too you.
Or, as most of us have at least minimal access to a woodshop, make the jig as described in the video out of plywood. I included a pdf of the design I based this on.
For the base, follow the drawings I included to cut out the base from 3/4" ply. There needs to be a hold down on each corner, 4 total. The drawing only shows one. The under side of the top piece has a place for a 7/16"-20 nut to be held in with CA. Glue and screw each of the small parts together, and then glue and screw the entire assembly onto the base.
Make a small (thin) knob for the 1" bolt that feeds down through, as the guard on the grinder does not leave a lot of clearance. Bolt the grinder to the base so each wheel is centered on the slots.
Cut a length of 3/4x3/4 stock to the length you need. Create an end cap that fits over or around the end of the stock. This cap will nest the arm of the verigrind in it. It should also be able to hold a tool handle. I Included a drawing of the endcap I made, but it is 3d printed, but you can get the idea from it and make something similar out of scrap wood.
I'm working on the adjustable table that slides into the slots. The ones that come on the grinder are toothed, and don't like to line up to the bevels I want.

")