
budnder
Member
I've had a CNC for a few years, but haven't used it for anything related to pens, aside from making a jig or two. I decided to take the plunge on a fourth axis (rotary axis). Because my CNC doesn't have a whole lot of Z (up/down), I really needed a fourth axis centered around 45mm (~1.75") above the table – anything much taller and my bit wasn't going to be able to lift high enough to get on top of the stock.
The canned solutions I could find (headstock/rails/tailstock) all seemed to be around 65mm, with maybe the occasional 55mm. So I looked into what it would take to roll my own. And since I was doing my own, I figured I could be a little pickier about the parts – I fancied a low backlash harmonic or geared drive. From my research, something with a gear reduction of 25 – 50 was a good compromise between speed and accuracy. I found these little surplus Rino/Vexta motor/drive combos to be attractive at around $100 on ebay:

So I watched and waited and snagged one when it popped up for auction. As I was likely going to have to hack a tailstock as well due to the 45mm height, I found one on ebay that had a 70mm height, but was modular, so I could easily remove the riser blocks and base and replace them with my own:

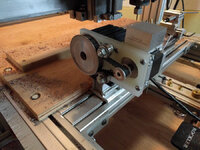
I had to make my own drive shaft for the Rino gear box and put a 3 / 4 16TPI thread on it so it would be compatible with Sherline accessories. I used aluminum because I had some. I built up a mount for the drive and tailstock out of maple, and figured I'd just use the T-tracks already built into my CNC bed as rails.
The gecko 540 driver and Mach3 software I was using on the CNC were already 4th axis capable, so wiring it up was pretty straight forward, with only a little trial and error and the usual googling for help to get things sorted and smoothed over.
The unknown for me in this is if the aluminum drive shaft and wooden mounts will be stiff enough to be accurate. It's a given that this setup will have to be "dialed" in to be square with the tooling every time I take it on and off the table. I figure I'll eventually develop a jig/indicator/macro/process for making this easy and repeatable.
The video shows a little test I did. I didn't futz too much with the squareness of everything, and it didn't seem to matter all that much. I had the rotation running in reverse so it carved out the text backwards (DOH!). I filled the (backwards) text with some ground coffee and CA and then turned it manually just to see how it was going to look, and I'm pretty satisfied. This particular font is a requirement for the first project I'm attempting, but if I had a choice, I'd go with a font that didn't have as many tiny nooks and crannies. I can go a little bigger and that will help. I used an 1/8" end mill to "turn" the blank to shape, and then a tiny R0.25 tapered ball nose engraving bit for the lettering ( https://www.amazon.com/gp/product/B01N7S00BH ). I started with a ¾" round blank with tube already glued in, and roughing it to shape took about 5 minutes. Same for engraving the text. I have a little 3 inch Sherline 4 jaw chuck that I could have used to hold the blank, but decided to use a basic pen turning mandrel instead to see if that would work (seemed fine and simpler to me than the 4 jaw).
All in all I'm pretty happy with this little setup so far. I'm using a combination of Fusion and Vetric Desktop to generate the gcode. I started my first "not a test" cutting tonight...
The canned solutions I could find (headstock/rails/tailstock) all seemed to be around 65mm, with maybe the occasional 55mm. So I looked into what it would take to roll my own. And since I was doing my own, I figured I could be a little pickier about the parts – I fancied a low backlash harmonic or geared drive. From my research, something with a gear reduction of 25 – 50 was a good compromise between speed and accuracy. I found these little surplus Rino/Vexta motor/drive combos to be attractive at around $100 on ebay:
So I watched and waited and snagged one when it popped up for auction. As I was likely going to have to hack a tailstock as well due to the 45mm height, I found one on ebay that had a 70mm height, but was modular, so I could easily remove the riser blocks and base and replace them with my own:
I had to make my own drive shaft for the Rino gear box and put a 3 / 4 16TPI thread on it so it would be compatible with Sherline accessories. I used aluminum because I had some. I built up a mount for the drive and tailstock out of maple, and figured I'd just use the T-tracks already built into my CNC bed as rails.
The gecko 540 driver and Mach3 software I was using on the CNC were already 4th axis capable, so wiring it up was pretty straight forward, with only a little trial and error and the usual googling for help to get things sorted and smoothed over.
The unknown for me in this is if the aluminum drive shaft and wooden mounts will be stiff enough to be accurate. It's a given that this setup will have to be "dialed" in to be square with the tooling every time I take it on and off the table. I figure I'll eventually develop a jig/indicator/macro/process for making this easy and repeatable.
The video shows a little test I did. I didn't futz too much with the squareness of everything, and it didn't seem to matter all that much. I had the rotation running in reverse so it carved out the text backwards (DOH!). I filled the (backwards) text with some ground coffee and CA and then turned it manually just to see how it was going to look, and I'm pretty satisfied. This particular font is a requirement for the first project I'm attempting, but if I had a choice, I'd go with a font that didn't have as many tiny nooks and crannies. I can go a little bigger and that will help. I used an 1/8" end mill to "turn" the blank to shape, and then a tiny R0.25 tapered ball nose engraving bit for the lettering ( https://www.amazon.com/gp/product/B01N7S00BH ). I started with a ¾" round blank with tube already glued in, and roughing it to shape took about 5 minutes. Same for engraving the text. I have a little 3 inch Sherline 4 jaw chuck that I could have used to hold the blank, but decided to use a basic pen turning mandrel instead to see if that would work (seemed fine and simpler to me than the 4 jaw).
All in all I'm pretty happy with this little setup so far. I'm using a combination of Fusion and Vetric Desktop to generate the gcode. I started my first "not a test" cutting tonight...

")