Cross cut Cocobolo Kitless

Signed-In Members Don't See This Ad

CjG78

Member
Joined
Feb 2, 2020
Messages
759
Location
Australia
G'day!
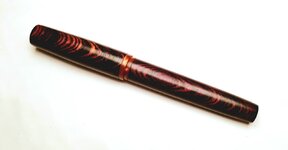
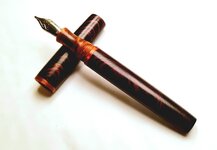
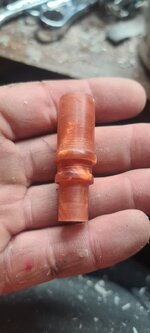
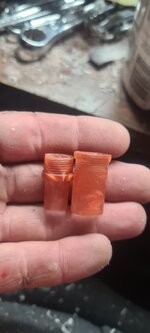
Well, after taking inspiration from a few outstanding turners around the globe, I have made a timber kitless which I am absolutely proud of. The only thing I need to improve on is making the threads triple start, which I am soon sorting.
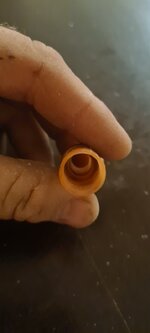
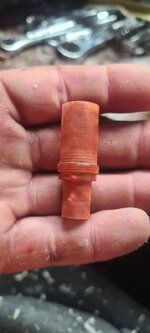
Resin sleeves and section, jowo 1.1 stub nib, bees wax finish!
 

Attachments

  • 20210708_215028.jpg
    20210708_215028.jpg
    63.5 KB · Views: 295
  • 20210708_215155.jpg
    20210708_215155.jpg
    93.5 KB · Views: 289
  • 20210707_183443.jpg
    20210707_183443.jpg
    63.7 KB · Views: 286
  • 20210707_182242.jpg
    20210707_182242.jpg
    132.5 KB · Views: 251
  • 20210707_182231.jpg
    20210707_182231.jpg
    135.2 KB · Views: 244
  • 20210707_182220.jpg
    20210707_182220.jpg
    117 KB · Views: 286
Signed-In Members Don't See This Ad

its_virgil

Member
Joined
Jan 1, 2004
Messages
8,118
Location
Wichita Falls, TX, USA.
Well done. I like it. I am starting one similar this weekend using stabilized amboyna burl I've had for 10 yrs waiting on its turn. My plans are very similar to yours. Could you share the specs: diameters mainly? I know which thread sizes I will use, I think. Thanks for sharing.
Do a good turn daily!
Don
 

magpens

Member
Joined
Feb 2, 2011
Messages
15,912
Location
Canada
B*E*A*U*T*I*F*U*L pen, Casey !!!!

In addition to what Don has asked for, I would like to see, please (if possible) .....

a pic of the nib/section unscrewed from the body ... and in line with the body ... with the cap beside

I am just trying to get a picture in my mind of all the parts you made from resin, and how they fit into the wood barrel and cap.

Would like to have seen that before you glued them into the barrel and cap, but it's probably too late for that now.

I am just planning my first attempt at this kind of wood kitless pen and so am still a bit uncertain of what all is required.

Thank you. . . :) :D
 

mark james

IAP Collection, Curator
Joined
Sep 6, 2012
Messages
12,750
Location
Medina, Ohio
You kitless guys/gals are amazing! Much admiration from here. I will also give a shout-out for just a few open wood grains!!! My preference is to not fully fill, so the few I see are really appreciated - I suspect it feels nice in the hand.

Superb work!
 

Weldon0405

Member
Joined
Jun 19, 2020
Messages
38
Location
North Carolina
Thank you for sharing this! I have the materials prepped to start my first wooden kitless this weekend. I have some Cocobolo and Honduran rosewood cut to length with some ebonite I will use to sleeve and thread. Were there any specific lessons you learned during this one you think are worth sharing?
 

darrin1200

Member
Joined
Mar 17, 2010
Messages
1,850
Location
Lyn, Ontario, Canada
B*E*A*U*T*I*F*U*L pen, Casey !!!!

In addition to what Don has asked for, I would like to see, please (if possible) .....

a pic of the nib/section unscrewed from the body ... and in line with the body ... with the cap beside

I am just trying to get a picture in my mind of all the parts you made from resin, and how they fit into the wood barrel and cap.

Would like to have seen that before you glued them into the barrel and cap, but it's probably too late for that now.

I am just planning my first attempt at this kind of wood kitless pen and so am still a bit uncertain of what all is required.

Thank you. . . :) :D
It looks awesome Casey.

Mal. If you look at the 4th and 5th pictures, you will see what you are looking for. The upper piece goes in the cap, while the lower piece goes into the barrel. The section would screw into the lower piece.
 

CjG78

Member
Joined
Feb 2, 2020
Messages
759
Location
Australia
Well done. I like it. I am starting one similar this weekend using stabilized amboyna burl I've had for 10 yrs waiting on its turn. My plans are very similar to yours. Could you share the specs: diameters mainly? I know which thread sizes I will use, I think. Thanks for sharing.
Do a good turn daily!
Don
Thanks mate!
I hope this picture helps!
I used m14 x 1.0 and m10 x .75, with a jowo tap (not sure of the measurements on it)
 

CjG78

Member
Joined
Feb 2, 2020
Messages
759
Location
Australia
B*E*A*U*T*I*F*U*L pen, Casey !!!!

In addition to what Don has asked for, I would like to see, please (if possible) .....

a pic of the nib/section unscrewed from the body ... and in line with the body ... with the cap beside

I am just trying to get a picture in my mind of all the parts you made from resin, and how they fit into the wood barrel and cap.

Would like to have seen that before you glued them into the barrel and cap, but it's probably too late for that now.

I am just planning my first attempt at this kind of wood kitless pen and so am still a bit uncertain of what all is required.

Thank you. . . :) :D
Thanks Mal, the pics of the sleeves are on the original post, plus I just uploaded a pic of it in pieces with measurements. It was alot of trial and error.
 

its_virgil

Member
Joined
Jan 1, 2004
Messages
8,118
Location
Wichita Falls, TX, USA.
Thanks Casey. That extra info is a tremendous help. I have the M14 tap and die but have not gotten the cap mandrel for that size yet. I will be using the M13 for the cap. Wish me luck. Thanks again.
Do a good turn daily!
Don
 

darrin1200

Member
Joined
Mar 17, 2010
Messages
1,850
Location
Lyn, Ontario, Canada
Thanks Casey. That extra info is a tremendous help. I have the M14 tap and die but have not gotten the cap mandrel for that size yet. I will be using the M13 for the cap. Wish me luck. Thanks again.
Do a good turn daily!
Don
Hey Don. The first mandrels I made/used, before I had a metal lathe, were acrylic acetate pen blanks. Worked excellent. They were easy and quick to make. While I make them from aluminum now, I will still make one from acrylic in a pinch.
 

Pierre---

Member
Joined
Jun 10, 2012
Messages
415
Location
France
Wow, very nice indeed, with an interesting construction, congrats Casey! And thanks for the dimensions.
I have some questions about them:
  • If I understand well, the sleeves are short, and the wood not tubed. I would not ask if the wood were straight, but without internal support, aren't you afraid of the cross-cut wood which is supposed to be weak and easily breakable?
  • M14 and the cap OD is 16.2. That does not leave a lot for wood + resin, same for the barrel it seems, you must have thought a lot about dimensions. What are both sleeves OD? I mean the part that goes into the wood, compared to the wood OD?
  • I do not understand what is the 12.92 measurement. If you use M14, the barrel should be larger, shouldn't it?
Thanks for your answer!
 

CjG78

Member
Joined
Feb 2, 2020
Messages
759
Location
Australia
Thanks Casey. That extra info is a tremendous help. I have the M14 tap and die but have not gotten the cap mandrel for that size yet. I will be using the M13 for the cap. Wish me luck. Thanks again.
Do a good turn daily!
Don
You could always make one! My section mandrel has somehow changed shape and I can't thread onto it so I made one from ebonite
 

its_virgil

Member
Joined
Jan 1, 2004
Messages
8,118
Location
Wichita Falls, TX, USA.
Thanks mate!
I hope this picture helps!
I used m14 x 1.0 and m10 x .75, with a jowo tap (not sure of the measurements on it)
Thanks again for your help. Here is my first attempt at this. Used a piece of mesquite. Went well. Learned a couple of things. Main one is I think the sleeve should be glued in place and then do the drilling and tapping.
Do a good turn daily!
Don20210711_204853-02.jpeg
 

CjG78

Member
Joined
Feb 2, 2020
Messages
759
Location
Australia
Wow, very nice indeed, with an interesting construction, congrats Casey! And thanks for the dimensions.
I have some questions about them:
  • If I understand well, the sleeves are short, and the wood not tubed. I would not ask if the wood were straight, but without internal support, aren't you afraid of the cross-cut wood which is supposed to be weak and easily breakable?
  • M14 and the cap OD is 16.2. That does not leave a lot for wood + resin, same for the barrel it seems, you must have thought a lot about dimensions. What are both sleeves OD? I mean the part that goes into the wood, compared to the wood OD?
  • I do not understand what is the 12.92 measurement. If you use M14, the barrel should be larger, shouldn't it?
Thanks for your answer!
Thanks mate, yes I was worried about the integrity of the timber, especially being cross cut, but it felt quite sturdy, even with a stress test. In future I will do full sleeves though. This was just a trial and error.
So the sleeve 'collar' I suppose you call it, I used dimensions of a standard #6 pen that I make. The measurement of 12.92 was actually a mistake, and was the measurements of the threads. The barrel is 14.5.
I am sure I'll be adjusting these sleeves, and try to make them easier to work with, as there wasn't much room for error.
Thankyou for asking mate!
Casey
 

CjG78

Member
Joined
Feb 2, 2020
Messages
759
Location
Australia
Thanks again for your help. Here is my first attempt at this. Used a piece of mesquite. Went well. Learned a couple of things. Main one is I think the sleeve should be glued in place and then do the drilling and tapping.
Do a good turn daily!
DonView attachment 312020
Don that's fabulous!! Well done mate. I agree on the sleeve being glued it before threading, the only reason I didn't was the allignment of the grain. I turned the collar to the finished diam, which is something that I'll change and make it larger, and turn it down on the timber.
Trial and error!! Have fun, keep them coming!!
They are extremely fun and allow your creativity to go wild!!
Casey
 

duncsuss

Member
Joined
Jun 29, 2012
Messages
2,160
Location
Wilmington, MA
I think the sleeve should be glued in place and then do the drilling and tapping.

Don - I normally use an alternative way, which is to make the "internal pen" (the nib section, the full length barrel inner sleeve, and the full length cap inner sleeve) first out of ebonite or plain acrylic acetate. All the threads are cut and the visible parts polished before I even cut and drill the wooden blank - which can be turned & finished before it's epoxied onto the inner parts. Getting the grain aligned is the easy part (just have to remember to do it!)
 
Last edited:

its_virgil

Member
Joined
Jan 1, 2004
Messages
8,118
Location
Wichita Falls, TX, USA.
Finished the cap. Here are pictures of the pen. Wood is mesquite. The inserts are made from acrylic acetate. Not perfect. I learned a lot making this. Drilling and threading the AA inserts will be done prior to gluing them into the wooden pieces. Enjoy. Comments welcome, especially more suggestions. I'm happy with this first one even though it has several flaws.
Do a good turn daily!
Don
20210713_204156-02.jpeg20210713_204137-02.jpeg
 

magpens

Member
Joined
Feb 2, 2011
Messages
15,912
Location
Canada
Revisiting this pen after seeing yesterday's latest . . . "Cross-cut Red heart" . . .


Amazing beauty in both !!! . . . I constantly admire your work, Casey !!! . . . Keep at it, Mate !!!!
 
Top Bottom