ChollaCactus and Turquoise

Signed-In Members Don't See This Ad
See more from Kenny Durrant

Kenny Durrant

Member
Joined
Sep 11, 2012
Messages
2,508
Location
Sachse Tx. 75048
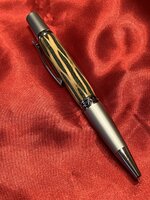
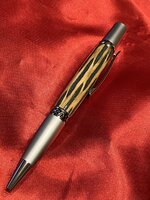
Thanks to KMCloonan for giving me the idea to give this a try. A friend gave me a bunch of different crushed stones and I thought this would be a great way to start playing with it. I started by drilling the cactus and gluing in the tube. That way the pattern is uniform all the way around the pen. Then I turned the cactus close to the bushings to save the powder and have less room for voids. I must say that was quite a mess. So after that I turned it to size and shape and gave it another several coats of CA to smooth out the rough spots. The sanded it smooth and started my regular CA finishing. Questions and Comments are Welcome. Thanks
 

Attachments

  • IMG_3928.jpeg
    IMG_3928.jpeg
    653.8 KB · Views: 109
  • IMG_3927.jpeg
    IMG_3927.jpeg
    634.8 KB · Views: 108
Signed-In Members Don't See This Ad
Joined
Jul 1, 2021
Messages
555
Location
Fayetteville, North Carolina
Thank you Markus. It was a learning experience for sure. I picked up a few things along the way that will make other projects easier.

Inlay with crushed stone can be both very frustrating and a lot of fun to experiment with but the stone density really comes into play. Then mix that density with glue and it can be even more of a head scratcher sometimes. Mixing materials can be extremely fun to get matches you wouldn't have thought of.

I used, what I thought was anyway, green limestone on a black walnut bowl as a filler because the color popped against the walnut grain. Turns out it wasn't limestone but lamproite lapilli tuff, a type of volcanic rock that is unique to where I got it and is typically between a 6-7 on Mohs scale rather than the 2-4 limestone is. The moment my HSS tools touched this stuff they reverted to butter knife dullness and/or chipped. Had to use fresh carbide to shape it, extremely frustrating. It chewed up sandpaper as well.

The lapilli tuff is in powder form, grinding the rocks down was easy, but once solidified with thin CA it got really, really hard. It wasn't much fun reshaping my HSS tools but lesson learned. I have a LOT of this stuff at my house and I now know to use it more effectively as well.

All that to say, know the stones you are working with. Color is essential to getting the look you want but know the density and how that can pair with woods you are using as well. Have fun with it, I did even with the frustrations and learned a lot. If you gather stones for use just be mindful of them and do your research. I really enjoy mixing mediums even with the frustrations that come with doing it.
 
Last edited:

Kenny Durrant

Member
Joined
Sep 11, 2012
Messages
2,508
Location
Sachse Tx. 75048
Thanks for the information. I noticed right off the bat when I started turning with my tools, the stone didn't play well. I ended up doing all of it with sandpaper, which actually worked really well.
 

Lew

Member
Joined
Oct 28, 2020
Messages
400
Location
Fair Oaks Ranch, Texas
I really like the result: beautiful pen. Question though. I have read different pieces of advice on how to add the crushed stone as an inlay. Some say don't use CA, others recommend it. There are several other ideas about how to bind the stone to the pen blank. Have you tried different methods? What made you finally decide on the one you chose? Sorry if this is a dumb question.
 

Kenny Durrant

Member
Joined
Sep 11, 2012
Messages
2,508
Location
Sachse Tx. 75048
Not a dumb question at all. After starting this project I thought about easier and or better ways. I used CA because that's what I use for similar applications. After starting I figured out it was messy. I filled one void at a time. In doing that I was worried about the CA flowing into other voids filling them and not being able to add the stone. Luckily that didn't happen. I've thought about making a slurry with types of glue. I thought about epoxy but it seems to thicken a little fast for me. I might try Elmers but not sure about the drying time. I'd hate for it to leak out. What's your thoughts?
 
Joined
Jul 1, 2021
Messages
555
Location
Fayetteville, North Carolina
Not a dumb question at all. After starting this project I thought about easier and or better ways. I used CA because that's what I use for similar applications. After starting I figured out it was messy. I filled one void at a time. In doing that I was worried about the CA flowing into other voids filling them and not being able to add the stone. Luckily that didn't happen. I've thought about making a slurry with types of glue. I thought about epoxy but it seems to thicken a little fast for me. I might try Elmers but not sure about the drying time. I'd hate for it to leak out. What's your thoughts?

For setting inlays like this I have found CA glue to be the most effective all-around solution because you can chose different thickness' of the glues. If you're concerned about bleed through you can use thin CA before adding the inlay to seal the area/wood in question. You can then add the inlay and use thin or medium glue. Another option is the use thick CA and then add the inlay on top of it, kind of acts like a sealed layer of thin. Using the thick base layer is typically what is done with inlaying rings as an example. Thin or medium CA can act as a final layer and sealer for the inlay.

Epoxy takes too long to set for these applications. You can only do one hole a time and epoxy takes a lot longer to set. There is still need to think about sealing because the epoxy can bleed through just like CA can. Albeit thicker mediums like epoxy or thick CA do not bleed through as easily but the porousness of the wood medium should be considered as well.
 

Lew

Member
Joined
Oct 28, 2020
Messages
400
Location
Fair Oaks Ranch, Texas
Kenny, in response to your question about my thoughts on what glue to use, I have never done inlay on pens, only boxes. One of the things I do is ask for a signature from the person who wants me to make a box for them. I then carve that signature onto the lid of the box and fill with turquoise, carbon, crushed opal, etc. I've used epoxy and CA. I've never tried anything else. The epoxy seemed to work best for me in this type of application. But I imagine it's quite different from doing a pen.
 

Kenny Durrant

Member
Joined
Sep 11, 2012
Messages
2,508
Location
Sachse Tx. 75048
Thanks Lew. I've thought about epoxy but it sets pretty fast. I don't want to waste powder remixing. The positive with CA is I can inlay a spot then rotate the pen not worrying about it spilling out. I'll try another one when I get a chance to see if I can hone my method and not be so messy. I have a few different inlay materials that I'm thinking will look nice. You mentioned opal. That sounds appealing and I was wondering if there's a crushed Abalone and what it might look like
 
Top Bottom