
robutacion
Member
I peoples,
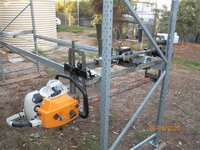
A long time ago I purchased a clone chainsaw of the Stihl 070 with a 36" bar and skip chains, I did also order a 44" GB chainsaw mill frame and put a mill together to slab some large logs I already had in the storage paddock.jpg") . At the time I slabbed with the help of my wife Merissa some logs including the last tree Merissa helped to cut and dismantle/slab (silky-Oak),
. At the time I slabbed with the help of my wife Merissa some logs including the last tree Merissa helped to cut and dismantle/slab (silky-Oak),  since them and due to the weight of the whole thing, I removed the chainsaw out of the mill frame so that I could use the chainsaw for any bigger logs when necessary.
These chainsaws by themselves are extremely heavy so I avoided its use as much as I could and has been a few years since I last used it but I keep thinking about some of the big logs that I had in the paddock, some have been there for about 13 years (Macrocarpa or Golden Cypress) and have started to rot where they contact the moist soil/sand so, I needed to do something about it.
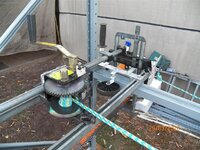
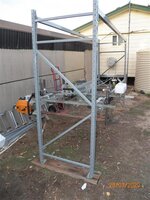
My 36" bar on the chainsaw mill does only give me about 28" of cut and the logs a log bigger than that so, I saw no option than invest in a 44" proper bar and 3x 44" skip chains and that cost a bundle. I did also look for a system to run the chainsaw mill where I didn't have to change the mill settings nor have to remove and re-install the whole set-up over the guides on the log itself and it happens that I saw a bloke on Youtube using a chainsaw mill with a pallet shelving type frame and that was exactly what I was looking for.
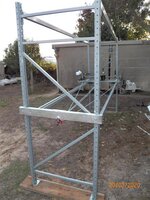
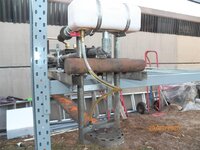
I knew that I would have to do a few modifications to get it how I wanted so and after I found some medium duty shelving frame (the heavy-duty ones are 3 times the price...!) I proceeded to work on it until I thought that would work OK or at least a lot easier than the normal chainsaw milling method. It happens that the up-rights of the frame have holes every 2" so the beams move up or down in those increments.
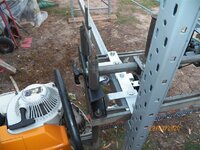
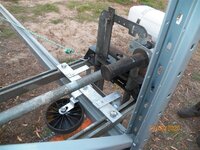
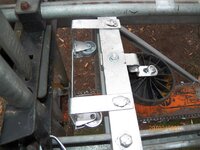
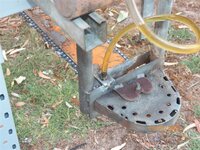
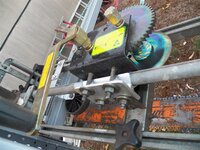
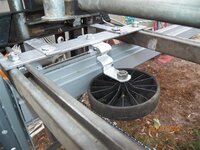
From experience and seeing other chainsaw mills where a hand winch was used to move the whole frame and chainsaw forwards, its a constant fight to keep it cutting straight and not sideways so I created a system where a number of small wheels run on either side of the beams/runners keeping the whole thing moving forwards straight and a lot easier to work with.
Everything is now dismantled and ready to take to the storage paddock for some testing and stabbing (I mean slabbing...! ), I don't envisage any major issues with it but I'm not sure. One of the concerns I had was on how to move the chainsaw mill down or up with only 2 people, what I mean is, the same system that needs to be used to put the chainsaw mill in position for the first cut, the 2 beams or runners as I call them will need to come down on both sides 2" or 4" increments so, one of the frames (up-rights) has to be momentarily removed before the chainsaw mill can be positioned for the next cut and while it may look difficult and a pain to do, there is indeed a very simple system that will allow me to do that all by myself if I have too but obviously easier with 2 people, It would be difficult to explain here what I mean and how I intend to do it, it worked in my testings so, fingers crossed. When I have the whole thing operating I will take further pics of the steps I just mentioned, it will be a lot easier to see with the pics.
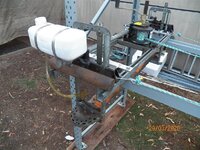
The frame is 2 meters tall x 80cm wide, the beans or runners are 3 meters long, the longest they have for these type shelves rated at 270kg per shelve. If I wanted to go longer I would need to go with the very heavy duty ones normally orange and blue in colour, weight and price is a problem, putting the chainsaw mill at the middle of the runner's length, the beams sag approx. 1/8" and this in due not only to the weight of the chainsaw, bar, chain, mill frame, which, wheels metal frame and a big solid steel 2"1/2 rod piece that I had to use as a counterbalance to the chainsaw head otherwise and the chainsaw is pushed forwards the bar would be lifting from the runner, that rod is a good 15kg.
I'm not sure when I get started, the weather here is getting a bit rainy and the Winter is coming, I know I would need lots of help getting the slabs out and on the trailer and then getting them out at home, I'm considering a 3 thrid person, a neighbour that seems to be interested in making a big outside table so, the wood will be free in exchange for his help. I myself have a few projects where I will need some 4" slabs (short ones) but none of the logs I have to mill are over 2.8 meters and that is exactly how much I can mill with this system/frame.
I leave you with some pics of the new stet-up just before I dismantled it.
Cheers
George
A long time ago I purchased a clone chainsaw of the Stihl 070 with a 36" bar and skip chains, I did also order a 44" GB chainsaw mill frame and put a mill together to slab some large logs I already had in the storage paddock
. At the time I slabbed with the help of my wife Merissa some logs including the last tree Merissa helped to cut and dismantle/slab (silky-Oak), since them and due to the weight of the whole thing, I removed the chainsaw out of the mill frame so that I could use the chainsaw for any bigger logs when necessary.These chainsaws by themselves are extremely heavy so I avoided its use as much as I could and has been a few years since I last used it but I keep thinking about some of the big logs that I had in the paddock, some have been there for about 13 years (Macrocarpa or Golden Cypress) and have started to rot where they contact the moist soil/sand so, I needed to do something about it.
My 36" bar on the chainsaw mill does only give me about 28" of cut and the logs a log bigger than that so, I saw no option than invest in a 44" proper bar and 3x 44" skip chains and that cost a bundle. I did also look for a system to run the chainsaw mill where I didn't have to change the mill settings nor have to remove and re-install the whole set-up over the guides on the log itself and it happens that I saw a bloke on Youtube using a chainsaw mill with a pallet shelving type frame and that was exactly what I was looking for.
I knew that I would have to do a few modifications to get it how I wanted so and after I found some medium duty shelving frame (the heavy-duty ones are 3 times the price...!) I proceeded to work on it until I thought that would work OK or at least a lot easier than the normal chainsaw milling method. It happens that the up-rights of the frame have holes every 2" so the beams move up or down in those increments.
From experience and seeing other chainsaw mills where a hand winch was used to move the whole frame and chainsaw forwards, its a constant fight to keep it cutting straight and not sideways so I created a system where a number of small wheels run on either side of the beams/runners keeping the whole thing moving forwards straight and a lot easier to work with.
Everything is now dismantled and ready to take to the storage paddock for some testing and stabbing (I mean slabbing...!
), I don't envisage any major issues with it but I'm not sure. One of the concerns I had was on how to move the chainsaw mill down or up with only 2 people, what I mean is, the same system that needs to be used to put the chainsaw mill in position for the first cut, the 2 beams or runners as I call them will need to come down on both sides 2" or 4" increments so, one of the frames (up-rights) has to be momentarily removed before the chainsaw mill can be positioned for the next cut and while it may look difficult and a pain to do, there is indeed a very simple system that will allow me to do that all by myself if I have too but obviously easier with 2 people, It would be difficult to explain here what I mean and how I intend to do it, it worked in my testings so, fingers crossed. When I have the whole thing operating I will take further pics of the steps I just mentioned, it will be a lot easier to see with the pics.The frame is 2 meters tall x 80cm wide, the beans or runners are 3 meters long, the longest they have for these type shelves rated at 270kg per shelve. If I wanted to go longer I would need to go with the very heavy duty ones normally orange and blue in colour, weight and price is a problem, putting the chainsaw mill at the middle of the runner's length, the beams sag approx. 1/8" and this in due not only to the weight of the chainsaw, bar, chain, mill frame, which, wheels metal frame and a big solid steel 2"1/2 rod piece that I had to use as a counterbalance to the chainsaw head otherwise and the chainsaw is pushed forwards the bar would be lifting from the runner, that rod is a good 15kg.
I'm not sure when I get started, the weather here is getting a bit rainy and the Winter is coming, I know I would need lots of help getting the slabs out and on the trailer and then getting them out at home, I'm considering a 3 thrid person, a neighbour that seems to be interested in making a big outside table so, the wood will be free in exchange for his help. I myself have a few projects where I will need some 4" slabs (short ones) but none of the logs I have to mill are over 2.8 meters and that is exactly how much I can mill with this system/frame.
I leave you with some pics of the new stet-up just before I dismantled it.
Cheers
George
Attachments
-
 001.JPG105.2 KB · Views: 522
 -
 002.JPG107.6 KB · Views: 495
 -
 003.JPG83.9 KB · Views: 487
 -
 004.JPG113 KB · Views: 501
 -
 005.JPG110 KB · Views: 455
 -
 007.JPG130.6 KB · Views: 482
 -
 008.JPG95.2 KB · Views: 485
 -
 009.JPG63.7 KB · Views: 480
 -
 010.JPG79.2 KB · Views: 432
 -
 011.JPG112.1 KB · Views: 454
 -
 012.JPG103.6 KB · Views: 450
 -
 013.JPG93 KB · Views: 441
 -
 014.JPG60.9 KB · Views: 435
Last edited:


