Signed-In Members Don't See This Ad

Peterpasha

Member
Joined
Apr 28, 2021
Messages
15
Location
Canada
I've only recently joined and being the sort of person who immediately jumps into the deep end, I've skipped turning wood or acrylic pens. Instead, I turn pens using copper round bar. On this particular pen, I noticed that there are tiny air bubbles trapped under the finish. I wet sand working up to 12,000 grit before putting the pen through it's patina process which takes a couple of days. After the patina process, I clean the pen's bright areas with acetone and let dry well before starting to finish. The lathe turns at around 1375rpm and I use thin CA Glue. I don't use accelerator, just letting it spin for a few minutes between coats. Each pen gets around 10 coats before final sanding and polishing. Any idea what caused these bubbles this time? Would using a heat gun between coats eliminate these?
20210524_171251.jpg
 
Signed-In Members Don't See This Ad

Peterpasha

Member
Joined
Apr 28, 2021
Messages
15
Location
Canada
Don`t know the answers , but what is your process for applying the CA , and which CA are you using ?
I use Super 'T' from Satellite City Inc (which I get from Lee Valley) and put it on with a folded Scott blue towel, (cut into tiny squares) which I then toss out and get another square for another coat.
 

bmundy

Member
Joined
May 7, 2021
Messages
11
Location
Southern California USA
I too have struggled with CA finishes. First thing I think the speed of your lathe is a little too high, you do run the risk of CA glue splashing off of your blank and possibly getting on your clothes or eye. I usually run at about 500 RPMs and a lot of times I just wipe it on and turn by hand.

I've also found a couple of products that seem to work better for me. When is glue boost and it's a two-part glue and accelerator. I will put a video link showing how to apply it only takes 4 to 6 applications to get a glass like finish. The second one is PARIX 3408 it is a medical grade CA that has no smell and the longer cure time. It to has it on special accelerator.
Here's the link to the video:

IMG_6196.jpg
 

duncsuss

Member
Joined
Jun 29, 2012
Messages
2,151
Location
Wilmington, MA
I'd be interested to know if these are present on the surface of the copper before the CA goes on. (Same with the fine radial scratches that are visible in your pic.)

Try taking a photo of a barrel that you've prepared (including building the patina and wiping the bright areas with acetone) but not yet applied CA onto.

Close up photos - particularly with flash - have a way of revealing things that we don't see while we're working at the lathe.

It may be that the problem is under the CA, and changing the way you apply it isn't going to help.
 

jttheclockman

Member
Joined
Feb 22, 2005
Messages
19,083
Location
NJ, USA.
Being an electrician by trade I am interested in what you are calling copper round bar?? Not sure what the blue stuff is. Maybe your patenia method. Maybe you can explain and maybe show us some before and after photos before the CA is applied. What grade of CA are you using?? Things that can cause bubbles is material used to apply (adds air bubbles) blank being applied to, and speed at which it is applied and the method. Whenever I use CA I never rub on more than one way and then back. Also use thin coats no matter what grade. Need more info on the blank.
 

Penchant 4

Member
Joined
Jun 23, 2018
Messages
324
Location
Great Lakes Area
I've only recently joined and being the sort of person who immediately jumps into the deep end, I've skipped turning wood or acrylic pens. Instead, I turn pens using copper round bar. On this particular pen, I noticed that there are tiny air bubbles trapped under the finish. I wet sand working up to 12,000 grit before putting the pen through it's patina process which takes a couple of days. After the patina process, I clean the pen's bright areas with acetone and let dry well before starting to finish. The lathe turns at around 1375rpm and I use thin CA Glue. I don't use accelerator, just letting it spin for a few minutes between coats. Each pen gets around 10 coats before final sanding and polishing. Any idea what caused these bubbles this time? Would using a heat gun between coats eliminate these?
View attachment 307589
It "looks" like the pinpoints (bubbles?) are associated with the circumferential lines. Gut impression is surface contamination in spite of the acetone wipe. Perhaps whatever is being used to achieve the patina is leaving residue on the surface.

As has been mentioned, the rpm seems high for application of any but a friction finish. This might be causing small spots of the CA to cure and get trapped in each layer. Just hunches as I am no chemist and did not even stay in a Holiday Inn Express last night. Good luck is figuring out the issue(s).
 

Peterpasha

Member
Joined
Apr 28, 2021
Messages
15
Location
Canada
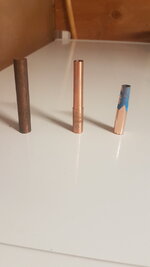
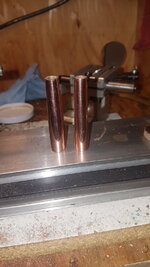
So as requested, from left: 1/2" copper round bar as I get it from a local metals distributer, tapered to size from the lathe (this one is a reject), fresh from the patina process and ready for finishing, and the 2 on the lathe bed are mid-way through the sanding process and haven't been polished yet. 20210525_150702 (1).jpg20210524_142838.jpg
 

magpens

Member
Joined
Feb 2, 2011
Messages
15,913
Location
Canada
@Peterpasha

With regard to your lathe speed during CA application .... at the speed you quote in your OP, I would fear that the CA could get flung off.
Could it be that in the process of getting flung, the CA forms cavities and bubbles ?

I am no expert, but I have learned some of what works for me ....

When I apply CA to my pen blanks on the lathe, I use an extremely low rotational speed .... about 20 RPM.

You might try such a low speed. . Also, I do not use a blue shop towel for application, I use a strip of that bubble wrap used for packaging.
That material has the bubbles on one side and is relatively smooth on the other. . I use the smooth side to spread the CA.
Actually, I do not apply the CA directly to the plastic strip. . I drip the CA from above the blank while it is turning and I rub the underside of the blank with the bubble wrap strip.

.... Just my idiosyncratic way of doing things, but it works quite well for me.

BTW, I believe you said in your introductory thread that you use a Taig lathe for doing your copper pens.
Just wondering how that is working out for you in terms of the machining of the blank. . Copper is not the easiest of materials to turn.
Also wondering where you get a live center for your tailstock. . I have a 2nd hand Taig (don't use much) and having trouble buying accessories for it.
Please advise if you can. . Thanks
 

Peterpasha

Member
Joined
Apr 28, 2021
Messages
15
Location
Canada
@Peterpasha


BTW, I believe you said in your introductory thread that you use a Taig lathe for doing your copper pens.
Just wondering how that is working out for you in terms of the machining of the blank. . Copper is not the easiest of materials to turn.
Also wondering where you get a live center for your tailstock. . I have a 2nd hand Taig (don't use much) and having trouble buying accessories for it.
Please advise if you can. . Thanks
I will definitely be trying a lower speed for the CA finish on the next pen.
Machining copper has been quite a learning curve for me. I learned to make pens in a one day course at Lee Valley a few years ago using brass, which (compared to copper) is a breeze to turn. The first thing I found with turning copper is it was easier going with carbide tools instead of HSS. The first couple of pens I did, I drilled the blank axially on the lathe. With brass it would take about 20 minutes; with copper, upwards of 2 and a half hours, and I would have to sharpen the drill bit at least twice. My original instructor said, when I asked about using copper instead of brass, "you know how brass wants to grab at your bits and pull them in? Copper is like that, only more so!" It's definitely a challenge to use copper and it's only cause I love the look of the copper and patina effect that I stick with it.
A major game changer was switching from drilling the blanks on the lathe to using a much more powerful drill press and a pen vise. I can do a blank in about 5 minutes without changing the bit. It's a bit scary to run cause it wants to fling brass streamers all over the workshop, but as long as I keep the bites small, it works really well.
I find that a higher speed works better for machining the blanks on the lathe with frequent use of cutting fluid. I stop using the toolbits at about 0.35mm above the finished diameter and finish smoothing it with files and sandpaper.
I was lucky enough to have purchased a Taig live center from Lee Valley before they suddenly and inexplicably stopped selling Taig products. If I'd known that they would suddenly stop selling without warning, I'd have purchased more. I picked up a 2nd Taig lathe at a garage sale for $200 that came with a 3 and a 4 jaw chuck and the milling slide (Buddy didn't know what he had and wanted to be rid of it), so thankfully I'm not hurting in that dept, although I would like to acquire a collet set.
There's a guy in Oregon named Nick Carter who runs about the best Taig website I've ever seen and he will ship from Taig into Canada, if you really get stuck.
 

magpens

Member
Joined
Feb 2, 2011
Messages
15,913
Location
Canada
@Peterpasha

Thank you ever so much, Peter, for your comprehensive reply !!

Hope you don't mind if I keep in touch with your re the Taig. . I am also going to "follow" you if you don't mind so as to keep apprised of your work !!
I normally use a Sieg-style lathe ... 7 x 14. . But I do have the Taig also which I intend to get working for some minor, less demanding jobs.

Thanks again !!
 
Top Bottom