Signed-In Members Don't See This Ad
See more from Yankee Remedy

Yankee Remedy

Member
Joined
Feb 20, 2018
Messages
42
Location
Winsted CT
Hi Y'all,
I'm not sure if I attached these pictures correctly, but here are a few thing I've made fairly recently. Nothing fancy, but in time I'd like to try to get a little bit fancy.

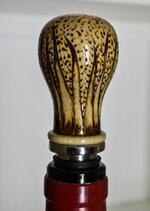
Bottle stopper - Decorated with pyrography.
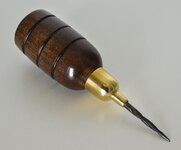
Awl - Made from a broken drill bit, a brass air fitting, and a piece of stained poplar finished with super glue.
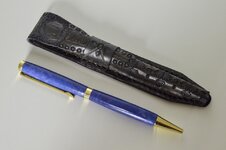
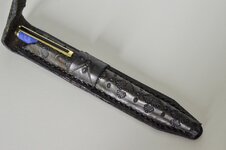
Pens and leather pen case - two slimline pens made from the Rockler pen kits. I cast the resins and turned them down with the lathe. I also made the leather pen case.
 

Attachments

  • pen-kit-2.jpg
    pen-kit-2.jpg
    154.7 KB · Views: 240
  • pen-kit-3.jpg
    pen-kit-3.jpg
    150.2 KB · Views: 219
  • pen-kit-4.jpg
    pen-kit-4.jpg
    133.3 KB · Views: 231
  • bottle-stopper-2.jpg
    bottle-stopper-2.jpg
    159.2 KB · Views: 244
  • awl-3.jpg
    awl-3.jpg
    158.2 KB · Views: 236
Signed-In Members Don't See This Ad

Yankee Remedy

Member
Joined
Feb 20, 2018
Messages
42
Location
Winsted CT
They don't look like beginners projects, well done !

Dave

Thanks Super Dave. If you knew what I was doing yesterday and today you'd know just how green I am! I was using this different kind of resin with a work time of 2.5 minutes. What a mess!! I see these other guys showing their pens with all of the nice swirls of brilliant colors, and mine always seem to turn out like mud. Hopefully I'll get the hang of it, If at first you don't succeed, try, and try again.
 

Yankee Remedy

Member
Joined
Feb 20, 2018
Messages
42
Location
Winsted CT
Thanks Jay,
I really appreciate those kind words. I've been working with leather for a few years, but the pyrography is something new. By the way, I stained the veggie tan leather with vinegaroon (rusty steel wool in vinegar) sometimes it turns it black and once it's done it's there forever.
 

magpens

Member
Joined
Feb 2, 2011
Messages
15,912
Location
Canada
You are setting us up for high expectations !

Your work is both beautiful and innovative ... I like it very much !!

At Rockler you are paying a little too much ...

With regard to the acrylic pens ... a little more attention to sanding and polishing would increase your satisfaction level, in my opinion.
I went through this when I started ... I was afraid to use 180 grit and 240 grit for acrylics at first, but if you sand lengthwise with the lathe turned off, just rotating the headstock/chuck by hand and go through all grits from 180 to 1500 ... about 60 strokes each after 240 grit (perhaps diminishing strokes as you go up) ... I think you will like the result. And then, some coarse automotive polish followed by Novus 3 and then Novus 2 and finally Plastix ...

The 180 and 240 grits will tend to take out any possible irregularites from the turning process and then you are starting to smooth things out, with the 1500 (and possibly 2000) starting to give you a bit of a shine. I used to use MicroMesh after that but found that unnecessary after a while. The Meguiar's Automotive coarse is a suitable intermediate stage, I found.

I buy my Novus cut polishes at ExoticBlanks.com ... I get the larger sizes (4 or 6 ounce) which other vendors don't seem to sell.

I think you are doing great and I like your boldness in jumping into casting so soon !! . I see kitless on your horizon !!
 
Last edited:

mark james

IAP Collection, Curator
Joined
Sep 6, 2012
Messages
12,750
Location
Medina, Ohio
Great results Gary.

Ditch the slims for a while (it is actually a challenging kit - but awesome for modifications later). Try some other inexpensive kits to get your appetite wet. Sierra (and clones), Knurl, Executive, etc... Then go to the two blank series; Jr Gent, etc ...

The awl and bottle stopper are very nice!

Mal gave some nice suggestions.

Have FUN!
 

Yankee Remedy

Member
Joined
Feb 20, 2018
Messages
42
Location
Winsted CT
To Mal and Mark James

Mal,
I didn't see those suggestions before. I don't believe they were there. I just read Mark James comment where he said "Mal gave some nice suggestions." Then I looked back at your comment and saw them. I'm sure you're right! Today I used the micro mesh pads for the very first time, but I have concerns about the price and how long they will last. So the auto rubbing compound sounds like a winner. I will try it for sure. Thanks for the tips!

Mark James,
I think you are talking over my head, but I'll try to research the pen kits that you mentioned. Then maybe I'll understand what you mean by ditching the slim lines.

Thanks for the help Gary
 
Last edited:

OZturner

Member
Joined
Aug 5, 2013
Messages
6,663
Location
Sydney. NSW. Australia
Terrific Display of your Creations Gary,
Nice Slim Lines, Attractive Blanks, Well Turned.
As Mal suggested the Finishing can be readily improved with the longitudinal strokes, and with the use of Plastic and Auto Finishes.
There is an excellent Youtube, by Ed of Exotic Blanks on Buff Finishing of Epoxy Blanks, well worth looking at.
Also all of Ed's Youtube's are well worth watching and adapting.

Love your Leather Pen Case, Brilliant Leather Embossing, Dying, and Stitching.

Excellent Pyrography, on the Bottle Stopper.

With the Brad Awl, Brilliant Idea of using a Twist Drill, Ground to a Taper where the Spiral Groove will aid the removal of the Timber when twisted against the Timber.

i look forward to your Future Posts,
Well Done,
Brian.
 

Yankee Remedy

Member
Joined
Feb 20, 2018
Messages
42
Location
Winsted CT
Thank you for the encouragement Brian.
The next pen I make you will see a vast improvement because of all of the great advice that I received here at IAP. I will be sure to check out Ed's videos.

Thanks again for all of the support. Gary
 

ed4copies

Local Chapter Manager
Joined
Mar 25, 2005
Messages
24,527
Location
Racine, WI, USA.
Hey Gary,

Since the vids were mentioned, you can "get there from here" by clicking on my signature picture. There are now about 90 free vids--hope they help.

Nothing on leather---an area I know NOTHING about!!! Nice pouches!!!
 

Charlie_W

Member
Joined
Nov 16, 2011
Messages
5,918
Location
Sterling, VA USA
Gary,
Excellent work on the leather! I am not into leather work but great tip on ebonizing with the vinegar/steel wool....I have only seen this used on wood.

The pyro on the bottle stopper is super as well. I am surprised no one has commented on the design.....all those sperms swimming towards the wine!! Well done!

Your awl is top notch....reminds me of a gimlet minus the screw point.

All in all, very well done! Your fit and finish on the acrylics will come with time.
 

Yankee Remedy

Member
Joined
Feb 20, 2018
Messages
42
Location
Winsted CT
Hey Gary,

Since the vids were mentioned, you can "get there from here" by clicking on my signature picture. There are now about 90 free vids--hope they help.

Nothing on leather---an area I know NOTHING about!!! Nice pouches!!!

Hi Ed,
Brian of OZturner said to look up your video -
"There is an excellent Youtube, by Ed of Exotic Blanks on Buff Finishing of Epoxy Blanks, well worth looking at.
Also all of Ed's Youtube's are well worth watching and adapting."

I tried to find it but couldn't. Is it under a different name?

I did subscribe to your channel, and your news letter.
Thanks Gary
 

Yankee Remedy

Member
Joined
Feb 20, 2018
Messages
42
Location
Winsted CT
Thanks for all of the support!

Thanks Brotherdale, I'm working on a few things right now and had a couple problems because of the quick setting resin I used, but I will post more as soon as I am able.

Charlie W, Thanks for the nice comments. Those little sperms are a texture that Sue Walters (an excellent Pyrogapher on YouTube) Teaches and they are not very easy to do correctly. If you look at hers and compare them to mine you'll see a huge difference. Hers are much better!

You must work with fasteners to know what a gimlet minus the screw point is.

Thanks again Gary
 
Top Bottom