mmayo
Member
Be sure to have a 6" blank, mark the blank with an x in both sides of the cut to align grain, cut 2-1/2" and 3"
Buy Rick Herrell's step drills. Mark the correct length and stick to it.
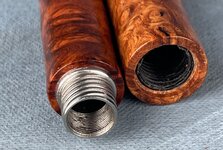
Use very small amounts of epoxy glue applied to the middle of the cap insert and the same with the stainless steel nib connector. Excess glue at the end of the stainless insert is a problem you don't need.
Clamp the stainless insert to the pen tube to keep it tight. Wipe off any excess glue.
Use the cap mandrel to insert the black plastic liner. Have it unscrewed a bit. Be SURE the end of the black liner is about 1/16" inside the lip. Not flush!!! Get off any excess glue. Unscrew more to push in farther if needed.
I make rings so I own a boring bar to hollow ring cores. I provided a link below, yes it costs money. I use this right after the glue is dry to clean out the inside of the recess near the black liner. Be easy and take light passes. Try the cap threaded to the pen body. If there is a gap, try very slightly opening up the diameter just above the black liner. You in essence make the hole very slightly larger. Test the fit. If needed, slightly cut back the black liner. Be gentle and take a tiny bit of plastic off. Try again. Do this until there is a tight fit.
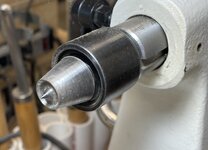
I use a 3/8" collet chuck to hold Kate's mandrel. Use the mandrel for the cap and a spur center in the tailstock. Just barely touch the end to stabilize it and reduce chatter.
Turn very carefully and take light passes- lighter than typical turning or else.
Decide on a diameter that pleases you. Get it even!
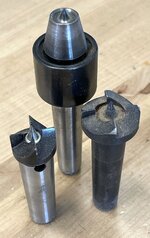
Move the tailstock away and get your toolrest ready to round the end. I use a round carbide cutter to VERY carefully round the end.
Sand and clean with DNA
Put a tiny drop of oil in the tiny threads of the pen body mandrel before joining them.
Use the spur center for the longer pen body. Don't force it in; just support it. Again turn carefully and very slowly. When you think it is right, try it mated to the cap. If not happy turn some more. When you are done with the diameter, turn the end carefully. It is fun if you take very light cuts with the tool firmly on the toolrest. If not- you'll wish you did.
Sand and clean with DNA
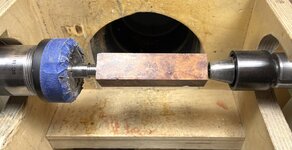
With the mandrels in the cap and pen body -cover the part of the mandrel near the wood with blue tape. Leave the 3/8" stub uncovered.
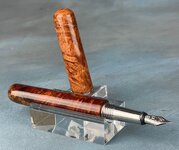
Finish with CA. I use four coats of thin (5cps) CA and 12 coats of thin (50cps) Pen Finish CA. See finished pen below. Let sit and cure.
Remove the mandrels carefully as they may be partially stuck. Remove tape where possible. Get it all off the mandrels.
I now use pen jaws in the headstock. I am careful not to apply much pressure to damage the finish.
I turn the end of the cap (using a square or 2" radius carbide tool) just a tiny amount to remove CA and flush up the end. Be easy. It should look flush quickly.
I turn the pen body with the same tool to flush up the shoulder near the stainless insert. Just a tiny cut will make the difference, you'll see.
Use gloves! Take a small piece of blue towel and put a drop of thin 5cps CA. Touch the open end of the cap where you just flushed it up to the wet spot. Rotate the cap as you do. Do this three times and set it aside to dry. I do this with the ends of every pen I make!!!
Get a new blue towel piece l, fold it to have a sharp corner and add the same CA drop. This time you want to coat the wood rim near the stainless insert. Rotate it.
Sand on the lathe but not with it spinning at all. I use 400 grit sandpaper, abranet 400 grit, maroon scotch brite, gray scotch brite and white. Lateral passes are best.
I buff each piece, still on the mandrel using the first two wheels of the Beale buffing system. Be careful to hold on more tightly than usual. There is not much to hold onto so take more time. Just buff a portion at a time until completion.
I buff the open end of the cap a bit. I buff the junction of the wood and the stainless insert at the EDGE of the buffs since it will discolor your buff quickly.
Clean out both tubes and assemble.
I hope this helps!!! Sorry about excessive tiny.
Buy Rick Herrell's step drills. Mark the correct length and stick to it.
Use very small amounts of epoxy glue applied to the middle of the cap insert and the same with the stainless steel nib connector. Excess glue at the end of the stainless insert is a problem you don't need.
Clamp the stainless insert to the pen tube to keep it tight. Wipe off any excess glue.
Use the cap mandrel to insert the black plastic liner. Have it unscrewed a bit. Be SURE the end of the black liner is about 1/16" inside the lip. Not flush!!! Get off any excess glue. Unscrew more to push in farther if needed.
I make rings so I own a boring bar to hollow ring cores. I provided a link below, yes it costs money. I use this right after the glue is dry to clean out the inside of the recess near the black liner. Be easy and take light passes. Try the cap threaded to the pen body. If there is a gap, try very slightly opening up the diameter just above the black liner. You in essence make the hole very slightly larger. Test the fit. If needed, slightly cut back the black liner. Be gentle and take a tiny bit of plastic off. Try again. Do this until there is a tight fit.
I use a 3/8" collet chuck to hold Kate's mandrel. Use the mandrel for the cap and a spur center in the tailstock. Just barely touch the end to stabilize it and reduce chatter.
Turn very carefully and take light passes- lighter than typical turning or else.
Decide on a diameter that pleases you. Get it even!
Move the tailstock away and get your toolrest ready to round the end. I use a round carbide cutter to VERY carefully round the end.
Sand and clean with DNA
Put a tiny drop of oil in the tiny threads of the pen body mandrel before joining them.
Use the spur center for the longer pen body. Don't force it in; just support it. Again turn carefully and very slowly. When you think it is right, try it mated to the cap. If not happy turn some more. When you are done with the diameter, turn the end carefully. It is fun if you take very light cuts with the tool firmly on the toolrest. If not- you'll wish you did.
Sand and clean with DNA
With the mandrels in the cap and pen body -cover the part of the mandrel near the wood with blue tape. Leave the 3/8" stub uncovered.
Finish with CA. I use four coats of thin (5cps) CA and 12 coats of thin (50cps) Pen Finish CA. See finished pen below. Let sit and cure.
Remove the mandrels carefully as they may be partially stuck. Remove tape where possible. Get it all off the mandrels.
I now use pen jaws in the headstock. I am careful not to apply much pressure to damage the finish.
I turn the end of the cap (using a square or 2" radius carbide tool) just a tiny amount to remove CA and flush up the end. Be easy. It should look flush quickly.
I turn the pen body with the same tool to flush up the shoulder near the stainless insert. Just a tiny cut will make the difference, you'll see.
Use gloves! Take a small piece of blue towel and put a drop of thin 5cps CA. Touch the open end of the cap where you just flushed it up to the wet spot. Rotate the cap as you do. Do this three times and set it aside to dry. I do this with the ends of every pen I make!!!
Get a new blue towel piece l, fold it to have a sharp corner and add the same CA drop. This time you want to coat the wood rim near the stainless insert. Rotate it.
Sand on the lathe but not with it spinning at all. I use 400 grit sandpaper, abranet 400 grit, maroon scotch brite, gray scotch brite and white. Lateral passes are best.
I buff each piece, still on the mandrel using the first two wheels of the Beale buffing system. Be careful to hold on more tightly than usual. There is not much to hold onto so take more time. Just buff a portion at a time until completion.
I buff the open end of the cap a bit. I buff the junction of the wood and the stainless insert at the EDGE of the buffs since it will discolor your buff quickly.
Clean out both tubes and assemble.
I hope this helps!!! Sorry about excessive tiny.
Attachments
Last edited: