Another Paua Abalone

Signed-In Members Don't See This Ad
See more from TDahl

TDahl

Member
Joined
Dec 11, 2019
Messages
1,903
Location
Brentwood
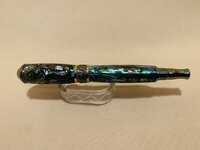
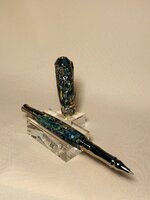
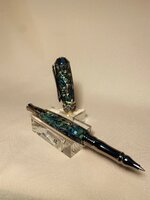
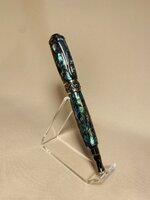
Here is another Paua Abalone pen I have recently completed, but with a different material. For this pen I used Paua Abalone veneers on the pen body, and individual Paua Abalone inlay pieces on the cap. I used the Noveau Septre Rolleball pen kit from PSI. The veneers were cut to 1/8" strips using a single edge razor blade (the blade was attached to a shop made razor blade saw handle for better leverage and control.) The individual pieces and strips were laid out on a preprinted design template using double sided tape prior to actually constructing the pen. This was actually like putting together a jigsaw puzzle in trying to minimize the gaps between the pieces.

The veneers had an adhesive backing which allowed them to be easily attached to the lower tube. The inlay pieces required some type of adhesive to attach to the upper tube. I used an emerald green nail polish to paint the tube and act as an adhesive for the inlay pieces. I found the working time for the nail polish ranged from three to five minutes which allows plenty of time to set the individual pieces in place. I should note that I brushed nail polish in the backs of each individual piece prior to setting them on the tube.

I used UV resin to seal the Paua Abalone strips and inlay pieces, and then casted the tubes with Polyester Resin.

Challenges

There were a few challenges along the way which mainly came from working with the inlay pieces. One challenge was in managing the thickness of the upper blank. The OD of the upper tube was approximately 12.25 mm and the thickness of the inlay pieces averaged between 1 to 2 mm. The narrowest point of the final diameter of the cap was 14.68 mm. This was an extremely narrow tolerance to work with when turning the upper blank.

Another challenge was taking the width of the individual inlay pieces when laying them out. Since the inlay pieces were mostly flat, the ends created height to the blank. I found the pieces could not be greater than 3/16" wide.

Things I would do (or try) differently

I have seen a few pens where the inlay pieces appear as if they overlapped each other. Considering the tolerance issue I stated above, the only way I could see this being accomplished is by carving larger inlay pieces with a rotary tool and a detailing bit. The desired result would be to have no gaps between the individual pieces.

Another aspect I might try differently is to paint the tubes black and use clear (or black) nail polish to fasten the pieces to the tube. I think this might give the effect of the pieces being in sort of a suspended state and giving the colors of the Paua Abalone a better contrast.

Being that this is the first time I have worked with Paua Abalone inlay material, I am fairly happy with the results.

As always, comments, questions, and critiques are encouraged. Thanks for reading.
 

Attachments

  • IMG_6675.jpg
    IMG_6675.jpg
    269.2 KB · Views: 132
  • IMG_6671.jpg
    IMG_6671.jpg
    315.3 KB · Views: 131
  • IMG_6673.jpg
    IMG_6673.jpg
    373.8 KB · Views: 115
  • IMG_6674.jpg
    IMG_6674.jpg
    292.3 KB · Views: 132
Signed-In Members Don't See This Ad
Very well done Tim in more ways than one. First and foremost thanks for the detailed explanation of the making of this beautiful pen. Next thanks for sharing the information and also sharing the posting of the pen. Must say well done on both ends of this pen using 2 different techniques. I have done a couple pens with the pieces of abalone as you described in your cap section. I have yet to try the strip section but it is on my to do list for sure. I recognized the trials and tribulations of laying out the abalone pieces and the time and effort it takes to do this method. finding a kit that has the room to use the pieces is tough.

The pen has that richy expensive look to it and would sell easily I bet. These types of pens are very hard to photograph because I have tried and am still looking for a method. I may try outdoors with sunshine to help. You did a good job. Thanks for showing.
 
Here is another Paua Abalone pen I have recently completed, but with a different material. For this pen I used Paua Abalone veneers on the pen body, and individual Paua Abalone inlay pieces on the cap. I used the Noveau Septre Rolleball pen kit from PSI. The veneers were cut to 1/8" strips using a single edge razor blade (the blade was attached to a shop made razor blade saw handle for better leverage and control.) The individual pieces and strips were laid out on a preprinted design template using double sided tape prior to actually constructing the pen. This was actually like putting together a jigsaw puzzle in trying to minimize the gaps between the pieces.

The veneers had an adhesive backing which allowed them to be easily attached to the lower tube. The inlay pieces required some type of adhesive to attach to the upper tube. I used an emerald green nail polish to paint the tube and act as an adhesive for the inlay pieces. I found the working time for the nail polish ranged from three to five minutes which allows plenty of time to set the individual pieces in place. I should note that I brushed nail polish in the backs of each individual piece prior to setting them on the tube.

I used UV resin to seal the Paua Abalone strips and inlay pieces, and then casted the tubes with Polyester Resin.

Challenges

There were a few challenges along the way which mainly came from working with the inlay pieces. One challenge was in managing the thickness of the upper blank. The OD of the upper tube was approximately 12.25 mm and the thickness of the inlay pieces averaged between 1 to 2 mm. The narrowest point of the final diameter of the cap was 14.68 mm. This was an extremely narrow tolerance to work with when turning the upper blank.

Another challenge was taking the width of the individual inlay pieces when laying them out. Since the inlay pieces were mostly flat, the ends created height to the blank. I found the pieces could not be greater than 3/16" wide.

Things I would do (or try) differently

I have seen a few pens where the inlay pieces appear as if they overlapped each other. Considering the tolerance issue I stated above, the only way I could see this being accomplished is by carving larger inlay pieces with a rotary tool and a detailing bit. The desired result would be to have no gaps between the individual pieces.

Another aspect I might try differently is to paint the tubes black and use clear (or black) nail polish to fasten the pieces to the tube. I think this might give the effect of the pieces being in sort of a suspended state and giving the colors of the Paua Abalone a better contrast.

Being that this is the first time I have worked with Paua Abalone inlay material, I am fairly happy with the results.

As always, comments, questions, and critiques are encouraged. Thanks for reading.
Tim: This its the pen you showed me last week and I can say then photos are OK but the pen is awesome and outstanding, great work.
 
I love the creativity!

Is it not possible to cut a continuous piece of the abalone material to fit the tube exactly, or is the thin strip method easier?

Either way, it made a spectacular pen. Thanks for sharing your process with us.
 
As mentioned nice work Tim! I also appreciate the detailed steps you took to make the pen. Not to take away from your post but to interact with the topic I have used both materials but a different process. The thin flexible sheets instead of cutting strips I just wrapped it around the tube. I overlapped the seam. With the dark material you can't see it without studying and looking for it. The lighter material you can see the edge when looking at an angle. As far as wrapping the sheet it does crack but there's a coating to keep it from falling apart. I figured you'll either have the lines from cutting strips or the cracking. The chips I painted the tubes black and used Alumilites Amazing sealer. It a thicker product similar to Elmers glue. I started in the middle of the tube and glued the pieces to the ends getting them as close together as possible. I didn't worry about gaps as long as they didn't look out of place or something missing. I cast both with Alumilite Clear Slow. When turning the chips I was worried about the pieces coming loose when turning. That wasn't a problem at all. The ones that were above the bushings turns down with regular tools with no issues. I sanded and polished the same as a regular acrylic blank. Once agian not saying this is better but I like to take others methods to see if I can make a better pen. Thanks
 
Very well done Tim in more ways than one. First and foremost thanks for the detailed explanation of the making of this beautiful pen. Next thanks for sharing the information and also sharing the posting of the pen. Must say well done on both ends of this pen using 2 different techniques. I have done a couple pens with the pieces of abalone as you described in your cap section. I have yet to try the strip section but it is on my to do list for sure. I recognized the trials and tribulations of laying out the abalone pieces and the time and effort it takes to do this method. finding a kit that has the room to use the pieces is tough.

The pen has that richy expensive look to it and would sell easily I bet. These types of pens are very hard to photograph because I have tried and am still looking for a method. I may try outdoors with sunshine to help. You did a good job. Thanks for showing.
Thank you JT
 
Tim: This its the pen you showed me last week and I can say then photos are OK but the pen is awesome and outstanding, great work.
Thanks Charlie. I agree the photo does not do the pen justice. I am pretty limited with my equipment. I would have tried to take the photos outside with more natural light, but of course I picked a day it was raining to photograph the pen.
 
I love the creativity!

Is it not possible to cut a continuous piece of the abalone material to fit the tube exactly, or is the thin strip method easier?

Either way, it made a spectacular pen. Thanks for sharing your process with us.
Thank you for the kind comments Derek. As far as the continuous piece goes, you can do that method using a flexible veneer. You will still have one seam, but you might be able to conceal it depending on the color. I found the flexible sheets don't have the same shine or sparkle that the coated veneers have. The coated sheets have a clear gloss coating on them which enhances the natural color and pattern of the veneer. I don't know if one method would be easier than the other, since both methods would present different challenges. I think it all depends on the look you are going for.

One advantage of the flexible veneer is you can cut patterns out of them. I am thinking of combining this method with another type of inlay material on a future pen.
 
Back
Top Bottom