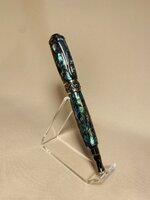
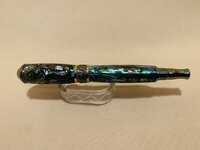
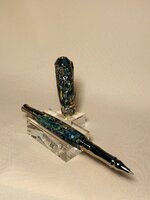
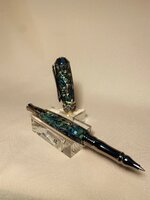
Here is another Paua Abalone pen I have recently completed, but with a different material. For this pen I used Paua Abalone veneers on the pen body, and individual Paua Abalone inlay pieces on the cap. I used the Noveau Septre Rolleball pen kit from PSI. The veneers were cut to 1/8" strips using a single edge razor blade (the blade was attached to a shop made razor blade saw handle for better leverage and control.) The individual pieces and strips were laid out on a preprinted design template using double sided tape prior to actually constructing the pen. This was actually like putting together a jigsaw puzzle in trying to minimize the gaps between the pieces.
The veneers had an adhesive backing which allowed them to be easily attached to the lower tube. The inlay pieces required some type of adhesive to attach to the upper tube. I used an emerald green nail polish to paint the tube and act as an adhesive for the inlay pieces. I found the working time for the nail polish ranged from three to five minutes which allows plenty of time to set the individual pieces in place. I should note that I brushed nail polish in the backs of each individual piece prior to setting them on the tube.
I used UV resin to seal the Paua Abalone strips and inlay pieces, and then casted the tubes with Polyester Resin.
Challenges
There were a few challenges along the way which mainly came from working with the inlay pieces. One challenge was in managing the thickness of the upper blank. The OD of the upper tube was approximately 12.25 mm and the thickness of the inlay pieces averaged between 1 to 2 mm. The narrowest point of the final diameter of the cap was 14.68 mm. This was an extremely narrow tolerance to work with when turning the upper blank.
Another challenge was taking the width of the individual inlay pieces when laying them out. Since the inlay pieces were mostly flat, the ends created height to the blank. I found the pieces could not be greater than 3/16" wide.
Things I would do (or try) differently
I have seen a few pens where the inlay pieces appear as if they overlapped each other. Considering the tolerance issue I stated above, the only way I could see this being accomplished is by carving larger inlay pieces with a rotary tool and a detailing bit. The desired result would be to have no gaps between the individual pieces.
Another aspect I might try differently is to paint the tubes black and use clear (or black) nail polish to fasten the pieces to the tube. I think this might give the effect of the pieces being in sort of a suspended state and giving the colors of the Paua Abalone a better contrast.
Being that this is the first time I have worked with Paua Abalone inlay material, I am fairly happy with the results.
As always, comments, questions, and critiques are encouraged. Thanks for reading.