If the Manager Kit is like the Jr. Series kits with two tubes (which I think it is), a lower tube with an Endcap and the nib and the upper tube having the Clip-Cap and threaded Center Band.
The process would be to turn the blank with the pattern matching in the center. The center of the blank, where the patterns match, would face each other in the center.
EndCap ----- Lower Tube ------ Nib Center ----- Upper Tube ----- Clip-Cap
The Pattern Alignment happens during assembly when done in this order:
1) press the Nib Coupler into the lower blank.
2) press the Cap into the lower blank.
3) screw the Center Band onto the Nib Coupler
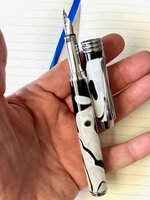
4) Align the Pattern on the Upper Blank with the pattern on the Lower Blank
4) Lightly (by hand) press the Upper Blank onto the Center Band with the desired alignment
5) Carefully unscrew the lightly pressed Center Band (and Upper Blank) from the Lower Blank
6) Press the Center Band all the way into the Upper Blank.
Now, when the two are screwed back together, the pattern should match.
7) Press the Cap-Clip into the Upper Blank.
This is essentially the process that Ed explains in his video:
Assemble Junior Series from ExoticBlanks.com.
Dave