About to totally give up on CA...(I know this subject has been beaten to death)

Signed-In Members Don't See This Ad

Shooter-55

Member
Joined
Jan 8, 2020
Messages
25
Location
Ohio
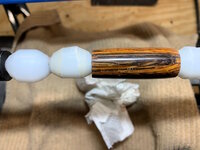
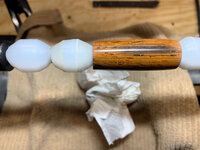
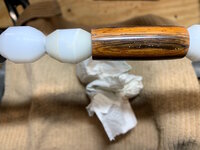
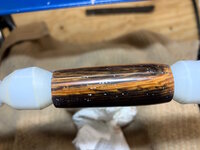
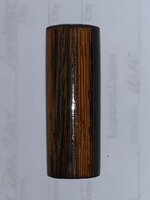
It's making me crazy. Get the blank to perfect sanded finish, smooth as glass, then try to apply CA and screw it up causing white embedded streaks. Here is what I've tried to do:
1. Sand to at least 400 up to 600 grit
2. Blow off blank
3. Clean with DNA
4. 3 coats sanding sealer (1/2 SS - 1/2 Laq thinner) Have done with and without.
5. Apply 3 coats Thin CA
6. Apply 6-9 coats Med CA
7. Sand up to 600 again to smooth finish.
This is where my issues are. After sanding, blowing off and cleaning with DNA, embedded streaks appear in what I think are crevices in the grain. At this point, I stop and don't go to the MM. I just sand down to bare blank and apply Pens Plus and get a decent, (although not as mirror-like) acceptable finish. I have tried many suggested processes as shown on the forum, but am at wits end on this.
Heres some questions:
1. When applying CA on a porous blank with visible "crevices", will enough coats fill those in or will it just build up the ridges and they are still there. If it does fill, am I not putting enough CA on?
2. When used, is Sanding Sealer exacerbation my issue?
3. When sanding after applying CA, can the lathe speed actually "melt" the CA and cause this. If so, what speed should I be sanding with?
4. Should I be using Acetone instead of DNA?
5. Does lathe speed contribute to the tear-out which makes this occur?
I realize that many of you have many years of experience, and I'm just starting out, so don't judge me too harshly if I am totally missing something. I want to be a sponge and absorb any advice or suggestions as to doing this and get the best possible finish I can do.
I appreciate any help provided.
Tim
 
Signed-In Members Don't See This Ad

elyk864

Member
Joined
Jun 12, 2017
Messages
354
Location
Phoenix, AZ
I spin the lathe by hand when applying and I also use foam pads to apply the finish. You may be seeing fibers from paper towels in there.
 

FGarbrecht

Member
Joined
Aug 22, 2019
Messages
618
Location
NY
Post a pic if possible. One issue may be with your sanding sealer. Mylands cellulose sanding sealer can function as a CA accelerator if it is not allowed to cure completely before starting CA application, which can lead to extreme heat generation and can destroy the CA finish (I've seen smoking and melted gloves!). If you need a sealer (open pore / grain woods or you just like the appearance), let it sit for at least an hour or two or overnight before starting CA steps.
 

bsshog40

Member
Joined
Oct 2, 2018
Messages
2,354
Location
Omaha, Tx
Everyone has thier own process as you will find out. This is what I do and has worked great with no issues.
I sand up to 800.
I air off with compressor.
I wipe down with DNA.
I then start CA process with lathe at my slowest speed of 720rpm
I start with 5 coats thin ca.
I then apply about 3-4 coats med. CA. and spray with excelerant.
I then MM with 6,000 and 12,000 just to knock down and papertowel dust.
I then go back to applying med. CA until I like the finish.
I always make sure that each coat of CA is completely dry before the next coat.
Just to add as to why I accelerate in the middle of my process. I have found that the finals coats of CA tend to cure much faster.
Anyway, that's my story and I'm sticking to it. Lol
 

Aces-High

Member
Joined
Jun 22, 2017
Messages
942
Location
Boulder, Colorado
Hi Tim!

Thanks for posting. I know sometimes people hesitate because they imagine getting beat down for not knowing. How are we suppose to know without asking and researching.... Anyway.

Your first 7 steps:

Ditch #3. If you would like to do acetone instead, fine. DNA contains water. Thought I don't think this is the issue..
Ditch #4. Never hear of using sanding sealer on a pen with a ca finish. If you want to use the sealer, I would sand after using it. One of the things that sealer does is raise wood grain.
#7. Here is where, without seeing, I think your issue might be. After applying the ca, do you start sanding with something like 400 like I do? In this first sanding after ca, you have to make sure you are not leaving any shiny spots on the blank. It has to be 100% dull in appearance. Nothing left untouched by that first sanding. If there are streaks running with the grain of the wood, you probably did not have the actual wood smooth enough before adding the ca, you will have to sand back to where it is all smooth, having filled in the wood gaps with ca, before applying more ca again.

Your questions:

1. Yes, ca will fill those gaps, but you may have to sand up to 600 before applying your final layers of ca.. and yes.
2. Maybe, never used it, never heard of using it.
3. Yes, don't sand at a high enough rpm that you are building unnecessary heat. Warm is ok, hot is not.
4. Couldn't hurt.
5. With porous woods tear out is something to watch out for...what tools are you using? Gouges or carbide? If you only use carbide you can set it at a skewed angle and get a cleaner cut.

Hope this helps. I'm sure others will add to things I forgot. The vid above is great btw.

Jason
 

jttheclockman

Member
Joined
Feb 22, 2005
Messages
19,082
Location
NJ, USA.
The CA finish has been around for many many years now and over those years many formulations of CA have been developed and tried along with many methods of applying. We as pen makers have tried many of these options and probably have fallen in love with a product or technique that has worked for US. That is the key word. US. You will too over time. To answer your question in my eyes and thoughts is very plain. First off lose the sanding sealer. Not needed. A wood blank sanded to 600 to 800 grit is all that is needed. Apply 3 to 4 coats of thin CA, which will seal the wood but will do nothing to fill in grain lines or other defects. (way too thin for that) You should not have to sand this down at all so do not add sanding dust because it will cause your problem and be tough to get out. The next time you sand should be for your final finishing method. Now apply about 6 coats of med CA or more depending on the grain lines depth. I like to apply with blue shop towels and make 2 swipes. drip on slow moving blank and wipe one way and then back. That is one coat. Do this for all coats. I do not use accelerator. I let the lathe spin and let the CA dry to touch on its own. After all coats are applied I start my finishing process with 1200 grit wet dry paper and always use water as my lubricant. I then go to 1500 and then 2000 and switch to MM. All the time using water. After the 2000. I will be able to tell if there is any low spots or defects because of the dull and shiny areas that someone else mentioned. I fill those in and start again. Till I get no shiny spots is when I move to MM.

This is my method. What you are seeing with those white lines is sanding dust. Need to clean that out and yes Med CA will fill in grin lines and defects. Good luck.
 

Humongous

Member
Joined
Feb 20, 2019
Messages
382
Location
Canandaigua, NY
My process is very similar to JT's. I don't use accelerator and will wait 20-30 min between coats of medium, since I'm not doing production it doesn't impact me to wait. I only wait maybe 5 min between coats of thin because it sets up much faster. I will also let the blank sit overnight before going to the MM to wet sand. The only time I get white spots is when I rush the process.
 

Shooter-55

Member
Joined
Jan 8, 2020
Messages
25
Location
Ohio
Gentlemen. First of all, thank you for your input on my issue. I decided to do a basic blank and use basic processes on some Wenge. This is what I did. After turning down to round, I inspected the blank for pits, crevices and indentions or tear-out. I observed some of each of those and proceeded to sand using 320/400/600 sand paper taking care to sand with grain after each use. I also cleaned with DNA between each grit. After getting the blank smooth to touch I inspected again after I cleaned with DNA. I saw that the sanding did not eliminate the issues I saw before sanding. I applied 5 coats of Thin CA. I the applied 12 coats of Med. CA. I looked after each application for inclusions and paid particular attention to those areas to make sure I concentrated to try and fill with the med CA prior to sanding. After my 12th coat, I believed that I had taken care of any of those. I next started to sand using 400 grit making sure (or thought I did) the entire blank was hazy from using the sandpaper. When I cleaned the blank, this is what I got.
My question is this. When I applied the Med CA, did I not use enough to build it up. Using 12 coats, I thought , would be enough, but apparently not. I did try and sand down to the spots, but have yet to reach them.
Appreciate more help and input.
Thanks,
 

Attachments

  • IMG_0724.jpg
    IMG_0724.jpg
    192.1 KB · Views: 343
  • IMG_0723.jpg
    IMG_0723.jpg
    195.5 KB · Views: 339
  • IMG_0722.jpg
    IMG_0722.jpg
    185.5 KB · Views: 373
  • IMG_0721.jpg
    IMG_0721.jpg
    179.6 KB · Views: 339

bsshog40

Member
Joined
Oct 2, 2018
Messages
2,354
Location
Omaha, Tx
Not quite sure what the white spots are. I do know that after applying all my coats of CA, that I go to mm starting at about 6,000. I never go back using sandpaper harsher than what I ended with. The 400 may be digging into your CA. Remember that after applying ca, you now have a plastic finish. If there are any porous spots on the blank, you may be forcing the ca into those holes using 400 grit.
 

Humongous

Member
Joined
Feb 20, 2019
Messages
382
Location
Canandaigua, NY
I have heard of people using a water mist as an accelerator substitute. I have also done an experiment using an exhaled breath to set the CA. In most cases these result in "blooming" which is not what we want for finishing and I think this what you are experiencing. The following is from the Resinlab website.

Cyanoacrylate Frosting or Blooming


What is cyanoacrylate frosting or blooming?
The technical term for cyanoacrylate frosting or blooming is chlorosis. It refers to when excess cyanoacrylate monomers vaporize or become airborne, reacting with moisture in the air. The monomers then cure into small particles that fall onto the area around the bond line. This is the white residue you often see on darker parts bonded with a cyanoacrylate.

What causes cyanoacrylate frosting or blooming?
This frosting or bloom residue is a by-product of an instant adhesive cure process and only occurs while the cyanoacrylate is curing. The worst cases of chlorosis happen when a part is packed into a container or plastic bag before the cyanoacrylate is fully cured or polymerized.

Is cyanoacrylate frosting or blooming harmful?
While frosting or blooming does not compromise the strength or integrity of a bond, it does disrupt the aesthetic appearance of an application. This can be an issue when smooth, clean lines are desired.

How can you prevent cyanoacrylate frosting or blooming?
  • Use a small amount of adhesive per application to minimize excess cyanoacrylate present or available to vaporize.
  • Use an accelerator to increase cure speed which doesn't allow time for uncured cyanoacrylate to vaporize.
  • Use adequate ventilation to "blow away" these cured particles, never allowing them to fall on the part.
  • Use a low bloom, low odor cyanoacrylates like ResinLab Cynergy Zero which are formulated to minimize bloom, odor, and worker irritation.

I have also seen blooming when using too much accelerator.
As others have stated DNA has some water in it and can contribute to the problem, I use Acetone instead. Using thin coats and waiting until it fully sets, no sanding between coats, letting set overnight before wet sanding. These have helped me greatly reduce white spots. I also only use 0000 steel wool to knock down the high spots before starting MM.

Those deep crevices will have the thickest CA and will be the last to cure, that's why I wait. It may be over kill but it has worked for me.
 

magpens

Member
Joined
Feb 2, 2011
Messages
15,913
Location
Canada
It takes a long time to develop a technique for finishing a pen with CA.

But don't give up, you will get there eventually.

IMHO, it is important to not use any other finishes or fluids on your pen if you are going to apply CA. . White spots/streaks result.

It is not so important to get a "glass-like" sanded finish before applying CA ... sanding wood to 600 grit is usually smooth enough .

I use only thin CA. (no medium, no thick)

With the lathe turning very slowly (about 15 RPM, yes that's fifteen ... ) ....

Apply two CA coats and sand with 320 grit or 400 grit ... just enough sanding to take off the high spots ... the lows will get filled up as you proceed.
Wait a few seconds and do a light spray of accelerator before trying to do any sanding ... the light accelerator spray is an important step and you have to be sure the surface has all been covered ... lightly ... before you sand. . How long to wait before sanding ? . Five seconds or so. . You can spread the accelerator gently with your finger to make sure the accelerator has covered the whole surface and done its job of hardening up (I hesitate to say curing) the CA.

Clean off sanding dust with a rag, possibly moistened with alcohol (but not essential).

Apply another two coats and sand again after another light spray of accelerator.
Another two coats, and you should find that the "lows" have largely filled up, and you can sand more aggressively, perhaps with 240 grit, but don't sand down to bare wood.
Another two coats and sand.
After 10 coats you should be getting close to the end and your sanding will yield a pretty smooth and continuous surface.

You can now decide whether to add more CA.

At some point you will make the decision to proceed with your final sanding sequence of 240, 320 400, 600, 800 1000, 1500, 2000.
You should now have the lathe power off and turn the headstock by hand. . Your sanding strokes should be lengthwise, parallel to the blank.
You can even stop at 800, and then use a coarse automotive "cut polish" like "Mequiar's 49" or equivalent.
You can next use a fine "cut polish" if you wish.
Finally, a plastic polish like "PlastiX" or equiv.

Everybody's method is a little different. . You pretty much have to work out your own. . No other fluids/finishes/waxes for me before using CA.

You have now read many methods. . No single one of them should be regarded as the only fixed recipe for success. . You'll find your own way.
 
Last edited:

jttheclockman

Member
Joined
Feb 22, 2005
Messages
19,082
Location
NJ, USA.
First off 12 coats should have been plenty but we do not what your version of a coat is. You should allow a more ample coat when you first apply the Med CA. That is your starting point. Those white dots are sanding dust from the CA. If you you are good with a skew you could very easily level the blank after the last coat of CA and skip any sandpaper work. MM will not give you that white dust especially if you use water as a lubricant. Now we can go back to the original blank and before you start any finishing technique you can use some wood putty or paste and this will fill in those divots. Use a black so it actually enhances the grain lines for you are not trying to hide them. Now when sanding and I have said this many times on this site, do not sand with your fingers as the backer for the sandpaper. Use a block of wood or a strip of wood and wrap the paper around it. What this does is sands the blank evenly by applying equal pressure to all parts of the blank. Wood will have soft spots due to grains and just mother nature. So those soft spots will sand faster and more of that the harder spots. That is why sometimes you see out of round blanks show up here too. All these things are learning aspects of this hobby. Stick with it you will figure it out.

I see Mal posted while I was doing this and agree to some but whole heartly disagree with the so much sanding thing between layers. You are just asking for that dust and trouble. Now this is his method and works well for him but will tell you do not do that for a beginner. I mean no disrespect.
 

magpens

Member
Joined
Feb 2, 2011
Messages
15,913
Location
Canada
By the way, I see that John has commented on my methodology.

I am telling you honestly what works for me. . What John says works for him ... I don't dispute that. . But I would not waste my time telling you my methods if they do not work for me. . As I said, everyone develops their own methods for CA. . You are not alone going through this process.

Sanding between ever second coat of CA works for me, and I think that wiping off sanding dust is an important part of it. . You can even sand LIGHTLY after every coat of CA once you have built up the CA thickness. . I sometimes think that the CA sanding dust actually gets incorporated into the next application of the CA glue, but I don't know for sure - I don't seem to have a problem with the CA dust. . Just make sure that you are not sanding right through to the wood because I do know that wood dust will affect the CA, causing blips and specs to develop.

LATER EDIT:
Perhaps I should explain further my reason for sanding between CA coats so that folks know that I do have a reason : --
I want to bring down the high spots ... and CA does tend to form tiny "peaks", for whatever reason, with the first few coats (could be wood fibers).
I take down the highs, and let the lows fill with subsequent applications of CA.
I thought this was a brilliant stroke of insight, but could be that others do not agree with me ... however, seems to work for me.
 
Last edited:

Shooter-55

Member
Joined
Jan 8, 2020
Messages
25
Location
Ohio
Response meant for BSSHOG40:
Good possibility of that. Never thought of it that way. I used your process as outlined above, and guess what. Positive results. I re-finish a cocobolo and a zebrawood trimline I did last evening. Originally finished with Pens Plus. Now finished with CA using your recipe and they now look great. Thanks for the help. (1st attempt at your recipe attached)
I appreciate all the input and will continue to try other systems offered. I don't want to muddy the water by mixing and matching some suggestions. I will try other ways and report on the progress. I sincerely appreciate all of your help as I want to be the best I can be in this. Thanks again.
 

Attachments

  • IMG_0728.jpg
    IMG_0728.jpg
    168.6 KB · Views: 267
Last edited:

John Murray

Member
Joined
Nov 26, 2018
Messages
23
Location
La Mirada, CA
The only time I have had similar issues as the white spots is when it was raining. I work on my lathe with the garage door open and I have learned to not even try and use a CA finish when it is raining, which fortunately for me, is rare here in So Cal. Not sure what your weather situation is, but just wanted to add one other variable that I have experienced.
 

Shooter-55

Member
Joined
Jan 8, 2020
Messages
25
Location
Ohio
The only time I have had similar issues as the white spots is when it was raining. I work on my lathe with the garage door open and I have learned to not even try and use a CA finish when it is raining, which fortunately for me, is rare here in So Cal. Not sure what your weather situation is, but just wanted to add one other variable that I have experienced.
Thanks John. Rain in SoCal.....no way. I lived there also and know that is infrequent to get rain except for this time of year. As a matter of fact, I ran a company in LaMirada until 2000. On Firestone Blvd. Thanks for the response. Tim
 

grebmar

Member
Joined
Mar 9, 2019
Messages
56
Location
Kirksville, Missouri
Regarding substituting denatured alcohol with acetone to get rid of water, acetone will also have water in it, and any acetone in a container will fairly quickly absorb water from the atmosphere. Only a solvent like terpentine or mineral spirits would have very little water in it, although I don't know if these would work for cleaning the blank before applying CA.
 

Mortalis

Member
Joined
Aug 19, 2013
Messages
658
Location
Bardstown, Ky
  • After turning the blank to near complete shape I will use 400 grit sandpaper to final shape. No finer. Many times I will use 240 if I really need to shape the profile.
  • After sanding I use my compressor and spray nozzle to remove as much dust as I can. I then will use my fingers (without gloves) and the moisture/oil/whatever moisture is there to remove the final bits of dust.
  • I then inspect for any large voids or crevices or craters. I do not worry about porosity of the grain as the CA will fill that in.
  • I do not use anything else to clean the blank. I have had all kinds of issues, including what you picture, using Denatured Alcohol. I've never used sanding sealer.
  • I then prepare my paper towel by folding it length-wise in approx 1" wide folds until the entire papertowel is folded.
  • With a Nitrile glove on my hand that will hold the paper towel I turn on the lathe as slow as it will go and hold the paper towel end just so it is touching the underside of the blank at its diameter at one end of the blank supported with my index finger.
  • I drip thin CA onto the edge of the blank so that it will run onto the paper towel. A drip or two and then move the paper towel slowly along the length of the blank while continuing to drip CA as I go. Once at the other end of the blank I stop dripping the CA glue and smooth the coat I just applied with a couple passes. After the coating is relatively smooth I step away. Just step away. Leave the lathe running.
  • Wait a few minutes and I test for wetness of the coating with the back of one finger ever so lightly. If there is no resistance and my finger is not wet, I continue with 3 more coats. After each coat I cut the tip of the paper towel to use a virgin end. The paper towel will/may smoke a bit at first when you set i t down after the application.
  • I do not sand in between coats unless I've screwed up and messed up the smoothness of the coating.
  • I then begin to apply Med CA for 3 or 4 coats in the same manner. The dry time takes considerably longer but still test the dryness as before with the back of my finger. Again, I do not sand in between coats.
  • Once I have the 3 or 4 coats of Med CA dried I begin my sanding.
  • I use MM only. I have the small square spongy pad set. I have them numbered with dots along the edge so I can easily remember the sequence, 1 through 8 or 9 (I dont really remember how many there are off the top of my head). I wipe the powder off on my shop jacket as each pad gets white. I do not allow the powder to build up any more than I need to.
  • After each grit I will remove the residue with a separate paper towel from the one I was applying with and then my hand/fingers lightly around the blank. This removes any residue grit that may be left behind.
  • For the first grit I sand until the entire blank is dulled and no shiny spots are left. I will progress through the first 3 or 4 grits at the low speed on the lathe. each successive 3 or 4 grits I bump the speed a bit. Do not apply too much pressure or the blank will over heat and weaken the glue used to mount the blank to the tube. Plus its not good for the MM.
  • I will normally see a shine develop by the 4th or 5th pad.
I have had the issue you show and normally it due to dust not removed before application of the CA or water trapped. I've also encountered it when I've used CA glue that has gone old and doesnt dry very well or completely.
 

Shooter-55

Member
Joined
Jan 8, 2020
Messages
25
Location
Ohio
  • After turning the blank to near complete shape I will use 400 grit sandpaper to final shape. No finer. Many times I will use 240 if I really need to shape the profile.
  • After sanding I use my compressor and spray nozzle to remove as much dust as I can. I then will use my fingers (without gloves) and the moisture/oil/whatever moisture is there to remove the final bits of dust.
  • I then inspect for any large voids or crevices or craters. I do not worry about porosity of the grain as the CA will fill that in.
  • I do not use anything else to clean the blank. I have had all kinds of issues, including what you picture, using Denatured Alcohol. I've never used sanding sealer.
  • I then prepare my paper towel by folding it length-wise in approx 1" wide folds until the entire papertowel is folded.
  • With a Nitrile glove on my hand that will hold the paper towel I turn on the lathe as slow as it will go and hold the paper towel end just so it is touching the underside of the blank at its diameter at one end of the blank supported with my index finger.
  • I drip thin CA onto the edge of the blank so that it will run onto the paper towel. A drip or two and then move the paper towel slowly along the length of the blank while continuing to drip CA as I go. Once at the other end of the blank I stop dripping the CA glue and smooth the coat I just applied with a couple passes. After the coating is relatively smooth I step away. Just step away. Leave the lathe running.
  • Wait a few minutes and I test for wetness of the coating with the back of one finger ever so lightly. If there is no resistance and my finger is not wet, I continue with 3 more coats. After each coat I cut the tip of the paper towel to use a virgin end. The paper towel will/may smoke a bit at first when you set i t down after the application.
  • I do not sand in between coats unless I've screwed up and messed up the smoothness of the coating.
  • I then begin to apply Med CA for 3 or 4 coats in the same manner. The dry time takes considerably longer but still test the dryness as before with the back of my finger. Again, I do not sand in between coats.
  • Once I have the 3 or 4 coats of Med CA dried I begin my sanding.
  • I use MM only. I have the small square spongy pad set. I have them numbered with dots along the edge so I can easily remember the sequence, 1 through 8 or 9 (I dont really remember how many there are off the top of my head). I wipe the powder off on my shop jacket as each pad gets white. I do not allow the powder to build up any more than I need to.
  • After each grit I will remove the residue with a separate paper towel from the one I was applying with and then my hand/fingers lightly around the blank. This removes any residue grit that may be left behind.
  • For the first grit I sand until the entire blank is dulled and no shiny spots are left. I will progress through the first 3 or 4 grits at the low speed on the lathe. each successive 3 or 4 grits I bump the speed a bit. Do not apply too much pressure or the blank will over heat and weaken the glue used to mount the blank to the tube. Plus its not good for the MM.
  • I will normally see a shine develop by the 4th or 5th pad.
I have had the issue you show and normally it due to dust not removed before application of the CA or water trapped. I've also encountered it when I've used CA glue that has gone old and doesnt dry very well or completely.
Thank you for your reply. This is the process I used in getting a good result as explained in an earlier thread. Apparently my issue was not going right to the MM after using the CA. When I did that, everything was good. Again, thank you for your reply. I'll learn more as I gain experience
 

mg_dreyer

Member
Joined
Dec 1, 2006
Messages
839
Location
Aurora, Ill, USA.
Much like Ed - I exclusively use GluBoost. I find it the most consistent and easy to use liquid finish.

My IAP Review:
IAP Review

My YouTube Video:
GluBoost Video

My Promise:
You come to the Midwest Penturners Gathering and you can try it as much as you like. I will have tons of blanks.
MPG
 

bsshog40

Member
Joined
Oct 2, 2018
Messages
2,354
Location
Omaha, Tx
I hear a lot about gluboost. I've never tried it before. May get some one day and check it out. I have used smiths ca since I've started and never had a problem with it.
 

leehljp

Member Liaison
Joined
Feb 6, 2005
Messages
9,314
Location
Tunica, Mississippi,
Agree with John T above. Do NOT sand between coats of thin when sealing. Sanding dust will get into the pores. Come back with medium or thick to fill in the pores. This is where I tend to disagree with the regular method of applying CA. You have already applied medium CA in numerous coats over the thin and still have open pores. The reason for that is that the paper towel is absorbing far more CA than is getting onto and into the pores.

As mentioned above, use foam or plastic baggies to apply the medium CA until it fills in and covers the pores.

Three Suggestions:

1. Understanding CA Application Medium i.e. Paper towels vs foam, bags etc.: Estimation of application pressure is HIGHLY SUBJECTIVE. Many recommend Paper towel and some do not. So which is it? WHY? . . . What is NOT understood - is the difference in people. We all assume that we are the standard or that we all are like everyone else because the application of CA is not dependent upon the individual. WRONG. What one person thinks is "light pressure" to another is "heavy pressure". Light pressure in applying CA will allow more to get onto the blank, while heavy pressure will force most of the CA into the paper towel and less onto the blank.

A 175 lb pipe fitter or farmer or plumber or construction person will call "heavy pressure" as "light". A 225 lb accountant will say that he is applying heavy pressure in applying the CA with paper towel when in fact it might be light pressure as judged by most. On another woodworking forum about 10 -12 years ago I was taken aback by one fellows comment that the black hand spring clamps with orange tips are too strong for him to use. He also said he had no cordless drill or impact driver beyond 12V. In observation of his pictures in his shop, he weighed a good 200 lbs. At that time, I weighed less than him but thought that the 18-20V cordless tools were still relatively weak and the clamps were not strong enough. When it comes to apply CA, the amount of pressure to get CA Buildup Onto the Blank is determined by the actual pressure, and different individuals will consider it differently, and argue about it. What one calls light, the other will say heavy. Apply too much pressure to rub it in will force more into the paper towel. The pressure level is highly subjective to us and we don't realize the contrast value from one to the other,

I lived overseas when I started turning, and CA was expensive and harder to get in anything more than 1 ounce. Paper towel absorbed as much as and more than got onto the pen. So I learned quickly to use other methods that did not absorb the CA. For others who tend to grip and want to force just a little more onto the blank - they may find that they are not getting a good build up. Nothing wrong with that, but it takes one to recognize if it is working for them or not, an if not, try another method. If one barely grips the blank with the CA/paper towel application, they may get a great build up of CA rather quickly. Again, this is a subjective issue.

2. Calipers. Get a good pair of calipers and MEASURE the amount of buildup. Calipers will tell you how much build up you have. Measure the turned blank. Then CA with thin for sealing. Next apply a couple of applications of Medium. Measure. You may find that you are not getting as much of a build up as you think.

3. Practice, practice, practice. I have only seen one person reject this idea in writing on this forum, although there probably are more. After 4 or 5 pens and inconsistency, I got a 2x4 pine cut-off and cut it into 10 to 12 blanks, drilled holes, inserted some extra tubes and spent a Saturday practicing. The end goal was not a pen but to learn the processes. Kind of like the Karate Kid's "Wax On, Wax Off" lesson. I learned reasonable application of CA in that one day. The problem for me (and many) with making a pen in the process of learning is that I tend to look forward to the end results and concentrate less on the process at that moment. This is what causes problems down the road. "This did not happen before" we claim. We skipped the detailed learning process and kept anticipating the finished product before it arrived.

I don't know how much you are an American Football follower but a great example is this: Ever see a star receiver who is the best at what he does, but suddenly he sees the football coming and he looks to see where he is going to run before he catches it - then he drops it. Pens are like that. As one guy said, I don't want practice, I want to make a pen. That comes with lots of mistakes down the road.

If you are having a problem with one particular point, step back and focus on that and practice on that. You will make far better pens faster in the long run - than jumping past the minor problem to complete one pen.
 
Last edited:

ramaroodle

Member
Joined
Feb 15, 2018
Messages
686
Location
Seattle
Wow! So many different techniques. Don't see the need for sanding sealer or DNA wipe down (I use compressed air) between sanding grits or the need for so many coats of CA. Wondering if the water in the DNA is soaking into the blank & contributing to your issues and who knows what's in sanding sealer? (water based?) I think the more chemicals you put on the blanks the greater the chances are of them interacting with each other. I have greatly decreased my finishing time by switching to GluBoost then EEE then plastic polish. I honestly don't see a difference in the final product between that and using a bunch of coats of CA and Micro Mesh.
 

jttheclockman

Member
Joined
Feb 22, 2005
Messages
19,082
Location
NJ, USA.
Wow! So many different techniques. Don't see the need for sanding sealer or DNA wipe down (I use compressed air) between sanding grits or the need for so many coats of CA. Wondering if the water in the DNA is soaking into the blank & contributing to your issues and who knows what's in sanding sealer? (water based?) I think the more chemicals you put on the blanks the greater the chances are of them interacting with each other. I have greatly decreased my finishing time by switching to GluBoost then EEE then plastic polish. I honestly don't see a difference in the final product between that and using a bunch of coats of CA and Micro Mesh.
If you used lacquer on your pens you would not see a difference either. It is just a matter of choice of the product you choose and the method you choose to apply it. There are many variations of both and that is what makes this site so good. People share their thoughts and ideas. There is no one way to anything in life so we roll with what we think works for us. To me Glu boost is just a hype. It is no better than CA and will not protect a pen any more than CA. Does come with a higher $$ cost.
 

ramaroodle

Member
Joined
Feb 15, 2018
Messages
686
Location
Seattle
If you used lacquer on your pens you would not see a difference either. It is just a matter of choice of the product you choose and the method you choose to apply it. There are many variations of both and that is what makes this site so good. People share their thoughts and ideas. There is no one way to anything in life so we roll with what we think works for us. To me Glu boost is just a hype. It is no better than CA and will not protect a pen any more than CA. Does come with a higher $$ cost.
Sorry. I didn't at all mean to imply that one method was better than any other. Not sure what you mean by hype. GluBoost is CA. It's just another product but I like using 4 coats and also not getting any white boiling spots. I think $ wise it works out to be similar since you are using less than half as much per pen. So as long as I can get the same job done in 1/3 the time I like that. I see people using up to 15 coats of CA per pen which to me is overkill but that's just me. Same as skipping the time and mess of Micro Mesh.

If you take out the part about GluBoost the point of my comment was in response to the OP's original question, not to discourage him from using CA...
I think the more chemicals you put on the blanks the greater the chances are of them interacting with each other.
 
Last edited:

leehljp

Member Liaison
Joined
Feb 6, 2005
Messages
9,314
Location
Tunica, Mississippi,
. . . but I like using 4 coats and also not getting any white boiling spots.
Made me think about something - I haven't had white spots in 13 - 14 years. I don't know If I just learned something I am not aware of, or as John T said: - fill the holes with CA before sanding or turning down the finish. Probably the latter. That is and has been instinctive for me.

. . . So as long as I can get the same job done in 1/3 the time I like that. I see people using up to 15 coats of CA per pen which to me is overkill but that's just me. Same as skipping the time and mess of Micro Mesh.

Another John T, and my habits - but I will speak for myself - I use and keep my scraper very sharp, honing it two or three times or more per pen. (John T uses a skew [correctly] ) and when I get through turning, it is so smooth that it does not need sanding at all. Smoother than 600 grit and 800 grit. Sanding is left to - sanding the finish if needed to level it out.
 

jttheclockman

Member
Joined
Feb 22, 2005
Messages
19,082
Location
NJ, USA.
Sorry. I didn't at all mean to imply that one method was better than any other. Not sure what you mean by hype. GluBoost is CA. It's just another product but I like using 4 coats and also not getting any white boiling spots. I think $ wise it works out to be similar since you are using less than half as much per pen. So as long as I can get the same job done in 1/3 the time I like that. I see people using up to 15 coats of CA per pen which to me is overkill but that's just me. Same as skipping the time and mess of Micro Mesh.

If you take out the part about GluBoost the point of my comment was in response to the OP's original question, not to discourage him from using CA...

If it works for you then you have found your method. Congrats.
 

cmiller

Member
Joined
Nov 23, 2015
Messages
111
Location
Eugene, Oregon
Hi friends, one thing I'll add, hope it hasn't been said yet: Shooter-55, when I get a blank with pits and holes and such or one that looks like yours in the original post, I'll fill them with medium CA, accelerate and then use a skew to smooth it all out. Then I sand. When I'm ready to apply CA as a finish, the blank is smooth. Then there's no chance for dust to get in the holes and the finish is uniform. Hope this makes sense.
 
Top Bottom