
calabrese55
Member
New to pen turning I like to waste time , money and energy on trying new things. I have been thinking about custom pen blanks and decided this would be my first try.
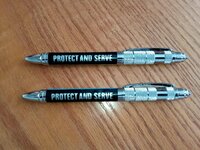
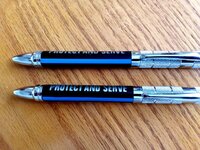
It is going on a Tactical Pen Kit https://www.woodturningz.com/Tactical_Pen_Kit_-_Chrome.
It is the typical thin blue line concept with text added. My goal here is to get the graphic closer to the outer diameter of the blank. This pen has some limited opportunity for that as the blank is not very thick but the concept so far is working out.
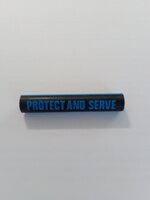
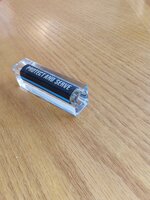
The picture below is the first stage blank . Aluminite resin, (black) is cast and turned around the kit brass tube. The graphics are all added at one time and the intent then is to recast with a clear outer layer and trim to pen diameters. I am hoping it will get the graphic to pop as it lives just below the finished diameter of the pen.
Future versions will involve water slide graphics , possibly some fractal burning decoration.
Like I said I like to waste time , money and energy tomorrow I am leaving to investigate a unicorn citing .
calabrese55
It is going on a Tactical Pen Kit https://www.woodturningz.com/Tactical_Pen_Kit_-_Chrome.
It is the typical thin blue line concept with text added. My goal here is to get the graphic closer to the outer diameter of the blank. This pen has some limited opportunity for that as the blank is not very thick but the concept so far is working out.
The picture below is the first stage blank . Aluminite resin, (black) is cast and turned around the kit brass tube. The graphics are all added at one time and the intent then is to recast with a clear outer layer and trim to pen diameters. I am hoping it will get the graphic to pop as it lives just below the finished diameter of the pen.
Future versions will involve water slide graphics , possibly some fractal burning decoration.
Like I said I like to waste time , money and energy tomorrow I am leaving to investigate a unicorn citing .
calabrese55

 .
.