
Good finish for rough sanded 3D CNC piece

Signed-In Members Don't See This Ad
Joined
Mar 26, 2021
Messages
164
Location
Lexington, Ky
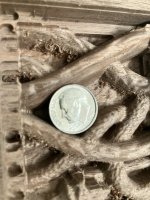
I'm doing test runs on sections of this really high relief CNC piece I'm working up to carving, and it appears that I'm gonna have a fair amount of fuzzies to deal with after the whole thing is done. Here's the first test...
fuzzies.jpeg

I've been able to make small sanding sticks using 320 grit that get fairly deep. So even though I should be able to get to the deepest of fuzzies, I'm left wondering about what kind of surface I'm leaving when it comes to applying finish. The top of the structures you see in the pic are relatively smooth, so I'm guessing they'll take finish normally. This is walnut, btw.

Any suggestion for a finish that will get all parts to a uniform color, despite the potential rough spots deeper in the crevices?
 
Signed-In Members Don't See This Ad
I can't help with finishes, but have you thought of using radial bristle sanding disks, similar to THESE. (The originals are by 3M, not sure how good the knock-offs are in comparison.) You fix 3 or 4 of the same grit on a mandrel and use a Dremel or micromotor tool to spin them. A very light touch gets rid of the fuzzies quickly.

I've used them to clean up after piercing thin walled vases with a dental tech turbine, they are very effective but don't go especially deep.
 
Any fuzzies you have left over from sanding will stain/finish darker than the sanded areas. With that in mind, I would suggest a (very) blonde Shellac. Apply the Shellac with the "carving" still in the cutting position. Once the Shellac dries you should be able rerun the program and knock a lot of the fuzzies off. Even deep in the corners. The Shellac will 'harden'' and raise the grain a bit so it can be easily cut.

On the other hand, I would suggest trying different cutting tools. I'm assuming you are using a pointed tool. Perhaps using an up cut tool or slowing down your travel speed a bit.

FWIW, LOML says leave them on. I kind of looks like what would be if the carving was real vines.
 
I can't help with finishes, but have you thought of using radial bristle sanding disks, similar to THESE. (The originals are by 3M, not sure how good the knock-offs are in comparison.) You fix 3 or 4 of the same grit on a mandrel and use a Dremel or micromotor tool to spin them. A very light touch gets rid of the fuzzies quickly.

I've used them to clean up after piercing thin walled vases with a dental tech turbine, they are very effective but don't go especially deep.
Thanks for the reminder duncsuss. A really good dude over at the Vetric forum suggested those, but the one's you've linked are half the price and more versatile if they can be stacked like that. I could also see cutting them down some to get in tight spots. Already have them in my Amazon cart.
 
Any fuzzies you have left over from sanding will stain/finish darker than the sanded areas. With that in mind, I would suggest a (very) blonde Shellac. Apply the Shellac with the "carving" still in the cutting position. Once the Shellac dries you should be able rerun the program and knock a lot of the fuzzies off. Even deep in the corners. The Shellac will 'harden'' and raise the grain a bit so it can be easily cut.

On the other hand, I would suggest trying different cutting tools. I'm assuming you are using a pointed tool. Perhaps using an up cut tool or slowing down your travel speed a bit.

FWIW, LOML says leave them on. I kind of looks like what would be if the carving was real vines.
Thanks Mortalis, you've hit the nail on the head as to what I've been thinking about recently. Since this kind of fraying can be an issue on the final toolpass, I've been wondering if it makes sense to treat the wood with some kind of sanding sealer or similar that would soak in and add reinforcement just before the final pass. If it soaks in even .5mm then your shellac suggestion is what I've been looking for. I put this idea through chatgpt and the bot says make a 8oz denat alcohol to 1/2oz shellac flakes and see how well that soaks in. Since I'm great at overdoing things, I'll probably apply it from a spray bottle and keep the piece wet for a while to let everything soak in.

Others have suggested I need to change my tool or speed as well. For my finish pass I'm using a 1/16" tapered ball nose running 25 ipm at around 18k. I can go slower but I'm not sure it'd make much of a difference. Apparently I've got room for improvement somewhere as others say when they carve walnut slowly it turns out just about perfect.
 
Back
Top Bottom