Cross threading when fitting cap

Signed-In Members Don't See This Ad

ibex

Member
Joined
May 12, 2022
Messages
13
Location
Victoria, Australia
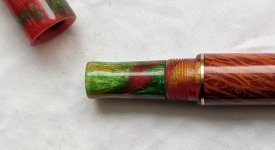
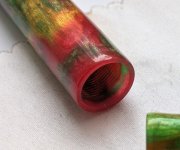
I've been having trouble when people are looking and trying some of my pens at sales, and sometimes they end up with the cap cross threading slightly when they put it on the body. It's easy to turn it back a third or so and restart it but it gives a poor first impression of the the pen.

I presume I'm doing something wrong with the fit of my cap and body threads but I don't know where to start.

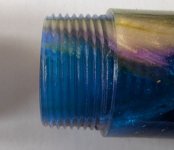
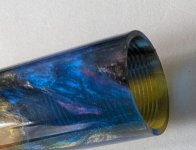
I am using Tapco M13x0.8 and M14x0.8 taps and dies and the blanks are typically either from Just Turning in Australia or TurntPenCo.

I've included some photos of two of my pens so maybe you can see what I need to do differently.

Any help would be appreciated.

PXL_20260407_052936456-1.jpg
 

Attachments

  • PXL_20260407_053004176-1.jpg
    PXL_20260407_053004176-1.jpg
    131.2 KB · Views: 52
  • PXL_20260407_053017636-1.jpg
    PXL_20260407_053017636-1.jpg
    137.9 KB · Views: 57
  • PXL_20260407_051733185-1.jpg
    PXL_20260407_051733185-1.jpg
    185 KB · Views: 57
  • PXL_20260407_051750275-1.jpg
    PXL_20260407_051750275-1.jpg
    170.8 KB · Views: 65
Signed-In Members Don't See This Ad
It looks to me like you need to put a radius on the end of your tenon and possibly chamfer the inside edge of the cap. At least from what I see on the blue section.

Doing so with help create a smoother start to the threads and guide the two pieces to join properly to help avoid cross threading.
 
I agree with @hooked - you need to give a bit of a 'runway' for the two parts to align themselves to prepare for turning. A chamfer or radius on the body would be my first step - allowing the cap to align with the threads as it is pushed forward on the body. The goal also should be to have a corresponding 'receiver' thread on the cap, so you have leeway for alignment before threads come into play.

The pics you provided show the thread starting immediately, without any space to help the cap be aligned before it hits the threads. Providing a non threaded area that brings things into alignment, even if you reduce your threading a bit, will cut back on the cross threading and ultimately help things last.

Kevin
 
May I ask what diameter your tenon is and the size of the hole you drilled for the different sizes?
 
I would blame miss handling. Have you ever cross threaded your own pen?
Fine threads in soft material can't take heavy handed attempts. Personally I always turn the cap counterclockwise until I feel it drop into place before tightening. If someone just puts the cap on and turns it without paying attention it doesn't take much pressure to cross thread.
A close fitting section helps a lot in cap to barrel alignment.
 
It looks to me like you need to put a radius on the end of your tenon and possibly chamfer the inside edge of the cap. At least from what I see on the blue section.

Doing so with help create a smoother start to the threads and guide the two pieces to join properly to help avoid cross threading.
The blue one definitely has no radius/chamfer or lead in on the tenon, but the start of the cap has 1-1.5mm clear before the thread starts. How big a radius so you think I need?

The red/green pen has a small roundover on the tenon and the cap has 3mm with no thread on it. Is this more what I should be aiming for?


PXL_20260408_042238770.jpg
PXL_20260408_042037263.jpg
 
I agree with @hooked - you need to give a bit of a 'runway' for the two parts to align themselves to prepare for turning. A chamfer or radius on the body would be my first step - allowing the cap to align with the threads as it is pushed forward on the body. The goal also should be to have a corresponding 'receiver' thread on the cap, so you have leeway for alignment before threads come into play.

The pics you provided show the thread starting immediately, without any space to help the cap be aligned before it hits the threads. Providing a non threaded area that brings things into alignment, even if you reduce your threading a bit, will cut back on the cross threading and ultimately help things last.

Kevin
I've expanded two of the photos for the red/green pen to see if that helps at all. I've seen some pens where there is a definite 1-2mm lead on the body with no thread on it. I presume this is at the minor diameter of the thread. Is that what I should be aiming for or is it enough to just round-over or chamfer the start of the thread?
 
May I ask what diameter your tenon is and the size of the hole you drilled for the different sizes?
I drill 12.2 for the M13x0.8 and 13.2 for the M14x0.8 My understanding is for metric threads that drill size = major diameter - pitch
The 12.2mm drill was supplied with the M13 tap and die.

I aim to cut the tenons at 12.9 - 13.0 and 13.9-14.0 but sometimes they end up a fraction smaller.
 
I would blame miss handling. Have you ever cross threaded your own pen?
Fine threads in soft material can't take heavy handed attempts. Personally I always turn the cap counterclockwise until I feel it drop into place before tightening. If someone just puts the cap on and turns it without paying attention it doesn't take much pressure to cross thread.
A close fitting section helps a lot in cap to barrel alignment.
While I tend to agree that most of the problem comes from heavy handed users, if I try hard enough I can cross thread my pens, and at a recent pen club meeting I had a couple of people there mention the cross threading. They are generally fairly careful with pens. So my concern is that if they are experiencing it there is more work for me to do to minimise the risk of it happening.
 
The blue one definitely has no radius/chamfer or lead in on the tenon, but the start of the cap has 1-1.5mm clear before the thread starts. How big a radius so you think I need?

The red/green pen has a small roundover on the tenon and the cap has 3mm with no thread on it. Is this more what I should be aiming for?


View attachment 392436View attachment 392437

Yes. More like the red/green one. It's just a matter of taking a tool to get rid of that 90 degree edge before you thread and make it more of a 45. 1-2mm.

To me, this creates a smoother connection and starts the thread a bit farther down from the edge of the tenon.

1775645599378.png


1775645614611.png
 
What is the diameter of the nose of your nib/grip section? As Patrick mentioned, if that is just small enough to pass through the threads inside the mouth of the cap, it more or less forces the correct alignment by preventing the two parts from joining together at an angle.
 
Learned in summer, 1964, while working in an engineering lab and model shop- turn backwards until you hear the "click" when the starter thread mate. Took a fountain pen from my craft display as people would pull the parts out of the pen body. Duh.
 
Have you measured the holes to be sure they are the intended dimensions and not larger. Depending on your drilling set up you may be getting a larger hole than intended. If the tailstock ins slightly off center or the drill bit is dull or off even a little it can make the hole a little to big. Are the tops of the threads on either piece flattened from not being fully formed?
 
What is the diameter of the nose of your nib/grip section? As Patrick mentioned, if that is just small enough to pass through the threads inside the mouth of the cap, it more or less forces the correct alignment by preventing the two parts from joining together at an angle.

THIS!

Also, what is the ID of the relief you cut in the cap? I remove only enough so that there are no threads or marks from the threads. If this is too large, then the ability to get things misaligned is increased.
 
Sorry for the length of this post..... but I hope it makes sense to all why.

I think as you can see from the comments on this thread - there are a good number of very skilled penmakers on this site - which it still is one of my favorites after my many years as a penmaker! Looking at all the comments, including the original poster, one thing that seems to come through for me is the required consistency and accuracy of making things work properly.

When I went back and looked at the original pictures, the red pen is definitely different in its construction than the blue pen. My comments were more focused on the construction of the blue pen - where the body threads start right in and the cap is recessed somewhat for threading. What we can't see is what caused the evolution of the discussion into the comments regarding the ID and relief cuts, as well as the depth and size/angle of the chamfers and more!

@ibex started the thread with a comment on cross threading and what to do. Everyone jumped in with thoughtful comments to help out, including me, but as all the craftsman here started to do the analysis, again what hit me is that the red pen and the blue pen are constructed differently. The original question posed was 'what do I need to do differently' - and I think the base answer is build up your consistency and insure your measurements are accurate.

Comments here have discussed tenon diameter, chamfer, thread depth, material durability, and a few other great ideas, but the original comment starting the thread was that 'some' of 'my pens at sales' are failing. Key word - some. I believe that all the posted comments provided lots of good ideas and places to start, so you have your work cut out for you. But I believe the one thing that custom pen makers have to learn to deal with quickly is to be consistent. Kit builds have strict guidelines for dimensions and construction that kind of set the rules for makers - moving to custom builds opens a whole new dimension, where you need to be precise and accurate, as no one has previously tested the design and workmanship - it's really on the maker.

Kevin


Thankyou for your insights. There another 29 pens and 12 months between the blue one, Nov 24, and the red one Oct 25. There have ben a lot of learnings and revisions along the way as I worked on improving the quality of my builds. There's a lot of ideas here that I need to look at but prime amongst them is consistency and I know I haven't always achieved the precision that I think a pen needs for threads of this size.
 
Last edited:
Thankyou everyone for your commentary and ideas on what I should be looking at.

To give some background there another 29 pens and 12 months between the blue one, Nov 24, and the red one Oct 25. Along the way I've been trying to improve my consistency and contraction but not always achieving the precision I need.

I'm going to make a couple of test pens to try out some of these ideas and see what comes of it.
 
Have you measured the holes to be sure they are the intended dimensions and not larger. Depending on your drilling set up you may be getting a larger hole than intended. If the tailstock ins slightly off center or the drill bit is dull or off even a little it can make the hole a little to big. Are the tops of the threads on either piece flattened from not being fully formed?
I have not but I will do that to see what they are coming out at.
 
Back
Top Bottom