Celtic Knot

Signed-In Members Don't See This Ad

WTBM

Member
Joined
May 6, 2023
Messages
13
Location
United States Florida
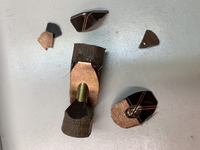
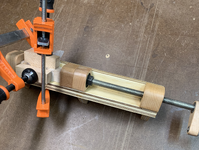
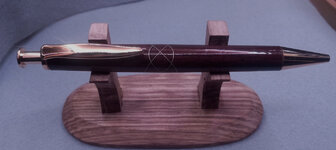
My first celtic knot . I'm not sure what the wood is, the pen kit is a longwood click pen . I learned a lot with this one , my knots did not come out even, but it will be ok for me to use at my desk . Since it will be a daily use pen for me i didnt go to overboard with the finish
 

Attachments

  • celtic.jpg
    celtic.jpg
    206 KB · Views: 185
Signed-In Members Don't See This Ad
First is not bad at all. Hope you learned some things from it. Tips, Not sure what you used to cut your slots but looks like a bandsaw blade because of how thin. it would look better if the slots were thicker. makes the knot stand out. Second not sure what angle you are cutting at but it is shallower than 45 degree. Around 52 works well. Third important to have a sled to repeat the cuts. Do not cut all the way through. Leave about 3/32" left. I would start with a 1" blank. Makes the cuts easier to handle. Make sure you match the infill material thickness with the size of the kerf. When gluing and clamping make sure the blank lays flat on the table because any amount of not enough infill or too much will throw the whole knot off. Always square the blank after each cut and infill. Have fun. Many things to inlay with. Always a fan favorite. Good luck and have fun
 
TY for the replies, yes it was a bandsaw blade , I did not use a sled with a stop block and i think "old welders eyes " arnt as good as they used to be;) , but I was smart enough not to cut all the way thru to make glue up easier :)
 
Hello celtic knot experts. I have made multiple attempts to make blanks with the knot made from black fiberboard or thin strips of cherry sandwiched between pieces of 28 gauge copper sheet. The copper is roughed up with 80-100grit and cleaned with DNA before gluing. The blanks explode not long after starting to turn. The breaks are always between the inserts and wood of the blank.
This looks like a glue failure problem, so I've tried different kinds of epoxy but still no luck. I cut the insert slots with a table saw jig and the inserts are the exact width of the kerf. It does not seem to matter whether I leave 3/32" uncut or cut entirely through the blank. The inserts are epoxied into the blank and clamped in a jig that also keeps the blank flat as well as providing longitudinal pressure to close the joint firmly. I allow a few days for curing before going to the lathe. The blanks look great but still blow apart before the blank can even be turned to a cylinder.
So, what am I getting wrong here? I've considered the following:
  1. Does the press squeeze all the glue out of the joint?
  2. Lathe is set to about 3000rpm which is what I use successfully with other designs. Too fast? Too slow?
  3. I've tried various chisels/gouges to adjust the angle of attack to the inserts. No difference noted.
  4. Could heat from turning be causing glue failure?
Can anyone out there help? I appreciate any ideas.
 

Attachments

  • tempImageESgoav.png
    tempImageESgoav.png
    2.1 MB · Views: 67
  • tempImageZ8BJYc.png
    tempImageZ8BJYc.png
    2.7 MB · Views: 68
A couple of things to try. First, yes, excessive pressure can squeeze to much glue out, try a little less pressure. Before you turn it on the lathe, round the square edges with a disk sander. Make your lathe cuts from the center of the knot to the edges, that seems to work better for me. Lastly, as you turn it, flood the knot with thin CA. Also metal inserted ,at an angle is usually problematic, so much so that I rarely feel inclined to do it. One final forum tip, it would have probably been better to start a new thread as this one is an old one.
 
Last edited:
Being I seen this thread an do many knots it caught my interest. But I agree with Ken, it is always better to start a new thread instead of reopening an older one. My thoughts are as follows. I looked at your photos and the first thing I noticed was the tube. There is no glue residue on it after it broke. I suggest you use a good epoxy for gluing tubes in and use the same epoxy for the segments. I like to use SystemIII T88 epoxy. It is a 24 hour dry time epoxy at least. The shorter the dry time on epoxy the less the holding power. Roughing all edges as well as the tube for better tooth for adhesive is a must. next is drilling the blank when you have it finished. You can be weakening the joints from the heat of the drill bit so need to be aware of this when drilling to use a sharp bit and keep cool. I like to cool the bit with DNA and clear the hole many many times especially drilling combination materials. Finally I suggest you turn the blank down using a sharp carbide cutter and I prefer a round cutter because it is taking off less material at a time as opposed to a flat edge. I like to finish the final passes with a very sharp skew and always take lite passes.

Yes to the question about tight glue joints. You really do not want to squeeze them so hard that you now starve the joints of adhesive. It is this way in all of carpentry building. It is a fine line to walk but you get the feel for it after awhile. You can do as Ken suggested as you continue to turn down the blank you can add CA to the blank to reinforce it and take small bites. Continue to saturate the blank after a few passes. heat from turning can hurt but I doubt you are even getting that hot. I turn as fast as I can. I do not slow down because it has metal. The sharp tools cut better at higher speeds. Good luck. Copper does make a nice segmenting material. I like to use alot of aluminum.
 
A couple of things to try. First, yes, excessive pressure can squeeze to much glue out, try a little less pressure. Before you turn it on the lathe, round the square edges with a disk sander. Make your lathe cuts from the center of the knot to the edges, that seems to work better for me. Lastly, as you turn it, flood the knot with thin CA. Also metal inserted ,at an angle is usually problematic, so much so that I rarely feel inclined to do it. One final forum tip, it would have probably been better to start a new thread as this one is an old one.
Thanks, Ken. This was my first post so I wasn't sure what I was doing. Rounding the blank on the sander makes a lot of sense-never even occurred to me. Turning from the center is another great idea. I really appreciate your help.
 
Thanks, Ken. This was my first post so I wasn't sure what I was doing. Rounding the blank on the sander makes a lot of sense-never even occurred to me. Turning from the center is another great idea. I really appreciate your help.
I just seen your from holt, that's probably around 12-15 miles from me. Welcome to the forum.
 
Being I seen this thread an do many knots it caught my interest. But I agree with Ken, it is always better to start a new thread instead of reopening an older one. My thoughts are as follows. I looked at your photos and the first thing I noticed was the tube. There is no glue residue on it after it broke. I suggest you use a good epoxy for gluing tubes in and use the same epoxy for the segments. I like to use SystemIII T88 epoxy. It is a 24 hour dry time epoxy at least. The shorter the dry time on epoxy the less the holding power. Roughing all edges as well as the tube for better tooth for adhesive is a must. next is drilling the blank when you have it finished. You can be weakening the joints from the heat of the drill bit so need to be aware of this when drilling to use a sharp bit and keep cool. I like to cool the bit with DNA and clear the hole many many times especially drilling combination materials. Finally I suggest you turn the blank down using a sharp carbide cutter and I prefer a round cutter because it is taking off less material at a time as opposed to a flat edge. I like to finish the final passes with a very sharp skew and always take lite passes.

Yes to the question about tight glue joints. You really do not want to squeeze them so hard that you now starve the joints of adhesive. It is this way in all of carpentry building. It is a fine line to walk but you get the feel for it after awhile. You can do as Ken suggested as you continue to turn down the blank you can add CA to the blank to reinforce it and take small bites. Continue to saturate the blank after a few passes. heat from turning can hurt but I doubt you are even getting that hot. I turn as fast als I can. I do not slow down because it has metal. The sharp tools cut better at higher speeds. Good luck. Copper does make a nice segmenting material. I like to use alot of aluminum.
Great tips, John thank you. Good to have an alternative to the 5min epoxies. Cooling the drill bit should help a lot. With the wisdom from you and Ken, I hope to be able to post a pic soon to show the results. Thanks to you both!
 
Being I seen this thread an do many knots it caught my interest. But I agree with Ken, it is always better to start a new thread instead of reopening an older one. My thoughts are as follows. I looked at your photos and the first thing I noticed was the tube. There is no glue residue on it after it broke. I suggest you use a good epoxy for gluing tubes in and use the same epoxy for the segments. I like to use SystemIII T88 epoxy. It is a 24 hour dry time epoxy at least. The shorter the dry time on epoxy the less the holding power. Roughing all edges as well as the tube for better tooth for adhesive is a must. next is drilling the blank when you have it finished. You can be weakening the joints from the heat of the drill bit so need to be aware of this when drilling to use a sharp bit and keep cool. I like to cool the bit with DNA and clear the hole many many times especially drilling combination materials. Finally I suggest you turn the blank down using a sharp carbide cutter and I prefer a round cutter because it is taking off less material at a time as opposed to a flat edge. I like to finish the final passes with a very sharp skew and always take lite passes.

Yes to the question about tight glue joints. You really do not want to squeeze them so hard that you now starve the joints of adhesive. It is this way in all of carpentry building. It is a fine line to walk but you get the feel for it after awhile. You can do as Ken suggested as you continue to turn down the blank you can add CA to the blank to reinforce it and take small bites. Continue to saturate the blank after a few passes. heat from turning can hurt but I doubt you are even getting that hot. I turn as fast as I can. I do not slow down because it has metal. The sharp tools cut better at higher speeds. Good luck. Copper does make a nice segmenting material. I like to use alot of aluminum.
Hey John. Forgot to ask about your technique for "cooling the bit with DNA." Do you just spray or dunk the bit? Or do you squirt some DNA into the bore hole to cool the metal being drilled? Again, I appreciate your feedback. May the Force be with you!
 
Hey John. Forgot to ask about your technique for "cooling the bit with DNA." Do you just spray or dunk the bit? Or do you squirt some DNA into the bore hole to cool the metal being drilled? Again, I appreciate your feedback. May the Force be with you!
I soak a rag with the DNA. When I withdraw the bit I lay the rag on the bit and it does not take long at all to cool bit. I do not shoot DNA into hole. You could if you want to. I never found a need to because I really do not let the bit get too hot. The hottest bits get is when I drill pure acrylics. With segmented blanks you just have to go slow advancing the bit and clear hole often. You spend so much time building them you do not want to rush drilling or turning.
 
I soak a rag with the DNA. When I withdraw the bit I lay the rag on the bit and it does not take long at all to cool bit. I do not shoot DNA into hole. You could if you want to. I never found a need to because I really do not let the bit get too hot. The hottest bits get is when I drill pure acrylics. With segmented blanks you just have to go slow advancing the bit and clear hole often. You spend so much time building them you do not want to rush drilling or turning.
Exactly! Tired of seeing hours of work explode. I'll try your bit cooling tips. Thanks.
 
Back
Top Bottom