You are using an out of date browser. It may not display this or other websites correctly.
You should upgrade or use an alternative browser.
You should upgrade or use an alternative browser.
These pieces are really small
- Thread starter Alan Morrison
- Start date
Signed-In Members Don't See This Ad
See more from Alan Morrison
These 'veneers' I cut on the table saw and are about 1.5mm. Here's a link to a video about making rosettes and is only 2 1/2 minutes long.
Alan
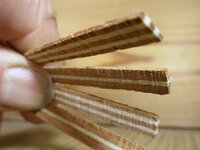
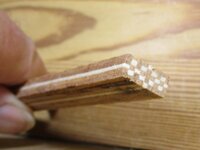
I know that the splintering and gaps come from the ridges left after cutting on the bandsaw.( as you can see on the second photograph )
There are jigs that I have seen on rosette makers videos which addresses this problem but I have not made one yet. This is just my second attempt with this type of pattern and as you know glueing such small items accurately is quite problematic. I made a clamping jig and, if I continue with a few more, will look at trying to tidy up the bandsaw marks better.
I agree fully that using hard woods will be an improvement. Currently I am at the 'suck it and see' part of the process, but will be trying different woods with my next ones.
I value your comments, John. I am aware of the issues, but posted anyway to get some feedback.
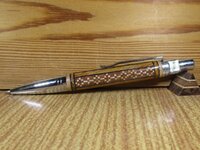
Saying that, the pen looks great in the hand as the wee gaps are not seen with the naked eye!!!
Alan
Signed-In Members Don't See This Ad
triw51
Member
I agree excellent work
SteveJ
Member
I like it Alan. Reminds me of this one I did a while ago with dyed veneer. Those small pieces are tough to work with. Since I wanted the design to flow around the blank I needed chose to drill the hole before assembling. I seem to have some difficulty drilling straight when constructing a blank like yours!
Alan Morrison
Member
Tim, the pieces are first cut on the table saw to just under 2mm thickness and when glued are cut on the bandsaw.Excellent work! Are you using a thickness planer on your inlay pieces?
Alan Morrison
Member
Steve, I remember your pen well. I tried working with veneers ( .6mm ) but needed to improve my clamping method when glueing first.I like it Alan. Reminds me of this one I did a while ago with dyed veneer. Those small pieces are tough to work with. Since I wanted the design to flow around the blank I needed chose to drill the hole before assembling. I seem to have some difficulty drilling straight when constructing a blank like yours!
These 'veneers' I cut on the table saw and are about 1.5mm. Here's a link to a video about making rosettes and is only 2 1/2 minutes long.
jttheclockman
Member
Alan you are really doing work that I would not even try and you have a good handle on it. But if you would allow me to make a comment or two. I believe if you are going to take this to the next level you need to be more precise and work a method out to be able to sand all sides or get extreme cuts. I say this because I can see splintering and gaps. This could be a product of the woods of choice. Maybe try using acrylics or metals because you will avoid those things. Yes gluing is a problem because of time constraints but doing things in batches or steps could work around this. being able to work with hard woods is a plus because of tighter grains. and being able to plane and sand flat is a must. Now how you do this is something I can not suggest but just throwing my thoughts out there. The work is far better than I could do but it seems you are looking for perfection. That next level is a tall step for sure working with woods this small. Good luck and hope you do not take my comments the wrong way.
Alan Morrison
Member
Thanks for your input, John.Alan you are really doing work that I would not even try and you have a good handle on it. But if you would allow me to make a comment or two. I believe if you are going to take this to the next level you need to be more precise and work a method out to be able to sand all sides or get extreme cuts. I say this because I can see splintering and gaps. This could be a product of the woods of choice. Maybe try using acrylics or metals because you will avoid those things. Yes gluing is a problem because of time constraints but doing things in batches or steps could work around this. being able to work with hard woods is a plus because of tighter grains. and being able to plane and sand flat is a must. Now how you do this is something I can not suggest but just throwing my thoughts out there. The work is far better than I could do but it seems you are looking for perfection. That next level is a tall step for sure working with woods this small. Good luck and hope you do not take my comments the wrong way.
I know that the splintering and gaps come from the ridges left after cutting on the bandsaw.( as you can see on the second photograph )
There are jigs that I have seen on rosette makers videos which addresses this problem but I have not made one yet. This is just my second attempt with this type of pattern and as you know glueing such small items accurately is quite problematic. I made a clamping jig and, if I continue with a few more, will look at trying to tidy up the bandsaw marks better.
I agree fully that using hard woods will be an improvement. Currently I am at the 'suck it and see' part of the process, but will be trying different woods with my next ones.
I value your comments, John. I am aware of the issues, but posted anyway to get some feedback.
Saying that, the pen looks great in the hand as the wee gaps are not seen with the naked eye!!!
Alan
mark james
IAP Collection, Curator
Alan, I love your artistry. No need to give pointers, you know the issues and where the tweaks need to be. BUT, for this pattern - I am a big fan and admire your work. Very nice design. And I agree, the visual is quite appealing for the casual eye and I would be proud of this. May you have a great spring on your side of the pond. If I get lucky I may get some time this summer to play.
sorcerertd
Member
My first thought was "wow". Next thought was "wow, that took a lot of patience". After that was "wow, he must have a very sharp skew".
I can see John's point about precision and tighter joints, but this is much beyond what I can do at this point. Maybe someday with practice and patience. That being said, I do like the old world feel it has about it. It reminds me of some of the matchstick art of days past. It's not like you can really use a planer with stuff that small. I wonder if stabilizing would help with any splintering or tear out from having to work with the end grain like that?
Anyway, bravo! That's some pretty amazing and intricate work!
jttheclockman
Member
Alan I am only trying to make suggestions because I do know that working with materials this thin and small is not easy. To me you will never get a good cut using a bandsaw. Just not possible because the way the blade travels and the thinness of it. It flexes too much. You would do much better using jigs designed for a tablesaw. I believe I told you this once before in one of our conversations I am a huge fan of using doublesided tape and securing to a flat piece of Baltic Birch plywood as my carrier. A tablesaw blade is solid and cuts cleaner than a bandsaw blade. If using a bandsaw blade I would try a metal cutting blade because it does not have the set in the teeth like a wood blade. and the tooth count is higher. If i need to sand the pieces they are already secured to plywood and I can run over a flat surface like sandpaper adhered to a glass plate or I like to use a piece of flat tile. Now that I have a Brynes tabletop sander I happened to use that for some thin material to make a pen that I will be showing at some time. This works well too. As far as clamping I would treat each row as one layer and clamp all in one row and then keep doing this. Now you have rows that you can even up by sanding method. Clamping is very easy. A 90 piece of aluminum angle is your buddy. Man I use that all the time. I either line with wax paper or scotch tape. Have a piece of straight aluminum to hold pieces down and just put stops on the ends and use tiny wedge if need be to tighten up joints. make sure you keep squaring everything up after each row you keep adding, just like doing a celtic knot or doing scallops. Just suggestions. Do as you may. Good luck.Thanks for your input, John.
I know that the splintering and gaps come from the ridges left after cutting on the bandsaw.( as you can see on the second photograph )
There are jigs that I have seen on rosette makers videos which addresses this problem but I have not made one yet. This is just my second attempt with this type of pattern and as you know glueing such small items accurately is quite problematic. I made a clamping jig and, if I continue with a few more, will look at trying to tidy up the bandsaw marks better.
I agree fully that using hard woods will be an improvement. Currently I am at the 'suck it and see' part of the process, but will be trying different woods with my next ones.
I value your comments, John. I am aware of the issues, but posted anyway to get some feedback.
Saying that, the pen looks great in the hand as the wee gaps are not seen with the naked eye!!!
Alan
RichAldrich
Member
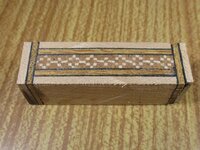
Really good Alan!I watched a video of a chap making rosettes for a guitar, using really tiny pieces, and thought that I would have a go. All comments appreciated.View attachment 353955View attachment 353956View attachment 353957View attachment 353958
Wow. That is amazing. Thanks for sharing.Steve, I remember your pen well. I tried working with veneers ( .6mm ) but needed to improve my clamping method when glueing first.
These 'veneers' I cut on the table saw and are about 1.5mm. Here's a link to a video about making rosettes and is only 2 1/2 minutes long.
Alan
I have to say this is one of the best Postings I have seen yet ( and there have been many great postings.) The contributions (especially the video and JT's input) from everyone advanced pen making skills that will make us all better pen makers moving forward.
sorcerertd
Member
I see all my mistakes in the "larger than life" pictures I take. Most of them are not noticeable in person without a magnifying glass. I'm still quite impressed by your experiments with segmenting. I hope more of them become pens.the wee gaps are not seen with the naked eye!!!
Alchemist
Member
Wonderfully savage!


