Wood stained grey during fine sanding. Don't know how to stop it.

Signed-In Members Don't See This Ad

dmcl

Member
Joined
Feb 15, 2021
Messages
5
Location
BC
My beautiful, curly maple blanks turn dull looking after sanding.

After my wooden pen blanks are turned to the size and shape I want I then move to the sanding process. Depending on the wood, I usually start sanding at 150 grit and step up through 180,220,320,400,600,1500 and 2000. (The fine grit 600,1500 and 2000 sandpapers I can get are all black colored.) When I use a light colored wood, such as a maple, I notice it begins to turn gray, especially when I move to the high grits. Thinking it might be metal dust from the metal bushings I try to be as careful as I can and hardly touch them with sandpaper. Lately I have experimented with some Aluminum inlay and with the metal in the wood I can't avoid it. I read about using denatured alcohol to clean a blank - In Canada we can not get denatured alcohol so I substituted isopropyl alcohol but it doesn't do anything but make the wood feel rougher. With a dark colored wood the staining isn't visible so this isn't an issue with darker blanks. I don't wet sand with water or oil either.

I suspect it might be from fine metal particles sanded off a bushing or from the metal inlay. Any suggestions? Thanks in advance.
 
Signed-In Members Don't See This Ad

Bope

Member
Joined
Oct 24, 2018
Messages
183
Location
Western NY
There have been a number of posts here with the same problem. Yes it probably is the metal from the bushings. Switch to the plastic non-stick bushings when you get to the sanding step.
 

1080Wayne

Member
Joined
Feb 5, 2006
Messages
3,340
Location
Brownfield, Alberta, Canada.
On wood only banks . I would stop sanding at 600 . Bushing metal is a high probability , but so is grit from those fine papers . I doubt if you will be able to see or feel the difference by stopping at 600 P grit (400 Ansi) . If you are putting on a hard finish , such as CA , then go to higher grits if you want a glossy finish .
 

jttheclockman

Member
Joined
Feb 22, 2005
Messages
19,082
Location
NJ, USA.
Darcy welcome to the site. Glad you found us and as you continue down your path of pen making you will find this site to be the best tool in the toolbox hands down. To address your problems and this topic get brought up many times here for various reasons, but these are my opinions and I do alot of segmenting with various colored woods and also metals. You can do a search of my name here just by hovering over the avatar name and then click on media when that opens. It will show many of the pens I have shown here over the years. But first off you are doing wood pens and you do not say what type top coat you are applying and that is important. There is so much that can be mentioned about your problems. I will do my best and you take it for what it is worth. Wood never ever needs to be sanded that low of a grit to start and that high of a grit to finish when turning projects especially if you are top coating with any finish. You will never see the differences or feel them. Now if not top coating then taking up higher grits is fine but I would stop at 800 grit and start with 400 grit. If bad tool marks then drop down to 220 grit. The black sandpaper is a start of your problems. That is automotive wet dry paper and not made for wood. I use it to polish out a CA finish but always wet. That is another story for another time. The bushings as mentioned can add to the black dust and that is why I and many other here switch to some sort of sanding between centers with non stick bushings.

But here is the kicker, you can do away with sandpaper all together if you learn to use the skew properly. It will give you a smooth as a baby's bottom finish with no black marks or contamination of woods. You will see this is a huge thing when doing segmenting work and you are combining metals and woods and woods of different colors. It really is not hard to learn but will take practice. Using your tools properly as well as presenting them to the project is key. Along with very sharp tools. A dull tool of any kind is more harmful than a sharp one. Requires less work to use. Here is an example or 2 of pens I made years ago and I use these many times as examples because the black and white one uses the 2 most highly different colored woods that produce very fine dust and mixing would be a mess. The black was holly and Gabon Ebony. The red one is maple and bloodwood. But the pens were turned with skew only. Good luck and hope some of this helps. I am sure you will get further answers too.

Copy of IMGP0897.JPG


Copy of IMGP0881.JPG
 

Kenny Durrant

Member
Joined
Sep 11, 2012
Messages
2,480
Location
Sachse Tx. 75048
Another thing to think about is lathe speed. I sliw mine down between 600-700 rpm. Sanding causes friction which is heat. Might be burning if done at high speeds. Another reason to slow it down is that once you start sanding past the first grit you should be sanding the marks left by the paper used before. Plus it doesn't take much of a build up in sand paper to start scratching.
 

RunnerVince

Member
Joined
Dec 18, 2019
Messages
276
Location
Ogden, UT
But here is the kicker, you can do away with sandpaper all together if you learn to use the skew properly.
I would expand that to include any of your turning tools. Gouges, scrapers, carbide tools...all of them can leave a finish-ready surface if sharpened and used properly.

I've spent considerable time working to master my skew chisel. And while I'm no Alan Lacer or Allan Batty, there are (usually non-pen) projects that I find it's my go-to tool. In fact, it's my favorite tool when I make "magic" wands, which, incidentally, are a great project for using up wood you might otherwise not use, gaining practice with all sorts of techniques, etc. However, I'm finding after years of practice that the bowl gouge (for spindle turning, funny enough) seems the most intuitive tool for me, and I get the best surface from there. That's what works for me.

If my tool finish is good enough to start sanding at 400 grit, I'm happy. I usually stop at 800, but I've been out of my 880-grit strips for a while, and haven't seen any negatives from stopping at 600. If I have to start at 320, I can make it work. But if you have to start at lower than that, you're introducing potential human error. By focusing on one area to get rid of a tool mark (or a deep sanding scratch from an overly aggressive grit used earlier), you can creative small flat spots or even sand your blank slightly out of round. And it's really easy to do that inadvertantly. When I hand sand at any grit, I always use a sharpie to put a line (parallel with the turning axis) onto mark my work holder (whether that's a mandrel, a chuck of some sort, a dead center, or a live center on the tailstock). I start sanding on that line, and sand as evenly as I can all the way around, even if I'm only trying to get rid of a small scratch. If one revolution doesn't do it, I go all the way around again. I do this for every grit I use to ensure I'm sanding as evenly as I humanly can around the entire blank.

I'll echo/confirm what you suspected and what others have said. It's both your bushings and your sandpaper causing the graying. When you sand, especially with frangible abrasives, some of the abrasive will inevitably break off or wear off. If this wasn't the case, we'd never have to replace our sandpaper. And those tiny particles will go all the same places sawdust does, including into your work.

Generally, there's no reason to go past 600 or 800 grit on a wood blank, especially if you'll be applying a film finish (CA, poly, lacquer, a lot of friction finishes). I will say that some woods burnish under high abrasive grits. Because of the smaller abrasive particles, there's far more surface area in contact with the wood surface. That means more friction, and therefore more heat buildup, which can alter the physical appearance of the wood. I've noticed that the color of maple deepens slightly when burnished, and I personally like the effect. But you can get eliminate surface contamination by using a folded over piece of shop towel or small piece of old t-shirt instead of a high-grit abrasive. I've not tried it on maple, but you can even skip the friction on some woods and just use a heat gun on the piece while it's spinning on the lathe (purpleheart is one example, though I'm not great with the technique and have difficulty getting even color).
 

Alan Morrison

Member
Joined
Jan 15, 2019
Messages
3,062
Location
N Ireland
First of all, welcome D'arcy.
Secondly, if the greyness is more pronounced at the ends of your blanks then it's coming from your bushes.
As stated above it can be overcome by changing to non-stick when starting to sand.
 

leehljp

Member Liaison
Joined
Feb 6, 2005
Messages
9,314
Location
Tunica, Mississippi,
Sanding over aluminum or brass etc WILL leave sanding dust. Some use erasers, some use Denatured Alcohol (DNA) and they do "ok" for some depending on the technique and wood.

However, as mentioned, the best way is to use the turning tool you are most skillful with to clean the surface. I personally use a razor sharp scraper.

On the above photo, I had severe smearing with the little dots at the top when sanding, and then tried using a just sharpened (razor sharp) scrapper and was amazed at how clean it made the finish.

There are two other steps involved in this to be real helpful:
1. Finish with the bushings off. Bushings will be touched when sanding, even after applying any finish and sanding again. I use TBC (Turning Between Centers without bushings for the finishing step. Bushings during finish will cause problems 99% of the time.

2. If applying a finish such as CA or lacquer, or polyurethane, use calipers and measure your build up thickness of the finish. IF THE Finish is sanded through to the wood (i.e. the wood is touched by the sandpaper) it will smear again. The secret is to avoid sanding the wood, either before finishing or sanding into the wood AFTER applying finish. If using an oil/wax finish instead of CA etc, do not squeeze too tight in applying.

3. As JohnT mentioned (he uses a skew), and as Vance mentioned in any of the tools used correctly, a properly sharpened and used tool can make the wood as smooth as any sandpaper can make it and it will be clean. A caveat is that soft woods, hard woods and stabilized woods each have their own characteristics and require adjustments in the final turning process to achieve a desired smooth surface before applying finish.

On the picture of the pens in the photo above, I built up a thick, probably .007 or .008 layer of CA and then sanded the CA down to the size needed but never sanded through to the wood. Bear in mind that I never put a piece of sandpaper to the wood and metal segments or dots. I have since learned that I can turn the CA down to a very smooth finish without needing to sand even the CA. I do buff lightly after turning.

One Last Thing: it takes some practice and proper sharpening the tool and patience. Enjoy the journey of making a pen instead of trying to get to the end too quickly.
 

monophoto

Member
Joined
Mar 13, 2010
Messages
2,542
Location
Saratoga Springs, NY
One further point - the graying of the wood is actually only a symptom of an underlying problem - that sanding gradually reduces the diameter of the bushings.

The argument between mandrels and bushings vs turning between centers can almost take on religious intensity at times, but it is certainly the case that one of the factors that must be accounted for when using bushing is that over time, they gradually become smaller. One of the principles involved in using bushings is that they set the proper diameter for the ends of the turning - but that's true only when the bushings are new. As they become older, and therefore smaller, they gradually lose that utility.
 

leehljp

Member Liaison
Joined
Feb 6, 2005
Messages
9,314
Location
Tunica, Mississippi,
I agree with Louie on the above. Please understand that principle. I do have some bushings that are 12 - 14 years old and are still the diameter today as they were when new. I DO NOT sand with them on the lathe. I DO NOT turn the blank down to the actual size of the bushings. I take them off after getting the blank round and close to size - and never have a bushing sanding problem since I started doing this years ago. IF you abide by that principle, the sanding dust goes away and the bushings stay the same. Otherwise: "As they become older, and therefore smaller, they gradually lose that utility." Louie

While I have been religiously intense on TBC in the past, 🤪 
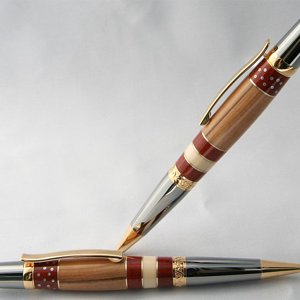
it is about the outcome - no sanding dust or no smearing of metal on wood, or as JohnT noted - no smearing of red/black wood segments onto white holly type of wood.

IF using a mandrel, look into getting something like this for turning to size on a mandrel type of system:

And of course use calipers to determine the sizing of blank ends needed.
 

wimkluck

Member
Joined
May 24, 2010
Messages
287
Location
Gaanderen Netherlands
Sanding over aluminum or brass etc WILL leave sanding dust. Some use erasers, some use Denatured Alcohol (DNA) and they do "ok" for some depending on the technique and wood.

However, as mentioned, the best way is to use the turning tool you are most skillful with to clean the surface. I personally use a razor sharp scraper.

On the above photo, I had severe smearing with the little dots at the top when sanding, and then tried using a just sharpened (razor sharp) scrapper and was amazed at how clean it made the finish.

There are two other steps involved in this to be real helpful:
1. Finish with the bushings off. Bushings will be touched when sanding, even after applying any finish and sanding again. I use TBC (Turning Between Centers without bushings for the finishing step. Bushings during finish will cause problems 99% of the time.

2. If applying a finish such as CA or lacquer, or polyurethane, use calipers and measure your build up thickness of the finish. IF THE Finish is sanded through to the wood (i.e. the wood is touched by the sandpaper) it will smear again. The secret is to avoid sanding the wood, either before finishing or sanding into the wood AFTER applying finish. If using an oil/wax finish instead of CA etc, do not squeeze too tight in applying.

3. As JohnT mentioned (he uses a skew), and as Vance mentioned in any of the tools used correctly, a properly sharpened and used tool can make the wood as smooth as any sandpaper can make it and it will be clean. A caveat is that soft woods, hard woods and stabilized woods each have their own characteristics and require adjustments in the final turning process to achieve a desired smooth surface before applying finish.

On the picture of the pens in the photo above, I built up a thick, probably .007 or .008 layer of CA and then sanded the CA down to the size needed but never sanded through to the wood. Bear in mind that I never put a piece of sandpaper to the wood and metal segments or dots. I have since learned that I can turn the CA down to a very smooth finish without needing to sand even the CA. I do buff lightly after turning.

One Last Thing: it takes some practice and proper sharpening the tool and patience. Enjoy the journey of making a pen instead of trying to get to the end too quickly.
Do you have a picture of your scrapper. I have problems with the translation. Putty knife? card scraper?
 

leehljp

Member Liaison
Joined
Feb 6, 2005
Messages
9,314
Location
Tunica, Mississippi,
Scrapers are a form of lathe chisels, and the ends come in different shapes and sizes.
Here is one:

I squared the end off of mine which was rounded, and have been using that for about 15 years. It is not much different than a chisel with a radiused square carbide insert on it. A radiused insert looks like a square insert but with a very slightly rounded edge.

Below you can see the insert that is slightly rounded square. My scraper is shaped like that.

If you are not proficient with a skew (and I am not) you can lay a sharp skew flat on the tool reset and let the edge scrape the blank as it turns (fast) and it will take the dust off. Use tiny bites.

Lathe chisel with carbide insert - which works the same as a scraper:

I apologize for any misunderstanding for using the word "scraper". I lived overseas (in East Asia) for 25+ years and am aware that some terms are not the same across different cultures and languages, and even in the English language from country to country.
 
Last edited:

randyrls

Member
Joined
Feb 2, 2006
Messages
4,821
Location
Harrisburg, PA 17112
D'Arcy; When I do either inlays of metal or varying wood colors the same situation can arise. The darker dust "contaminates" the lighter wood. As soon as I complete the tool work, I coat the blank as I normally would with CA. This seals the wood and the sand paper dust does not stick and can be wiped off. You should wipe the blank after each grit of sandpaper.

PS. In Canada I believe DNA is called "mentholated spirits". OR use grain alcohol.
 

dmcl

Member
Joined
Feb 15, 2021
Messages
5
Location
BC
Darcy welcome to the site. Glad you found us and as you continue down your path of pen making you will find this site to be the best tool in the toolbox hands down. To address your problems and this topic get brought up many times here for various reasons, but these are my opinions and I do alot of segmenting with various colored woods and also metals. You can do a search of my name here just by hovering over the avatar name and then click on media when that opens. It will show many of the pens I have shown here over the years. But first off you are doing wood pens and you do not say what type top coat you are applying and that is important. There is so much that can be mentioned about your problems. I will do my best and you take it for what it is worth. Wood never ever needs to be sanded that low of a grit to start and that high of a grit to finish when turning projects especially if you are top coating with any finish. You will never see the differences or feel them. Now if not top coating then taking up higher grits is fine but I would stop at 800 grit and start with 400 grit. If bad tool marks then drop down to 220 grit. The black sandpaper is a start of your problems. That is automotive wet dry paper and not made for wood. I use it to polish out a CA finish but always wet. That is another story for another time. The bushings as mentioned can add to the black dust and that is why I and many other here switch to some sort of sanding between centers with non stick bushings.

But here is the kicker, you can do away with sandpaper all together if you learn to use the skew properly. It will give you a smooth as a baby's bottom finish with no black marks or contamination of woods. You will see this is a huge thing when doing segmenting work and you are combining metals and woods and woods of different colors. It really is not hard to learn but will take practice. Using your tools properly as well as presenting them to the project is key. Along with very sharp tools. A dull tool of any kind is more harmful than a sharp one. Requires less work to use. Here is an example or 2 of pens I made years ago and I use these many times as examples because the black and white one uses the 2 most highly different colored woods that produce very fine dust and mixing would be a mess. The black was holly and Gabon Ebony. The red one is maple and bloodwood. But the pens were turned with skew only. Good luck and hope some of this helps. I am sure you will get further answers too.

View attachment 350707

View attachment 350706
Thank you for your help.
Darcy welcome to the site. Glad you found us and as you continue down your path of pen making you will find this site to be the best tool in the toolbox hands down. To address your problems and this topic get brought up many times here for various reasons, but these are my opinions and I do alot of segmenting with various colored woods and also metals. You can do a search of my name here just by hovering over the avatar name and then click on media when that opens. It will show many of the pens I have shown here over the years. But first off you are doing wood pens and you do not say what type top coat you are applying and that is important. There is so much that can be mentioned about your problems. I will do my best and you take it for what it is worth. Wood never ever needs to be sanded that low of a grit to start and that high of a grit to finish when turning projects especially if you are top coating with any finish. You will never see the differences or feel them. Now if not top coating then taking up higher grits is fine but I would stop at 800 grit and start with 400 grit. If bad tool marks then drop down to 220 grit. The black sandpaper is a start of your problems. That is automotive wet dry paper and not made for wood. I use it to polish out a CA finish but always wet. That is another story for another time. The bushings as mentioned can add to the black dust and that is why I and many other here switch to some sort of sanding between centers with non stick bushings.

But here is the kicker, you can do away with sandpaper all together if you learn to use the skew properly. It will give you a smooth as a baby's bottom finish with no black marks or contamination of woods. You will see this is a huge thing when doing segmenting work and you are combining metals and woods and woods of different colors. It really is not hard to learn but will take practice. Using your tools properly as well as presenting them to the project is key. Along with very sharp tools. A dull tool of any kind is more harmful than a sharp one. Requires less work to use. Here is an example or 2 of pens I made years ago and I use these many times as examples because the black and white one uses the 2 most highly different colored woods that produce very fine dust and mixing would be a mess. The black was holly and Gabon Ebony. The red one is maple and bloodwood. But the pens were turned with skew only. Good luck and hope some of this helps. I am sure you will get further answers too.

View attachment 350707

View attachment 350706
Very helpful. Thank you so much. I shall be using your ideas! Your pens are stunning.
 

dmcl

Member
Joined
Feb 15, 2021
Messages
5
Location
BC
I would expand that to include any of your turning tools. Gouges, scrapers, carbide tools...all of them can leave a finish-ready surface if sharpened and used properly.

I've spent considerable time working to master my skew chisel. And while I'm no Alan Lacer or Allan Batty, there are (usually non-pen) projects that I find it's my go-to tool. In fact, it's my favorite tool when I make "magic" wands, which, incidentally, are a great project for using up wood you might otherwise not use, gaining practice with all sorts of techniques, etc. However, I'm finding after years of practice that the bowl gouge (for spindle turning, funny enough) seems the most intuitive tool for me, and I get the best surface from there. That's what works for me.

If my tool finish is good enough to start sanding at 400 grit, I'm happy. I usually stop at 800, but I've been out of my 880-grit strips for a while, and haven't seen any negatives from stopping at 600. If I have to start at 320, I can make it work. But if you have to start at lower than that, you're introducing potential human error. By focusing on one area to get rid of a tool mark (or a deep sanding scratch from an overly aggressive grit used earlier), you can creative small flat spots or even sand your blank slightly out of round. And it's really easy to do that inadvertantly. When I hand sand at any grit, I always use a sharpie to put a line (parallel with the turning axis) onto mark my work holder (whether that's a mandrel, a chuck of some sort, a dead center, or a live center on the tailstock). I start sanding on that line, and sand as evenly as I can all the way around, even if I'm only trying to get rid of a small scratch. If one revolution doesn't do it, I go all the way around again. I do this for every grit I use to ensure I'm sanding as evenly as I humanly can around the entire blank.

I'll echo/confirm what you suspected and what others have said. It's both your bushings and your sandpaper causing the graying. When you sand, especially with frangible abrasives, some of the abrasive will inevitably break off or wear off. If this wasn't the case, we'd never have to replace our sandpaper. And those tiny particles will go all the same places sawdust does, including into your work.

Generally, there's no reason to go past 600 or 800 grit on a wood blank, especially if you'll be applying a film finish (CA, poly, lacquer, a lot of friction finishes). I will say that some woods burnish under high abrasive grits. Because of the smaller abrasive particles, there's far more surface area in contact with the wood surface. That means more friction, and therefore more heat buildup, which can alter the physical appearance of the wood. I've noticed that the color of maple deepens slightly when burnished, and I personally like the effect. But you can get eliminate surface contamination by using a folded over piece of shop towel or small piece of old t-shirt instead of a high-grit abrasive. I've not tried it on maple, but you can even skip the friction on some woods and just use a heat gun on the piece while it's spinning on the lathe (purpleheart is one example, though I'm not great with the technique and have difficulty getting even color).
Thank you for your help. Great tips.
 

dmcl

Member
Joined
Feb 15, 2021
Messages
5
Location
BC
Scrapers are a form of lathe chisels, and the ends come in different shapes and sizes.
Here is one:

I squared the end off of mine which was rounded, and have been using that for about 15 years. It is not much different than a chisel with a radiused square carbide insert on it. A radiused insert looks like a square insert but with a very slightly rounded edge.

Below you can see the insert that is slightly rounded square. My scraper is shaped like that.

If you are not proficient with a skew (and I am not) you can lay a sharp skew flat on the tool reset and let the edge scrape the blank as it turns (fast) and it will take the dust off. Use tiny bites.

Lathe chisel with carbide insert - which works the same as a scraper:

I apologize for any misunderstanding for using the word "scraper". I lived overseas (in East Asia) for 25+ years and am aware that some terms are not the same across different cultures and languages, and even in the English language from country to country.
I will definitely be trying to use different tools and do less sanding. Thanks
 

wimkluck

Member
Joined
May 24, 2010
Messages
287
Location
Gaanderen Netherlands
Scrapers are a form of lathe chisels, and the ends come in different shapes and sizes.
Here is one:

I squared the end off of mine which was rounded, and have been using that for about 15 years. It is not much different than a chisel with a radiused square carbide insert on it. A radiused insert looks like a square insert but with a very slightly rounded edge.

Below you can see the insert that is slightly rounded square. My scraper is shaped like that.

If you are not proficient with a skew (and I am not) you can lay a sharp skew flat on the tool reset and let the edge scrape the blank as it turns (fast) and it will take the dust off. Use tiny bites.

Lathe chisel with carbide insert - which works the same as a scraper:

I apologize for any misunderstanding for using the word "scraper". I lived overseas (in East Asia) for 25+ years and am aware that some terms are not the same across different cultures and languages, and even in the English language from country to country.
Thanks, I do use scrappers with carbide inserts. I do turn the blanks with the skew and when everything is oke I start sanding with p 400.
I use the scrappers to turn the end of the blanks perfect round. I had some issues with roundness. I pushed the skew to hard and/or it was not sharp enough. I will try it the next time when I am working with alu inlay material. Our neighbours, the Belgians, speak Flemish Dutch in Flanders. They use words that sometimes mean something different in Dutch
 

dmcl

Member
Joined
Feb 15, 2021
Messages
5
Location
BC
Thank you to everyone who responded to my initial question. Your responses and tips are most helpful. My first attempt using metal as an inlay. Next time I will use a scrapper.

D'Arcy
Salmon Arm BC Canada
 

Attachments

  • IMG-8520.jpg
    IMG-8520.jpg
    753.3 KB · Views: 40

Ray-CA

Member
Joined
Nov 14, 2020
Messages
289
Location
San Diego CA, USA (SAN)
I can't get DNA here in California either but, I can get 99% isopropyl alcohol at just about any grocery or drug store. Since there is only 1% water in the solution, I don't see any raising of the grain. You might try that.

Ray
 
Top Bottom