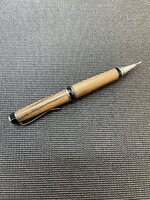
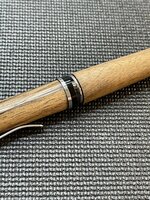
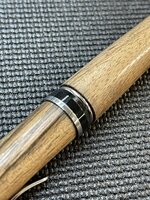
Second Attempt at the Cigar Pen.

Signed-In Members Don't See This Ad

Stephanie

Member
Joined
Mar 30, 2021
Messages
124
Location
Washington State
This is a challenge. Pretty sure I had the bushings in the right order. Pretty sure....I even turned one at a time. The two pieces looked amazing. Then I realized...

1). Pay attention to the grain, before you put the bushings on and turn it. This complicated little bugger has no mercy.
2). Check to make sure the pen blanks are the right length before turning. Not sure how, thought I was pretty careful when I drilled/sanded to the brass, but one was shorter then it was supposed to be and so the ink refill turning thingy doesn't work properly.
3) Glad Take #1 is always the silver finish. Not a fan. Tomorrow we go gold. Take #2.
4). If the bearings had been in the right place, I did do a pretty good job getting the ends matched up with the bearings and the sloping size difference of each end. 😁

Hopefully the batteries for my calipers arrive early. I need them. Apparently my sense of size is a bit off, as I obviously did not get the bushings in the correct order. 🤷‍♀️😔


1F8AA1FA-64FA-4B1E-B219-24FA933A316B.jpeg22484296-FEE6-4D37-BA42-0B341DC35240.jpegDEFD4178-8142-41E9-9E07-0955326F50A4.jpeg
 
Signed-In Members Don't See This Ad

Brian G

Member
Joined
Jul 2, 2013
Messages
1,567
Location
Bloomington, MN
Try so hard, be so careful and still mucked it up. 🤷‍♀️. I need a pen kit sponsor. 😁. Still fun.
Did you by chance mistakenly use one of the upper brass tubes as the lower tube? The lower tube is the longer of the two. If you used a shorter tube for the lower barrel, that might explain why the ink fill protrudes. Before you start #2, verify the lengths of the brass tubes you have on hand or you might end up with the opposite problem.

Here's what might be a helpful link Keeping things organized

Another key in my view is establishing good habits from the start. For example, I use three different colored Sharpies to color the bushings. Red is ALWAYS the nib, green is ALWAYS the finial, and blue is ALWAYS for the lower end of the upper barrel. I also rim the inside of the brass tube with the corresponding color, just in case I don't put the barrels back on my rack properly, or drop a barrel.

There's nothing wrong with learning how to disassemble a pen, turn off the material, and starting over.

My comments are meant to be helpful. Keep working at it. 😄
 

Mr Vic

Member
Joined
Aug 11, 2008
Messages
1,865
Location
Falcon, CO
Brandy, Almost look like you assembled bass ackwards. The Upper barrels (clip end) on a cigars are bigger diameter. Dissasembly practice and reverse tubes.
 

Brian G

Member
Joined
Jul 2, 2013
Messages
1,567
Location
Bloomington, MN
Brandy, Almost look like you assembled bass ackwards. The Upper barrels (clip end) on a cigars are bigger diameter. Dissasembly practice and reverse tubes.
Vic, I think it looks that way because Stephanie (not Brandy) reversed the bushings for the center band (i.e., upper bushing for lower barrel used for lower end of the upper barrel, and lower bushing for upper barrel used for upper end of the lower barrel). The upper center is overturned, and the lower center is underturned.
 

jttheclockman

Member
Joined
Feb 22, 2005
Messages
19,082
Location
NJ, USA.
Yes hate to say this you got the barrels mixed up. The shorter barrel is always the cap end on all pen kits that are 2 parts. I told you these are one of the most tricky kits on the market but there are others where there is 4 different sized bushings and Majestic kits are another one. Keep at it you are doing fine and learning as you go. Keep that one around so you will have an example to look back on.
 

TDahl

Member
Joined
Dec 11, 2019
Messages
1,889
Location
Brentwood
One of the first things I heard when I began turning pens is there is going to be a lot of FAIL (First Attempt In Learning.) You can always order more tubes and disassemble the first pen so you can save the components. I do like your choice in the pen blank, and your finish looks pretty good.
 

Stephanie

Member
Joined
Mar 30, 2021
Messages
124
Location
Washington State
Yes hate to say this you got the barrels mixed up. The shorter barrel is always the cap end on all pen kits that are 2 parts. I told you these are one of the most tricky kits on the market but there are others where there is 4 different sized bushings and Majestic kits are another one. Keep at it you are doing fine and learning as you go. Keep that one around so you will have an example to look back on.
I blame you. You cursed me. 😂. Tomorrow I will try again. As soon as I get the batteries for my calipers delivered.
 

sorcerertd

Member
Joined
Sep 30, 2019
Messages
2,655
Location
North Carolina, USA
I have to agree with John. That looks more like a mixup with assembly than with the turning. Been there, done that. Dis-assembly is definitely something worth learning.
 

Stephanie

Member
Joined
Mar 30, 2021
Messages
124
Location
Washington State
Did you by chance mistakenly use one of the upper brass tubes as the lower tube? The lower tube is the longer of the two. If you used a shorter tube for the lower barrel, that might explain why the ink fill protrudes. Before you start #2, verify the lengths of the brass tubes you have on hand or you might end up with the opposite problem.

Here's what might be a helpful link Keeping things organized

Another key in my view is establishing good habits from the start. For example, I use three different colored Sharpies to color the bushings. Red is ALWAYS the nib, green is ALWAYS the finial, and blue is ALWAYS for the lower end of the upper barrel. I also rim the inside of the brass tube with the corresponding color, just in case I don't put the barrels back on my rack properly, or drop a barrel.

There's nothing wrong with learning how to disassemble a pen, turn off the material, and starting over.

My comments are meant to be helpful. Keep working at it. 😄
Honestly I am not sure what all I goofed up. Tomorrow I will go figure it out. I did manage to grab the two different size tubes when I started. But something obviously went haywire. I love your idea of color coding. I am an organizing freak so this is right up my alley. I love peoples comments. I have no desire to reinvent the wheel, I just appreciate being able to steal spokes from everyone to create my own. 😏
 

Stephanie

Member
Joined
Mar 30, 2021
Messages
124
Location
Washington State
Vic, I think it looks that way because Stephanie (not Brandy) reversed the bushings for the center band (i.e., upper bushing for lower barrel used for lower end of the upper barrel, and lower bushing for upper barrel used for upper end of the lower barrel). The upper center is overturned, and the lower center is underturned.
I think so also. I took everything off the lathe together so I wouldn't mix them up. Tomorrow will tell when I have the mind set to figure it out.
 

jttheclockman

Member
Joined
Feb 22, 2005
Messages
19,082
Location
NJ, USA.
I blame you. You cursed me. 😂. Tomorrow I will try again. As soon as I get the batteries for my calipers delivered.
:):) Tried to warn you ahead of time. As I said there are more kits out there that are like this. You will not be able to reverse the bottom and the top because you turned them down already. Chalk it up to a learning experience. If you want you can knock the parts out using a set of transfer punches which we all have a few sets of and you will too. Harbor Freight is the place to get them and at a reasonable price. If you save the parts then just buy extra tubes the next time you place an order for those kits and start over. It is actually a good idea whenever you buy kits to buy a couple sets of extra tubes. They do not go bad and may some day come in handy. I do this all the time.
 

Stephanie

Member
Joined
Mar 30, 2021
Messages
124
Location
Washington State
:):) Tried to warn you ahead of time. As I said there are more kits out there that are like this. You will not be able to reverse the bottom and the top because you turned them down already. Chalk it up to a learning experience. If you want you can knock the parts out using a set of transfer punches which we all have a few sets of and you will too. Harbor Freight is the place to get them and at a reasonable price. If you save the parts then just buy extra tubes the next time you place an order for those kits and start over. It is actually a good idea whenever you buy kits to buy a couple sets of extra tubes. They do not go bad and may some day come in handy. I do this all the time.
You did warn me. It is the only other kit I have that included the bushings. I had to order the bushings to go with the several dozen kits I ordered that didn't come with them. I didn't know I had to order those separate. Transfer Punches? Is that the specific name to look for? This kit did come with several extra tubes. It would be great to try again and make it right. Probably plenty of YouTube videos that show you how I would guess?
 

jttheclockman

Member
Joined
Feb 22, 2005
Messages
19,082
Location
NJ, USA.
https://www.harborfreight.com/28-piece-transfer-punch-set-3577.html

The object is to find the correct size punch that just fits inside the tube. Now comes the tricky part but many just hold the piece with the punch in the tube in one hand and with a hammer a quick blow to the punch it will dislodge the parts. remember they were just pressed into the tube so they will slide back out. There are different ways people do this and I am sure others will chime in but that is the basic principle of how to disassemble.
 

Stephanie

Member
Joined
Mar 30, 2021
Messages
124
Location
Washington State
https://www.harborfreight.com/28-piece-transfer-punch-set-3577.html

The object is to find the correct size punch that just fits inside the tube. Now comes the tricky part but many just hold the piece with the punch in the tube in one hand and with a hammer a quick blow to the punch it will dislodge the parts. remember they were just pressed into the tube so they will slide back out. There are different ways people do this and I am sure others will chime in but that is the basic principle of how to disassemble.

I watch this guy all the time. I was going to go this route. I like the pliers.
 

magpens

Member
Joined
Feb 2, 2011
Messages
15,913
Location
Canada
@cheetah1965

FWIW ..... I will offer this .....

I think it is better to buy another Cigar kit and start from scratch all over again. . Cigar kits are not that expensive.

You can come back at a later date and learn disassembly on this one if need be.

The Cigar kit is one of the trickiest kits there are .... due to the 4 different bushing sizes, and due to the shaping to get it to look right.
I honestly expect that disassembly will also be tricky. . I think it is best not to get involved with disassembly at this early stage in your pen career.

Actually ..... BETTER STILL ..... why don't you move on to a different kit and put the making of a Cigar kit on the back burner.

I believe you said that you had bought a couple of dozen other kits. . Let us know what kits they are, and we can recommend one for your next pen.

IMHO, the making of a Cigar pen is better left for a time when your pen-making skills are more highly developed.
 

leehljp

Member Liaison
Joined
Feb 6, 2005
Messages
9,314
Location
Tunica, Mississippi,
I am glad to see that you have some calipers ordered. It is most helpful to measure the pen occasionally as it is turned, particularly in getting it to size. The correct use of a good set of calipers "should" help as it requires a slightly different way of thinking.

1. Cut the blank in two at the correct length as measured by the tubes.
2. lay them down and line them up.
3. measure with the calipers the nib where the wood fits to the nib and write that number down down - and write down what that number corresponds to on the pen.
4. do the same for where the lower barrel end meets the Center Band, write it down as well (and what it corresponds to on the CB)
5. upper barrel - measure the CB for the upper barrel, write it down. (and what it corresponds to on the CB)
6. upper barrel - measure for the clip end, write it down. (and what it corresponds to on the clip end)

You can number each end of the two blanks if you want, and it is helpful to many to do that. And It is helpful to some to lay out the parts of the pen that fit in each location.

BTW. John T and I (and I think some others) have a notebook in which we put the instructions for each pen type, AND we mark down the measurements of the fittings - clip end, center band for upper, center band for lower barrel and nib end.

With this method, it helps in getting things lined up before starting. It only takes an extra 2 minutes for the process above and is very helpful in visualizing the parts, the blanks and the location of each before turning. The marking of 1, 2, 3, 4, on the blank keeps the order straight.
 

KenB259

Member
Joined
Dec 24, 2017
Messages
3,537
Location
Michigan
If you turned them correctly, meaning you had the bushings set up correctly, then it's fixable, assuming you just assembled incorrectly.
 

GuyOwen

Member
Joined
Mar 25, 2021
Messages
49
Location
Minneapolis Minnesota
Did you by chance mistakenly use one of the upper brass tubes as the lower tube?
i find this kinda funny because you thought the tubes were a mistake when if you looked at the assembly manual you can see exactly what you need to people really have to read those paper booklets that come with their kits and tools
 

penicillin

Member
Joined
Feb 27, 2019
Messages
1,036
My early pens were failures, too. You learn from your mistakes and they quickly become a thing of the past.

You shop at Woodcraft, so I looked at the instructions for the "Premier Cigar Pen Kit" 77C21:

What struck me was that everything is oriented with the Body(Tip)-Left, Cap-Right, except "Mandrel Preparation", which is oriented in the other direction. The Mandrel Preparation illustration shows the pen blanks on the mandrel in the reversed direction from the rest of the illustrations.
-> Could that be the reason for your problem with the pen above?

(In addition, you may have mixed up which pen tube is which.)

I prefer to keep my pens always pointed in the same direction throughout the pen making process. From setup on the mandrel, to turning, sanding, and finishing, all the way through assembly. I always keep everything:

Pen Tips: Left
Pen Caps: Right

(The Tips-Left, Caps-Right direction didn't feel natural to me at first, but nearly all of the instructions for my pen kits are oriented that way, so I forced myself to get used to it.)

Most pen turners make or find something with a V-groove in for layout before and during assembly. If you don't have anything with a v-groove or can't make one, tape two rulers or flat sticks to a flat board or table surface, leaving a thin groove between them. Before any assembly steps, they place all of the small pen kit pieces from tip to cap order, including the newly turned pen blank(s). As you lay out the parts, keep a special eye open for springs, which disappear easily. After laying everything out, check to make sure that the size of the ends of the turnings match their corresponding pen kit parts.
 

mnerland

Member
Joined
Mar 26, 2019
Messages
124
Location
Bowling Green, KY
I agree with Ken B. By the photo of the center band....one side is over turned and one side under turned. Possibly just flipping the lower tube end for end and making that the upper tube. Then flipping the upper tube end for end and making that the lower tube. Very possible just a mistake in assembly.
 

magpens

Member
Joined
Feb 2, 2011
Messages
15,913
Location
Canada
What struck me was that everything is oriented with the Body(Tip)-Left, Cap-Right, except "Mandrel Preparation", which is oriented in the other direction. The Mandrel Preparation illustration shows the pen blanks on the mandrel in the reversed direction from the rest of the illustrations.
-> Could that be the reason for your problem with the pen above?

Good observation . . .

I pointed this out some time ago. . .

Lousy instruction sheet !! . . . would confuse everybody.
 
Last edited:

jjjaworski

Member
Joined
Feb 22, 2012
Messages
914
Location
Las Cruces, NM
I would set it aside and possibly re-work it at a later date after you have gained more experience at turning pens.

Once you figure out how to disassemble a cigar pen- that might be the time to rework this one. You can just buy an extra set of tubes and start over OR turn off the wood on these and use them again.

The excitement of making those first pens can overwhelm us all. Once you make a few of the same type kit things will be much easier and methodical.

Next time you buy some pen kits you like , get a couple of extra brass tubes for that kit. They do come in handy when we hit those pesky speed bumps.
 

sorcerertd

Member
Joined
Sep 30, 2019
Messages
2,655
Location
North Carolina, USA
After seeing quite a few members mention this assembly/disassembly tool, I finally ordered one. Why did I not do this sooner?
 
Joined
Mar 16, 2021
Messages
21
Location
Pennsylvania
Buying extra tubes has been my routine. Prior to joining this group, I started with 5 slimline kits, and bought 2 extra packs of tubes "just in case".
I made 2 thus far, 1 acrylic and 1 wood. Mistake I made was forgetting non-stick bushings for the finishing of the wood one (despite having them on my shopping list lol), so that one is bare wood, going to see how the oils from my hand change it. (i've since gotten the bushings)
Instructions are always helpful, even for the easier kits. I find myself going over them a few times during the process, and lay the material out exactly like the diagram. Although, as noted above, the diagram isn't always correct.
Yesterday, I got a little overconfident, and attempted a 3/8" kit (bolt action). 2 blown out blanks due to not having patience most likely, or the drill moved a bit as i was squaring off. Packed it in for the night, and started fresh today with 2 more blanks..this time waiting til the glue cures a bit more than 5 minutes *lol*
But yeah, mistakes happen to everyone, especially during the learning process. Chalk it up to a learning experience, and not get frustrated. :)
 

jttheclockman

Member
Joined
Feb 22, 2005
Messages
19,082
Location
NJ, USA.
As I mentioned there are those that use those pliers and also other methods to disassemble pens so find one that works well for you. For me it is easy to hold the pen and the punch and just smack it a few times being careful not to have the parts fly out.

After looking at the photos again and someone mentioning the overturning and underturning makes me believe it is just a matter of putting the blanks in the wrong order on the kit and easily fixed by taking them off and redoing. This way you did not loose the blanks at all. I would give this a try and would not wait to try these things. To me this way you get to learn another aspect of pen turning which you will need to learn anyway.

As Hank mentioned yes I keep instruction sheets in a folder with measurements on them and any notes I took when learning the kits. I suggest you do the same as you go through these kits. I will say again this is not the only kit that has 4 different bushings but this one has unique shapes to it that makes the flipping of bushings or tubes to stand out. Kits like the majestic have sightly different sized bushings on each pen tube but they are subtle but if mislaigned they jump out at you because the overturning and underturning stands out and it was just a matter of flipping the tube the wrong way. Good luck as you continue down the path of pen turning.
 

GuyOwen

Member
Joined
Mar 25, 2021
Messages
49
Location
Minneapolis Minnesota
the diagram isn't always correct.
Yesterday, I got a little overconfident, and attempted a 3/8" kit (bolt action). 2 blown out blanks due to not having patience most likely
i haven't ever had a diagram be wrong. and unless you're drilling by hand blow outs happen a way of preventing is to not apply alot of pressure if you are hearing alot of noise ease off on the tool let everything cool down and start again letting the tool do more work. i dont understand how people have a hard time with pen making its easier then you think it is and most mistakes happen because of very simple some times preventable reasons. 5 min is good enough if you're using CA glue and a activator
 

Stephanie

Member
Joined
Mar 30, 2021
Messages
124
Location
Washington State
After seeing quite a few members mention this assembly/disassembly tool, I finally ordered one. Why did I not do this sooner?
I should have gone that route. I bought the typical pen press. Disassembly not included. 😁 I didn't know this combo existed. Live and learn.
 

KenB259

Member
Joined
Dec 24, 2017
Messages
3,537
Location
Michigan
I should have gone that route. I bought the typical pen press. Disassembly not included. 😁 I didn't know this combo existed. Live and learn.
I have the same press. It's not great at disassembly if you're hoping on reusing the blank. Now for just disassembling to reuse the components it's fine. I did have to replace the sliding mechanism on mine, the part that the handle attaches to. The stock one is very wimpy. I found a heavier duty one on Amazon that worked.
 

Brian G

Member
Joined
Jul 2, 2013
Messages
1,567
Location
Bloomington, MN
i find this kinda funny because you thought the tubes were a mistake when if you looked at the assembly manual you can see exactly what you need to people really have to read those paper booklets that come with their kits and tools
I don't understand why you think my assessment that the wrong tubes were used is "kinda funny." It's quite logical. The upper tube for a cigar is shorter than the lower tube. Using an upper tube for the lower barrel would cause the inkfill to protrude further by the difference in length...like in the pictures. The upper barrel could be extended any length and have no effect on inkfill protrusion.

Perhaps you meant something else.
 

sorcerertd

Member
Joined
Sep 30, 2019
Messages
2,655
Location
North Carolina, USA
I have the same press. It's not great at disassembly if you're hoping on reusing the blank. Now for just disassembling to reuse the components it's fine. I did have to replace the sliding mechanism on mine, the part that the handle attaches to. The stock one is very wimpy. I found a heavier duty one on Amazon that worked.
Ken, which press did you get from Amazon?

As for this one, I removed a nib from a broadwell twist pen yesterday to line the pattern up wwith where I wanted the clip to be. It worked fine but had a spongy feel to it. I might look for something firmer than the silicone tubing to hold the barrels.

Until I picked up this press, I was just using the wood vise on my workbench for assembly and a piece of scrap leather for a grip (by hand) for disassembly. I definitely stepped up.
 

penicillin

Member
Joined
Feb 27, 2019
Messages
1,036
I like and recommend these for assembly. I have used several types of pen press accessories, and prefer these. They are available at Woodcraft:

Hint:
I prefer to use the side with no hole to press in pen tips (e.g., Slimlines). The hole seems like the obvious choice, but one time it left dents in a pen tip, and I found that the no hole side works well.
 

KenB259

Member
Joined
Dec 24, 2017
Messages
3,537
Location
Michigan
Ken, which press did you get from Amazon?

As for this one, I removed a nib from a broadwell twist pen yesterday to line the pattern up wwith where I wanted the clip to be. It worked fine but had a spongy feel to it. I might look for something firmer than the silicone tubing to hold the barrels.

Until I picked up this press, I was just using the wood vise on my workbench for assembly and a piece of scrap leather for a grip (by hand) for disassembly. I definitely stepped up.
I didn't buy an press at Amazon, I just bought a replacement part. I'll try and find it ad I'll post a link.
 

KenB259

Member
Joined
Dec 24, 2017
Messages
3,537
Location
Michigan
Ken, which press did you get from Amazon?

As for this one, I removed a nib from a broadwell twist pen yesterday to line the pattern up wwith where I wanted the clip to be. It worked fine but had a spongy feel to it. I might look for something firmer than the silicone tubing to hold the barrels.

Until I picked up this press, I was just using the wood vise on my workbench for assembly and a piece of scrap leather for a grip (by hand) for disassembly. I definitely stepped up.
Mine snapped the rivets the first time I tried disassembling on it
 

KenB259

Member
Joined
Dec 24, 2017
Messages
3,537
Location
Michigan
Oh, sorry, I misread that. No need to search for a part then. Thanks for clarifying that.
No problem. I did just buy a replacement part. Way more heavy duty than the original one. The only thing that didn't fit is the threads in the ordinal plastic piece. I just made a new one.
 
Signed-In Members Don't See This Ad
Top Bottom