On Center Segmenting Drilling

Signed-In Members Don't See This Ad

Wmcullen

Member
Joined
Dec 1, 2020
Messages
397
Location
Fairfax, Virginia
I'm not sure if this process is right or wrong; unique or common. But it works for me and I want to share in case it's interesting.​
10: On Center Drilling
last post: 09: Center Band Circles: Part Deux
j2.jpg
One of the first segmented pens I made involved putting a plug of curly maple into a cocobolo blank. I was very happy with it. But when I tried to make more, all the plugs looked "smeared."
I could have pretended it was intentional... but it wasn't and it bothered me.
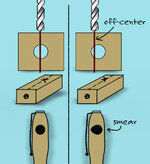
The Problem
The holes I drilled were off-center.
My impatience and imprecision yielded poor results and I realized my first pen's success was just luck.
j1.jpg


Here's my new process
(Not rocket surgery, just how I do it.)
j4.jpg

I decided it's better to drill into blanks that are "roughly" turned round.
It just seems easier to gauge where the center is.
For smaller holes, I can "eye-ball" it and everything works just fine.
But larger holes may need another solution.

Solution #2: Overkill
To be more precise, I use a jig that clamps to the base of my drill press. (File attached.)
It has a classic v-shape trench to hold the cylinder still. And I added a swinging measuring arm to identify the center.
Using this in combination with my drill press's laser finder means I can hit the center accurately.
j6.jpg

j5.jpg

Here's what it looks like in real life:
j7.jpg

Summary
For my pens, precision is a matter of perception. How exact does it need to be to look good?
It's nice to have a range of options available when trying to appear precise: everything from "quick and dirty eye-balling" to "carefully measured and deliberate."

-Cullen

About the 3d Jig file
The geometry (*.obj file) for this Center Finding Jig is attached as a *.zip file called "centerDrillJig.zip."
It consists of two pieces: the base and the arm.
I used a steel rivet for the arm pivot.
The holes the rivet pass through will probably need to be re-drilled carefully.
j3.jpg
 

Attachments

  • j1.jpg
    j1.jpg
    43.7 KB · Views: 138
  • centerDrillJig.zip
    14.7 KB · Views: 170
  • j1.jpg
    j1.jpg
    43.7 KB · Views: 135
Signed-In Members Don't See This Ad

leehljp

Member Liaison
Joined
Feb 6, 2005
Messages
9,314
Location
Tunica, Mississippi,
Are you into selling the 3D printings? I am sure some could use it. Great looking jigs!

Ken is right on with stripes. And you are right on to turn it round before drilling. Having a jig helps considerably for most people. Then there are those who like, Sam Maloof, have crosshairs in their eyeballs! 😁 (It's in his book.)

For me, I figure the angles, mark the spots and drill. Going straight in is not a problem once the spots are marked.

AND Pen Wizards are great for doing this also.

Lastly, Cullen, you are a great natural teacher! Many can do what you do fairly easily, but explaining and drawing it out to those without experience, as you do so easily - takes special teaching talent! Well done!
 
Last edited:

jttheclockman

Member
Joined
Feb 22, 2005
Messages
19,082
Location
NJ, USA.
It is one way to drill for dots I drill both square stock and also round. Depends on detail of the segmenting. Looks good.

I just take the rod and place against a straight edge and mark a line down the center. Here is another way if case you never seen this.

http://www.bing.com/videos/search?q...7F0B8BA226B7981373867F0B8BA226B79&FORM=VDQVAP

Another video


And another method

https://www.instructables.com/Cross-Hole-Drilling-In-Round-Rod-Stock/

And a method to make jig. As you see this has been around a long time and there are various ways to do this. Here is another.

http://www.bing.com/videos/search?q...deos/search?q=drilling+round+rods&FORM=HDRSC3
 
Last edited:

howsitwork

Member
Joined
Jul 9, 2016
Messages
2,299
Location
Thirsk
Old trick is to turn to,round between centres then move to vice in the drill press ( with cylinder above level of the vice jaws ) and lay a metal rule across the top of the work . Trap the rule between your drill bit and the work. View the rule and when the rule is level the drill bit tip is on centre line. Remove rule and drill
 

Wmcullen

Member
Joined
Dec 1, 2020
Messages
397
Location
Fairfax, Virginia
Thanks for the great responses!
Are you into selling the 3D printings?
Hank- Thanks for asking, I take it as a compliment. I'm not selling these jigs right now. It's all just play in my occasional free-time. But I do like the idea of finding ways to share with anyone who is interested. And I understand there's only a small subset of this group that can access 3d printers. I'll continue to try and find a good way to close that gap.

It is one way to drill for dots...
John- thanks for the additional (and often times BETTER) ways to accomplish this. It gets me thinking about improvements.... which provide endless fun!

... stripes.
Ken- If you and Hank are talking about this process and stripes, I'll need to investigate. Thanks for the connection!

All your feedback is greatly appreciated. It gets me thinking in new directions!
Best,
Cullen
 

KenB259

Member
Joined
Dec 24, 2017
Messages
3,537
Location
Michigan
Thanks for the great responses!

Hank- Thanks for asking, I take it as a compliment. I'm not selling these jigs right now. It's all just play in my occasional free-time. But I do like the idea of finding ways to share with anyone who is interested. And I understand there's only a small subset of this group that can access 3d printers. I'll continue to try and find a good way to close that gap.


John- thanks for the additional (and often times BETTER) ways to accomplish this. It gets me thinking about improvements.... which provide endless fun!


Ken- If you and Hank are talking about this process and stripes, I'll need to investigate. Thanks for the connection!

All your feedback is greatly appreciated. It gets me thinking in new directions!
Best,
Cullen
Yes stripes have to go in perfectly normal to a round surface, not a big deal if you're doing 4, not so easy if you're doing more or less. To add to the mix, the drill through for the tube has to be darn near perfect as well or you'll get slanted stripes. Sorry this is taking off in a new direction. You're jigs are awesome, I admire them. Figuring out and building jigs as solutions is one of my favorite woodworking endeavors.
 

KenB259

Member
Joined
Dec 24, 2017
Messages
3,537
Location
Michigan
Here's one for you to ponder. Can you figure out a jig to place dots that run on an angle completely around a pen? Here's one I made for last years bash. Looks simple, but it was a humbling experience. I had to achieve dots that remained centered between the aluminum segments. I think there are 6 dots.
 

Attachments

  • 524446FB-EF38-471C-AE3C-8EA1055DA39A.jpeg.jpg
    524446FB-EF38-471C-AE3C-8EA1055DA39A.jpeg.jpg
    123 KB · Views: 155

leehljp

Member Liaison
Joined
Feb 6, 2005
Messages
9,314
Location
Tunica, Mississippi,
Here's one for you to ponder. Can you figure out a jig to place dots that run on an angle completely around a pen? Here's one I made for last years bash. Looks simple, but it was a humbling experience. I had to achieve dots that remained centered between the aluminum segments. I think there are 6 dots.
This is where the indexed pen wizard will shine. But it takes a good bit of figuring to learn the gearing. That has been more difficult to me than using an index on the lathe and then marking spots equi-distant apart. With the index, I can mark the number of longitude lines to be made, then with .5mm pencil draw the lines. Although your dots are spiral, they are equivalent-distance from each other ( measured from end to end) doing this - sets up a grid. I used to do this often enough.

Drilling straight in by hand at the cross sections of grids is not a problem for me and many who have experience. I am not in the same league or world as Sam Maloof (whom I mentioned above) but distances and angles come naturally to me, similarly as it does to him. I flabbergasts my wife as she asks me to measure something and I tell her what it is without measuring. Then she measures it and swears I must have measured it before hand.

As to angles, I don't know Paul in OKC personally, but I bet he could do somewhat the same, especially when it comes to sharpening drill bits by hand on a grinder - better than most of us can with a Drill Doctor.
 

Wmcullen

Member
Joined
Dec 1, 2020
Messages
397
Location
Fairfax, Virginia
Here's one for you to ponder. Can you figure out a jig to place dots that run on an angle completely around a pen? Here's one I made for last years bash. Looks simple, but it was a humbling experience. I had to achieve dots that remained centered between the aluminum segments. I think there are 6 dots.
Ken-
This is great. As the youth would say, "I think we're vibing!"
Over the past two weeks I've been tinkering at night and came up with an attachment to the last jig I made.
In the picture below, on the left, are the new gray pieces that act as a "stop" for an elongated guide as it revolves.
The rough blank on the right was made using this idea.
Sorry if the pictures and this brief explanation are confusing or unclear.
My next post, which I'm still writing and may go out next weekend, will explain it better.
Cullen
While it's working, I can't figure out if I'm "over-thinking" or "under-thinking" the solution. ("Just-right-thinking" is not always my strong suit! ;))
1.jpg
 

KenB259

Member
Joined
Dec 24, 2017
Messages
3,537
Location
Michigan
I'm loving it but your method will not work on the example I posted. It's very hard to explain, but I will try. You see on my example, I wanted the dots to be exactly in the center between the aluminum segments . I erroneously thought I could just drill equidistant between the aluminum segments, as long as they were 60 degrees apart, that it would be fine. Didn't work out because you see, as you turn it down and the diameter of the spindle shrinks, those dots "move on you", and they move way more than you might think. Now if aren't trying to keep them centered between another element, yours might work. I think your attachment might work, but it will never be a "one size fits all" solution because it will always be determined by the final diameter. I encourage you to glue up a blank similar to my example, doesn't have to be aluminum and try one out using your latest attachment. Also you could create a sample blank with your attachment, turn it to the desired size and measure their final angle, them you could glue in the aluminum or whatever segment at that angle you determined , might work.
 

jttheclockman

Member
Joined
Feb 22, 2005
Messages
19,082
Location
NJ, USA.
Ken If you have an indexing wheel on your lathe then you can establish the one set of lines something what Hank is trying to say. You mark the horizontal lines at each stop. Weather it is 6,8, or 12. Those dots will never move. Now you carefully measure between the aluminum on those lines and that gives you the center point for drill bit. Now how you drill is up to you. I would drill on the lathe. But you could do it with a drill press but you at the mercy of getting the drill bit always 90 degrees to the rod to drill straight.
 

KenB259

Member
Joined
Dec 24, 2017
Messages
3,537
Location
Michigan
Ken If you have an indexing wheel on your lathe then you can establish the one set of lines something what Hank is trying to say. You mark the horizontal lines at each stop. Weather it is 6,8, or 12. Those dots will never move. Now you carefully measure between the aluminum on those lines and that gives you the center point for drill bit. Now how you drill is up to you. I would drill on the lathe. But you could do it with a drill press but you at the mercy of getting the drill bit always 90 degrees to the rod to drill straight.
I get that, but, when you are referencing their relationship with another feature, as I showed in my example. they do in deed "move". I know this by experience. I am using the term "move" loosely. I encourage you to glue up a pen blank similar to the one I show here and see what you get. The goal being to have the center dots be exactly between the aluminum all the way around. Doesn't have to be aluminum of course. I think you'll be surprised. They'll look good when you start, not so much when you finish. I'd love to see your, or anyone's results. LOL I lost a few hairs on this pen.
 

leehljp

Member Liaison
Joined
Feb 6, 2005
Messages
9,314
Location
Tunica, Mississippi,
I'm loving it but your method will not work on the example I posted. It's very hard to explain, but I will try. You see on my example, I wanted the dots to be exactly in the center between the aluminum segments . I erroneously thought I could just drill equidistant between the aluminum segments, as long as they were 60 degrees apart, that it would be fine. Didn't work out because you see, as you turn it down and the diameter of the spindle shrinks, those dots "move on you", and they move way more than you might think. Now if aren't trying to keep them centered between another element, yours might work. I think your attachment might work, but it will never be a "one size fits all" solution because it will always be determined by the final diameter. I encourage you to glue up a blank similar to my example, doesn't have to be aluminum and try one out using your latest attachment. Also you could create a sample blank with your attachment, turn it to the desired size and measure their final angle, them you could glue in the aluminum or whatever segment at that angle you determined , might work.

Ken - GOT IT! I see that now. Honestly, I did what I get aggravated at others for not doing: I didn't look close enough. I just saw "spiral" - when looking at your pen. In a spiral world it will work as Cullen's jig does and as the pen wizard does. But your "oblique?" circles - circle back on you, and as you say "move" on you in relation to the dots! . . . in some sort of way similar to a square Celtic knot quits being square boxes and X's and becomes round Celtic Knots.

Off center drilling for tubes moves the lines unequally on striped pens too!
 

KenB259

Member
Joined
Dec 24, 2017
Messages
3,537
Location
Michigan
Ken - GOT IT! I see that now. Honestly, I did what I get aggravated at others for not doing: I didn't look close enough. I just saw "spiral" - when looking at your pen. In a spiral world it will work as Cullen's jig does and as the pen wizard does. But your "oblique?" circles - circle back on you, and as you say "move" on you in relation to the dots! . . . in some sort of way similar to a square Celtic knot quits being square boxes and X's and becomes round Celtic Knots.

Off center drilling for tubes moves the lines unequally on striped pens too!
You got it :) I wish I had pictures of the blank before turning, the aluminum and the angle of the dots didn't even look close to being the same angle, as they do when finished. I'm sure there's some mathematical explanation that would figure it all out from the get go.
 
Last edited:

dogcatcher

Member
Joined
Jul 4, 2007
Messages
2,359
Location
TX, NM or on the road
There are many methods to get the same end result. Many years ago, about 45 I met a retired machinist, that liked to play with a wood lathe. He was an education on cheating to get an easy way to get something done. Today everyone has the same benefit. YouTube and Google. My method, look at the old Unimat lathe with mill stand. Sort of like today's 2 in 1 lathe milling machine. Decades ago I made a drill press column to fit my banjo. Over the years I picked up a Delta wood lathe cross slide that fit my lathe. My friend also helped me design a cross drill method similar to this. http://www.davidreedsmith.com/Articles/DrillGuide/DrillGuide.htm But David Reed Smith's drilling method is better than mine. The drill guide shown in the video above also works with other designs.

The machinist is machining metal, we are machining wood, same principles apply. Spend some time researching what you want to do, you will find detailed answers, unfortunately some will be long winded and useless, while others are presented so simple, that we fail to see the benefits of simple.
 

Wmcullen

Member
Joined
Dec 1, 2020
Messages
397
Location
Fairfax, Virginia
supl1.jpg

Ken- Thanks for the great conversation!
I "think" I'm seeing it.
I can line everything up perfectly on the surface (A) and drill. But when I turn the blank the hole will drift relative to the segment (B).
God bless the endless puzzles!
And I didn't say it before but I really like the pen. Moreso now that I've thought through it.
Cullen
 

KenB259

Member
Joined
Dec 24, 2017
Messages
3,537
Location
Michigan
View attachment 299406
Ken- Thanks for the great conversation!
I "think" I'm seeing it.
I can line everything up perfectly on the surface (A) and drill. But when I turn the blank the hole will drift relative to the segment (B).
God bless the endless puzzles!
And I didn't say it before but I really like the pen. Moreso now that I've thought through it.
Cullen
Your image shows it perfectly.
 

jttheclockman

Member
Joined
Feb 22, 2005
Messages
19,082
Location
NJ, USA.
Ken I will try it. I do not see it . First a couple questions. Did you make the entire blank before you drilled for dots?? If you establish the centerline left to right or east to west. Then measure on that line for each dot the center between both pieces of aluminum. This will give the north to south line. Why would it move. Your hole is between those two fixed points on all dots. As I said when drilling a round rod it is imperative to drill the holes 90 degrees to the rod. Not an easy thing. If slanted then the hole will be slanted and the hole would be oblong and not round. To establish that center line east to west you need to put in the lathe and work off center. That is why an indexing wheel will be good. I happen to have mine in for another blank I am currently working on. When I get done I will take photos of my so called procedure. Maybe I am not seeing something. But will show progress photos too. What I will do is cit the pieces at 45 degrees. I think that is what you used. I will start square and round and then procede.

I think I now see what you are saying with Cullens drawing of drill bit. You would have to match the angle of the piece and maybe 45 degree. Pictures are worth a 1000 words as they say. Now with that said, here is a suggestion. Would it work if you drilled a separate piece and then cut to the angle of the dots and then glued on the ends.??? Thinking out loud.

I am saying this because I have seen this done before but not with a segmented piece. It was done by YoYOSpin. Maybe I can find the pen. He did a write up too and what he used was a lathe with a drill mounted on a oneway mount. I bought that mount but found I can not use it because that is a 1" banjo rod and mine is 3/4" and never pursued it. I believe he drilled at an angle.

You may remember this thread
https://www.penturners.org/threads/pinned-pens.161725/#post-2043187

This was Ed's pen I was thinking about.

https://www.penturners.org/media/imported-photo-from-yoyospin.4320/

I keep editing this post because I am catching up on the reading and I see that Ken has mentioned what I just did too so he knows that will not work. I read Dogcatchers link and my drilling on an angle will not work too because he has photos as to what happens when you do this. So I will lean back on what I said about making the seperate pieces and then gluing together. That is what I may try. I like this type discussion. Gets the brain cells moving some. :)

I can not do it for the next day or two. I have a blank in the lathe that I need to drill and make slots in so I have my router setup on it but when done I will document my experiment or a couple of them because now I have another idea that came to me. We will get to the bottom of this.

I got the answer and it is so simple. Go back to the beginning and do as I said with the east west thing but do it on a blank that is finished size or just about with maybe a shaving above to get rid of blemishes. Dots will not move because you are not turning them down. Then drill as normal for tubes. That should work.
 
Last edited:

KenB259

Member
Joined
Dec 24, 2017
Messages
3,537
Location
Michigan
Ken I will try it. I do not see it . First a couple questions. Did you make the entire blank before you drilled for dots?? If you establish the centerline left to right or east to west. Then measure on that line for each dot the center between both pieces of aluminum. This will give the north to south line. Why would it move. Your hole is between those two fixed points on all dots. As I said when drilling a round rod it is imperative to drill the holes 90 degrees to the rod. Not an easy thing. If slanted then the hole will be slanted and the hole would be oblong and not round. To establish that center line east to west you need to put in the lathe and work off center. That is why an indexing wheel will be good. I happen to have mine in for another blank I am currently working on. When I get done I will take photos of my so called procedure. Maybe I am not seeing something. But will show progress photos too. What I will do is cit the pieces at 45 degrees. I think that is what you used. I will start square and round and then procede.

I think I now see what you are saying with Cullens drawing of drill bit. You would have to match the angle of the piece and maybe 45 degree. Pictures are worth a 1000 words as they say. Now with that said, here is a suggestion. Would it work if you drilled a separate piece and then cut to the angle of the dots and then glued on the ends.??? Thinking out loud.

I am saying this because I have seen this done before but not with a segmented piece. It was done by YoYOSpin. Maybe I can find the pen. He did a write up too and what he used was a lathe with a drill mounted on a oneway mount. I bought that mount but found I can not use it because that is a 1" banjo rod and mine is 3/4" and never pursued it. I believe he drilled at an angle.

You may remember this thread
https://www.penturners.org/threads/pinned-pens.161725/#post-2043187

This was Ed's pen I was thinking about.

https://www.penturners.org/media/imported-photo-from-yoyospin.4320/

I keep editing this post because I am catching up on the reading and I see that Ken has mentioned what I just did too so he knows that will not work. I read Dogcatchers link and my drilling on an angle will not work too because he has photos as to what happens when you do this. So I will lean back on what I said about making the seperate pieces and then gluing together. That is what I may try. I like this type discussion. Gets the brain cells moving some. :)

I can not do it for the next day or two. I have a blank in the lathe that I need to drill and make slots in so I have my router setup on it but when done I will document my experiment or a couple of them because now I have another idea that came to me. We will get to the bottom of this.

I made the blank and turned it round before drilling. I then took the measurements and drew it up in AutoCad to see where I had to actually drill the holes to make it work out in the end. I like these discussions too.


Sent from my iPhone using Penturners.org mobile app
 

jttheclockman

Member
Joined
Feb 22, 2005
Messages
19,082
Location
NJ, USA.
I made the blank and turned it round before drilling. I then took the measurements and drew it up in AutoCad to see where I had to actually drill the holes to make it work out in the end. I like these discussions too.


Sent from my iPhone using Penturners.org mobile app
Read my final comment. I think this would have been your answer. You relied on turning to size after you drilled for dots.
 

KenB259

Member
Joined
Dec 24, 2017
Messages
3,537
Location
Michigan
I got the answer and it is so simple. Go back to the beginning and do as I said with the east west thing but do it on a blank that is finished size or just about with maybe a shaving above to get rid of blemishes. Dots will not move because you are not turning them down. Then drill as normal for tubes. That should work.[/QUOTE]

In theory, this could work, I think you would have an extremely hard time drilling for tubes, especially it being segmented.


Sent from my iPhone using Penturners.org mobile app
 

jttheclockman

Member
Joined
Feb 22, 2005
Messages
19,082
Location
NJ, USA.
I got the answer and it is so simple. Go back to the beginning and do as I said with the east west thing but do it on a blank that is finished size or just about with maybe a shaving above to get rid of blemishes. Dots will not move because you are not turning them down. Then drill as normal for tubes. That should work.

In theory, this could work, I think you would have an extremely hard time drilling for tubes, especially it being segmented.


Sent from my iPhone using Penturners.org mobile app
[/QUOTE]
Why I do this all the time> Blank is round I chuck up in a collet chuck and good to go. I have one on the lathe that I said I am working on is basically the same thing we are talking about but no angle segmented piece. But I will drill for slots and dots and add aluminum and then cut to size and drill for tubes. I am about 1/32" proud of final dimention. I do that to clean up glue and any chips. Works for me.

You could do all work ahead of time including installing tubes or drilling for tubes and then turn down close to size drill dots and add tubes. If you put dots too deep a little drill work to clean out. To me that is the answer.
 

jttheclockman

Member
Joined
Feb 22, 2005
Messages
19,082
Location
NJ, USA.
The angled segmented piece though is what throws a monkey wrench in the works. Without that piece you wouldn't notice anything being wonky.


Sent from my iPhone using Penturners.org mobile app
That is correct and with Cullens drawing you see it right away. You are turning the dots down and that is what is changing the relationship to the aluminum. Yes if it were not segmented than the dots will not be seen because they all move the same amount.

Now what you did is add another pen to my 30 pen list to make before spring. That is OK will give it a try too.
 

KenB259

Member
Joined
Dec 24, 2017
Messages
3,537
Location
Michigan
That is correct and with Cullens drawing you see it right away. You are turning the dots down and that is what is changing the relationship to the aluminum. Yes if it were not segmented than the dots will not be seen because they all move the same amount.

Now what you did is add another pen to my 30 pen list to make before spring. That is OK will give it a try too.

Thirty pens before spring, you better get busy.


Sent from my iPhone using Penturners.org mobile app
 

mark james

IAP Collection, Curator
Joined
Sep 6, 2012
Messages
12,720
Location
Medina, Ohio
I'm loving it but your method will not work on the example I posted. It's very hard to explain, but I will try. You see on my example, I wanted the dots to be exactly in the center between the aluminum segments . I erroneously thought I could just drill equidistant between the aluminum segments, as long as they were 60 degrees apart, that it would be fine. Didn't work out because you see, as you turn it down and the diameter of the spindle shrinks, those dots "move on you", and they move way more than you might think. Now if aren't trying to keep them centered between another element, yours might work. I think your attachment might work, but it will never be a "one size fits all" solution because it will always be determined by the final diameter. I encourage you to glue up a blank similar to my example, doesn't have to be aluminum and try one out using your latest attachment. Also you could create a sample blank with your attachment, turn it to the desired size and measure their final angle, them you could glue in the aluminum or whatever segment at that angle you determined , might work.
Yup! But the masses don't understand ;)
 

darrin1200

Member
Joined
Mar 17, 2010
Messages
1,835
Location
Lyn, Ontario, Canada
I believe Cullen's jig will work perfectly, if you add in the third dimension. On a drill press, this will be achieved by tilting the table to the same angle that the slanted piece is at. This will keep the holes from "moving" as your turn down, because you are drilling straight through the section. Cullens jig will move the blank laterally, to keep it in line with the center of the section.
Unfortunately, the jig will only be viable for one angle. It would take better math than mine to calculate the length of each step, to traverse 360deg circumference at say a 60deg angle. You could however, make a series of stepped jigs to cover various angles.
Once figured out though, this could be a great add on to your jig Cullen.
 

KenB259

Member
Joined
Dec 24, 2017
Messages
3,537
Location
Michigan
I believe Cullen's jig will work perfectly, if you add in the third dimension. On a drill press, this will be achieved by tilting the table to the same angle that the slanted piece is at. This will keep the holes from "moving" as your turn down, because you are drilling straight through the section. Cullens jig will move the blank laterally, to keep it in line with the center of the section.
Unfortunately, the jig will only be viable for one angle. It would take better math than mine to calculate the length of each step, to traverse 360deg circumference at say a 60deg angle. You could however, make a series of stepped jigs to cover various angles.
Once figured out though, this could be a great add on to your jig Cullen.
The dots wont be round though, they will end up ovals.
 

jttheclockman

Member
Joined
Feb 22, 2005
Messages
19,082
Location
NJ, USA.
I believe Ken is right because that was my thought when I suggested drill on an angle. That is basically what you are saying but you are putting the blank on an angle. Dogcatchers link proves this.
 

jttheclockman

Member
Joined
Feb 22, 2005
Messages
19,082
Location
NJ, USA.
Boy I have to say this thread is resonating in my head. I worked on a blank for 2 days and was going to put the aluminum dots and stripes in and looked at the dots and they were not going in straight. Now I have used my router many times with the same setup and done this many times but something must have shifted. So I am now going to make a whole new blank after I figure out what shifted on me. I believe I need to raise the back of the router up a tad. If I would spin the way they are the dots would be oval. You have to love segmenting. :)

You know when you have a problem and you can not sleep. Well I just had to go to the shop and find out what happened. After about 5 minutes figuring how to correct it dawned on me how it happened. The platform my router rides on was built with a wood top. Last year I got a brilliant idea to place a thin piece of metal on top and now I can use strong earth magnets in strips of woods to use as spacers. well that did not really work well because they still moved if pushed on so will stick with the doublesided tape idea. But what this did was now raise the center up about 1/16". That is why the center of my bit is not on center. So I have to take 1/16" off the base of my router. That should be easy fix and it is designated as the router for the lathe anyway so no great loss. Have to say I took a transfer punch and chucked it in a collet chuck and lined it up with my center in the tailstock and it is dead on after all these years. It is 15 years old. Now I can sleep tonight. 😴😴😴
 
Last edited:
Signed-In Members Don't See This Ad
Top Bottom