Help with CA finish

Signed-In Members Don't See This Ad

MMWW

Member
Joined
Oct 28, 2020
Messages
12
Location
Hannawa Falls, NY
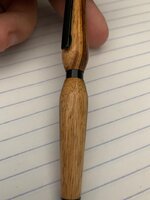
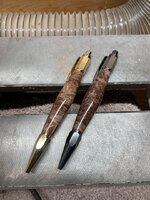
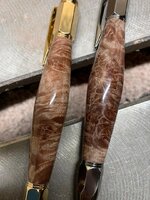
Hello all. I have been trying to get a beautiful polish with CA glue. I sand the wood to 12,000, wipe it down with mineral spirits and apply around 8 layers of medium CA glue using accelerant for faster drying. I spend about an hour from start to finish on a single pen and the finished blanks look beautiful... Upon assembly almost every time, the glue chips off and in my opinion ruins the pen.. Am I doing something wrong here? Should I opt for a wax friction polish?
Any suggestions would be greatly appreciated. Happy turning everyone!!

Best regards,
Kyle Scott
Morning Moon Wood Works
 
Signed-In Members Don't See This Ad

elyk864

Member
Joined
Jun 12, 2017
Messages
354
Location
Phoenix, AZ
You may not have an issue with your finish but an issue with your assembly method. I've seen that crack many finishes and blank types.
 

jttheclockman

Member
Joined
Feb 22, 2005
Messages
19,082
Location
NJ, USA.
Kyle the answer is quite long but will try to sum it up for you. Now there are many ways of doing a CA finish and you will probably see some here. But lets start with the sanding. Way over done in my opinion. You will never tell the difference between 400 grit or 1200 grit under a film finish because you can not feel the wood. So to me stopping at 400 grit works well. If you want to take to 600 go for it. Using all medium CA is a choice but not one I like to make because if you start with 3 to 4 coats of thin it will soak into the wood and seal it better than med where you are force drying it with the accelerator and making it brittle. If you do 3 to 4 coats thin and let dry naturally, then you can add your med coats ( I like about 4 to 5 coats med) If you are in a hurry then accelerator can be used if it is designed to be used with the CA you are using. They are not all compatable so beware of this.

Now after you did the finish you need to make sure your tubes are clean and free from CA getting in them. I always ream the ends with a reamer and also file the inside of the tube with a round rats tail file. When pressing the components make sure they are straight as you aply pressure. If you feel too much pressure is being applied I would file the inside of the tube some to give it some play. I also have used a dab of vaseline at times to help slide the parts in. This becomes a feel thing. Good luck.
 

leehljp

Member Liaison
Joined
Feb 6, 2005
Messages
9,314
Location
Tunica, Mississippi,
What type of wood are you using? It happens more often with oily woods. Also, why are you wiping it with mineral spirits? Some mineral spirits are oily by nature. This exacerbates the problem of CA sticking to the wood.

Next, I used to have the problem with oily wood. Two things can be done with oily wood (or most but not all woods): Wipe with Acetone, not mineral spirits. Also, use TBC (Turning between Centers). You are probably using bushings and finishing the blanks with the bushings. When you separate the bushings from the turned and finished blanks, the popping loose also loosens the finish from the blank.

To prevent that, score the CA buildup with a pen knife precisely at the joint of the bushing and blank. Score it deep to the bushing. OR with TBC, you finish the blank with CA without using bushings and you don't have that "pop" that lifts the CA from the blank.

Lastly, sand the ends on 400/600 sandpaper, or if you have an blank end sander (my mind has forgotten the correct term) use that to square it up and remove the excess CA from the ends on the blank, and that is the best way.
 

CjG78

Member
Joined
Feb 2, 2020
Messages
759
Location
Australia
Mate I wouldn't bother sanding past 600. I stop at 400 most of the time.
I clean with methylated spirit, the start with thin mercury flex and lightly spray mercury (or starbond) activator between each coat.
If the timber has an open grain like wenge or pheasantwood for example, I'll do 2 medium to fill in the voids, activator, then wet sand 1200 until completely dull and smooth. I check on the reflection on an angle to see if this has been achieved. Clean with metho and start the thin process again.
Once however many layers are desired (8 to 10 is plenty) it is very important to wet sand 1200 to completely dull the finish, lateral wet sanding with lathe off also. Check reflective light once again by looking at the blanks from a horizontal angle and make sure there is no shiny spots visible. (Leaving these spots now will result in un even shine on completion).
I thin wet micromesh sand through the entire grits, finishing with auto wax and shine on paper towel, then buff with a soft rag.
I have tried dozens of different techniques, this one is fail proof (for me anyway). I should mention that I use 2 drops of thin ca on paper towel (store bought) per layer, I keep the speed on fast, which others will disagree on, I find i get the same results at any speed, and I have a manual lathe so I may be a little lazy with this part! Haha. But it works for me.
You will end up taking advice from about 549.3 people, and combining ideas from a few to achieve your finish.
Start with the brand, there are a few good ones, I've found mercury flex to be excellent.
Now next step, once you have polished, make sure to have a piece of 1500 sandpaper, and sand the ends in a circular motion on a solid surface applying light pressure. This eliminates the chance of the ca laminating under pressure from assembly. Always check the smoothness of the ends before assembly, make sure they are perfect. Also a good tool to have is a chainsaw file. I give the tubes a quick file before assembly just to make sure that the parts don't need excess force on pressing, which can lead to the ca moving and buckling, an extremely frustrating thing, there is nothing worse than creating a perfect ready to assemble piece and ruining it on the last step of the process. I've had my fair share but I think you need to experience that to really make sure that this step is done every single time.
Lot's of things to take in, but if you practice the same process many times, it will become second nature and you will be knocking them out of the park!!
I've found starbond and mercury flex are compatible. Be careful on other brands as they can work against you.
Cheers!
Casey
 

Roly

Member
Joined
Dec 24, 2017
Messages
108
Location
Batlow, Australia
No advice from me Casey as you method is almost exactly the same right down to the sanding of the ends after then finish. Only thing I do different is tha I put a drop of CA on some paper towel and lightly brush the ends to prevent moisture getting into the end grain of the wood.
 

MMWW

Member
Joined
Oct 28, 2020
Messages
12
Location
Hannawa Falls, NY
Can you post a photo of the problem/defect
pen 2.jpg
 

Attachments

  • pen.jpg
    pen.jpg
    53.8 KB · Views: 209

jttheclockman

Member
Joined
Feb 22, 2005
Messages
19,082
Location
NJ, USA.
That is an adhesion problem. Not sure what the wood is but is probably an oily wood and needs to be cleaned with DNA or acetone before CA is applied. Also sure does look like a thick coat of CA. Too thick for what you are doing. I will say again also that the use of that many med coats and accelerator makes the CA brittle. When you insert parts the wood will expand and there is no flexibility in the finish. Some people choose flex CA just for that reason but to me loosen the tension in the tube for the parts as I said and also use 3 coats thin and 4 coats med. More is always not better. Does nothing for looks. Some people say it gives a deeper look but I do not agree. Aslo you did not say what CA you are using. People here have had problems with Stickfast.
 

egnald

Member
Joined
Jun 9, 2017
Messages
3,061
Location
Columbus, Nebraska, USA
Greetings from Nebraska - I suggest the following based on my current CA regimen (it hasn't let me down yet).

First, I would apply CA without cleaning the blank if Mineral Spirits was my only option. Mineral spirits is petroleum based and can actually leave an oily residue behind. Fortunately here in Nebraska Denatured Alcohol is available so that is what I use. In states with strict VOC regulations Denatured Alcohol might not be available so my second choice would be Acetone which is a VOC exempt solvent. Both of these remove oils that can cause problems with CA adhesion. (Since Acetone is a solvent for CA, I keep it on hand as an emergency de-bonder for when I stick something undesirable to my fingers and I use it to clean off my UHMW non-stick bushings).

If you use a solvent, make sure you give the blank a minute or two so that the volatiles can evaporate completely before applying any CA or other finish.

Second, as has already been suggested, I recommend starting with at least one or two coats of a thin CA product which will soak into the wood providing a stable base layer for the medium CA layers. In my regimen I wipe on 4 to 6 thin coats of thin CA without using accelerator. I have a 90 second timer that I use to give each coat adequate time to dry. Then I follow up by wiping on several coats of medium CA using an aerosol accelerator between coats.

Third, since I use a wet sanding process, as has also already been suggested, after removing any CA buildup "fingernails" from the ends of the blanks, I dab the ends on a blotter of thin CA in order to insure that the end grain of the wood is sealed against water infiltration.

Finally, also already mentioned, before assembly I use a hand reamer and/or round file to make sure there is no CA residue inside the tubes. I also use a swab to apply a film of Renaissance Wax inside the ends of the tubes to provide just a hint of lubrication when pressing the hardware in.

I hope some of these suggestions helps you in developing a finishing regimen that works out for you.

Regards,
Dave
 

Alchemist

Member
Joined
Aug 13, 2020
Messages
548
Location
Central Valley, California
I usually use acetone or 91% isopropyl alcohol to wipe my blanks down before the CA. Wood gets a couple of thin CA coats without acceleration, then move to medium or thick depending on the grain. One-step polish after sanded to 12k micro. The ends are either sanded with 400 or 800 grit (depends what is closer to my hand) and sometimes, I use a razor blade to cut the excess CA.

Where I tend to disagree with some of the folks here, and this is my opinion, is sanding the wood. I start with 400 and go to 12k in micro before wiping down. This gives me a super smooth finish. I usually then use linseed oil or danish oil before applying CA. This is my my way of doing it. It does add extra work, but it gives me a desired effect. Super smooth.
IMG_2028.JPG


Sent from my iPhone using Penturners.org mobile app
 

MMWW

Member
Joined
Oct 28, 2020
Messages
12
Location
Hannawa Falls, NY
Thank you for all of the input folks. after reading your replies Ive come to the conclusion that I am cleaning the sanded blanks with the wrong stuff (mineral spirits) as well as skipping the thin CA step. And I do put a lot of layers of medium CA on. I have had a couple pens that wore through the CA finish during the final sanding and buffing. I take responsibility for that as I am sometimes and aggressive sander with heavy hands. Stand by for a retry! will post pictures soon. Thanks again everyone. I really enjoyed reading the responses on this thread!

Best regards,
Kyle J Scott
 

MMWW

Member
Joined
Oct 28, 2020
Messages
12
Location
Hannawa Falls, NY
I usually use acetone or 91% isopropyl alcohol to wipe my blanks down before the CA. Wood gets a couple of thin CA coats without acceleration, then move to medium or thick depending on the grain. One-step polish after sanded to 12k micro. The ends are either sanded with 400 or 800 grit (depends what is closer to my hand) and sometimes, I use a razor blade to cut the excess CA.

Where I tend to disagree with some of the folks here, and this is my opinion, is sanding the wood. I start with 400 and go to 12k in micro before wiping down. This gives me a super smooth finish. I usually then use linseed oil or danish oil before applying CA. This is my my way of doing it. It does add extra work, but it gives me a desired effect. Super smooth.
Sent from my iPhone using Penturners.org mobile app
How long do you let the linseed oil set for before coating with CA?
 

MMWW

Member
Joined
Oct 28, 2020
Messages
12
Location
Hannawa Falls, NY
REDEMPTION!!!! Curly maple burl. 2 coats of thin CA natural dry, 4-5 coats medium CA half dry then accelerator. Polished with 12k grit micro mesh. These click pen kits are much more appealing than the slim lines. Thanks again for the input everyone!
 

Attachments

  • Curly maple burl 2.jpg
    Curly maple burl 2.jpg
    195.3 KB · Views: 206
  • Curly maple burl.jpg
    Curly maple burl.jpg
    167.1 KB · Views: 212

PreacherJon

Member
Joined
Aug 28, 2019
Messages
650
Location
Ohio
Well, you've got plenty of help here and you've come to the right website. All I can tell you is, once you find your method you can do... stick with it... everyone seems to do things differently. When it comes to wood... I only sand down to 280 grit. Apply two thin coats of CA. Spritzing accelerant each time... then do two coats of medium with accelerant each time. Then I use Micro Mesh up to the 12,000 grit. I always put then put a coat of Ren Wax on... this helps stop finger prints.
 

TonyL

Member
Joined
Mar 9, 2014
Messages
8,902
Location
Georgia
i use dna or liquid/pump bsi accelerator to prep blanks before apply ca. i first blow out any dust. i do wait a minute or two to allow the cleaner to dry/evaporate.
 

MMWW

Member
Joined
Oct 28, 2020
Messages
12
Location
Hannawa Falls, NY
i use dna or liquid/pump bsi accelerator to prep blanks before apply ca. i first blow out any dust. i do wait a minute or two to allow the cleaner to dry/evaporate.
Good to see someone from Alpharetta! I used to play hockey at The Cooler. My mother lives right next to The Golf Club of GA.
 

TonyL

Member
Joined
Mar 9, 2014
Messages
8,902
Location
Georgia
Good to see someone from Alpharetta! I used to play hockey at The Cooler. My mother lives right next to The Golf Club of GA.
Thank you. I lived in Queens for 28 years (attended Fordham in the Bronx, played baseball), then Manhasset for 15. been here for 13 and love it. Vacationed upstate many years. I saw the writing on the wall and got out of NY. Happy to say Hi to mom or send her a pen!
 

sparkynz

Member
Joined
Aug 8, 2020
Messages
3
Location
New Zealand
Not wishing to appear too critical? But l have a problem with this pen design. In my view the blank is too thick, especially at the clip end. Due to the shape, the clip is pushed outwards more than it should. This will make clipping the pen to a pocket or book, very difficult. It also adds pressure onto the pen surface. I personally would turn the pen to a smaller diameter. I for one am not a fan of the fat body, thin waist look.
 

MMWW

Member
Joined
Oct 28, 2020
Messages
12
Location
Hannawa Falls, NY
Not wishing to appear too critical? But l have a problem with this pen design. In my view the blank is too thick, especially at the clip end. Due to the shape, the clip is pushed outwards more than it should. This will make clipping the pen to a pocket or book, very difficult. It also adds pressure onto the pen surface. I personally would turn the pen to a smaller diameter. I for one am not a fan of the fat body, thin waist look.
I agree. I do like the look of it, but it does stress the clip quite a bit. Still getting a feel for shapes. Feel free to share some pictures!!
 

Alchemist

Member
Joined
Aug 13, 2020
Messages
548
Location
Central Valley, California
How long do you let the linseed oil set for before coating with CA?

Sorry, just saw your question. I rub it in and wipe it all within minutes. 10 minutes and it should be completely dry. If I'm letting it spin on the lathe, I tend to just wait till it's dry to touch then hit it with the thin CA.


Sent from my iPhone using Penturners.org mobile app
 
Top Bottom