Prototype

Signed-In Members Don't See This Ad
See more from DrD

DrD

Member
Joined
Jun 26, 2019
Messages
1,104
Location
Columbus, Mississippi
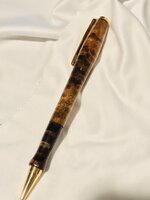
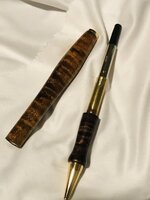
An on-line exchange with Mark James led to this. We were discussing the upturn at the base of the nib in some of my more recent pens I showed on IAP, and I allowed as how I got the idea - though I realize it is not an original idea - from studying the sections on fine fountain pens. So, what not put a section on a ballpoint? It's about as useful as hip pockets on a pig, but why not? I had hoped the section would be dark, ebonized, but I had neither component for ebonizing on hand, so I tried a dark stain - FAIL. The prototype is shown in the included 2 photos. Would love to hear your comments.

DrD
 

Attachments

  • BallPointNib1.jpg
    BallPointNib1.jpg
    185.3 KB · Views: 292
  • BallPointNib2.jpg
    BallPointNib2.jpg
    240.2 KB · Views: 294
Signed-In Members Don't See This Ad
I still like the nib profile. I also agree that the color match is a bit off - but this is what a prototype is for, so I'd say mission accomplished.

I would suggest you consider a metal ring as a divider to give a visual separation between the two sections. I think the one below was copper. Just a thought.


IMG_3343.jpg
 
Great idea Mark, thanks. And thanks for the comments. That's a beautiful pen you've got there. I hate to sound like the ignorant hillbilly that I am, but do you do the copper divider, with it being so much harder than wood?

Don
 
Great idea Mark, thanks. And thanks for the comments. That's a beautiful pen you've got there. I hate to sound like the ignorant hillbilly that I am, but do you do the copper divider, with it being so much harder than wood?

Don

It was a thin sheet from - K & S Precision Metals, a hobby supply company. ( 5"x 7") I got from either Hobby Lobby or Ace Hardware. It is .016" thick. I drilled a hole for the tube - drill this before you cut it out as it is easier to clamp. Then cut out a small section and epoxied it onto the lower blank. I turned both sections at the same time, so there was pressure supporting the metal section. If you have not turned a closed end pen, put it on your bucket list, a very fun way to while away a few hrs.

I actually do not remember if I turned it with a carbide tool or HSS. This was a few years ago and I'm lucky if I remember what I had for dinner last night. But, I do not remember that it was difficult, I did several of this profile with copper and aluminum. Wifey snagged this one and it is still in use.

Have FUN!
 
Well , I see that plain vanillla looks as curly as ever ! Were you hoping the section would be a uniformly dark solid colour, or did you want to preserve some appearance of curl ? Any dark brown or black paint should make it pretty uniform if that is what you want . Zero experience with ebonizing , but after finishing with any oil , my guess would be minimal retention of grain , similar to the effect of oil or CA on bog woods . We will look forward to seeing the results of your experiments .
 
Well , I see that plain vanillla looks as curly as ever ! Were you hoping the section would be a uniformly dark solid colour, or did you want to preserve some appearance of curl ? Any dark brown or black paint should make it pretty uniform if that is what you want . Zero experience with ebonizing , but after finishing with any oil , my guess would be minimal retention of grain , similar to the effect of oil or CA on bog woods . We will look forward to seeing the results of your experiments .
I was hoping for a uniformly very dark result for the section. I'll have the ebonizing liquids ready by next week and will have another go at it. One of the liquids is a strong tannic acid solution, like very strong tea. The other is iron acetate which you can make by dissolving steel wool in white vinegar.

Don
 
Back
Top Bottom