Specifically, what I think Mal and I are trying to figure out is how
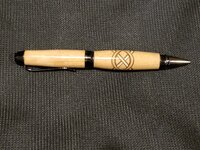
@duderubble got 4 unders and 4 overs. Seems like doing opposite sides might be the key to that. Intentional or not it is a very esthetically appealing look that I'd like to achieve and consistently duplicate. I haven't had an issue with the knots being off-center. I need to decide which is easier, sizing the insert to fit the kerf or cutting all the way through so that isn't an issue. JT, your comment about not clamping the ends makes sense. Your blank in the above picture was obviously made with the "not cut through" method and has the crisp lines with no gaps that
@duderubble achieved. Looking at that blank, on the side that's facing up it appears that the diagonal lines would end up under the horizontal lines.
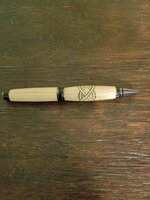
I'd love to see how the above-pictured blank looks when it's turned. You and I are saying the same thing about glue lines (gaps) being caused by the blank bowing. I think I can fix that by making sure the inserts are an exact fit and, like you suggested, not clamp the ends. I'll also try the 1-2-4-3 idea. What do you mean by "but still cut in order"?
@duderubble, again, I was very impressed with your results as a first try so I was trying to take elements from various techniques and combine them to get a better result in the end. I know, as the expression goes, "I am trying to pick the fly s**t from the pepper" but I feel like I'm zeroing in on a good overall technique.


") .
.


") It sounds like harping but sometimes repeating things just is a method to get across the message. You ask about the 3 0ver 1 under. Have to say this I never did a blank where you number the blank in sequential order so you have me at a disadvantage. I never really payed attention to others knots when they criss cross like that. All I knew was they did go over and under. It maybe the natural thing when you do number like that. That requires more investigating. Maybe someone else can jump in on that. To sum that up if you want consistency then number the blank as I do and many others do and that is opposite sides. This ghosting you talk about is due to the infill not matching the slot. That is glue lines. Again you need a consistent thickness piece or else there will be gaps. I wish there a way to show you what happens when you clamp the blank end to end. This is where many knots fail. When you clamp blank end to end, if that infill material is not dead on perfect thickness to slot then the blank will bow. You take this part away when you cut all the way through but when you do not you leave an anchor point or pivot point. Take a look at blank after you cut filled and glued. Now you go to sand excess off. You want to take only excess infill material off and not sand main blank. Then lay blank on flat surface. If it is bowed just slightly then when you do this 4 times it throws the inlay material alignment off because you are not cutting on the same angle each and every time. Hope this makes sense. As I mentioned I have learned not to clamp blank end to end when not cutting all the way through the blank. I do put more effort into making inlay material more exact to avoid voids. It has worked well for me. Again the quality of the cuts determine if there are minor imperfections because the smoother the cuts the better the or less of a glue line you will see. That is why I am not a fan of a bandsaw to do these especially if you are making multiple cuts to widen kerf. If you are doing a thin knot then one cut with blade on bandsaw works very well. Many examples on this forum. This is the knot I am working on now and I used the exact methods as I am telling you. But what I did was mix some white epoxy dye in the epoxy glue when I glued in the infill material. Now I had to cut the orange strips from a orange pen blank to make up the sandwich and I did that on my tablesaw. No drum sander needed. I did lightly sand the blade marks off using the flat glass method I described. I used same epoxy to glue white strips. Now I did have to just lightly sand the finished material some because with the epoxy it did make the material a tad thicker than the slot but again no huge problem and no drum sander needed.
It sounds like harping but sometimes repeating things just is a method to get across the message. You ask about the 3 0ver 1 under. Have to say this I never did a blank where you number the blank in sequential order so you have me at a disadvantage. I never really payed attention to others knots when they criss cross like that. All I knew was they did go over and under. It maybe the natural thing when you do number like that. That requires more investigating. Maybe someone else can jump in on that. To sum that up if you want consistency then number the blank as I do and many others do and that is opposite sides. This ghosting you talk about is due to the infill not matching the slot. That is glue lines. Again you need a consistent thickness piece or else there will be gaps. I wish there a way to show you what happens when you clamp the blank end to end. This is where many knots fail. When you clamp blank end to end, if that infill material is not dead on perfect thickness to slot then the blank will bow. You take this part away when you cut all the way through but when you do not you leave an anchor point or pivot point. Take a look at blank after you cut filled and glued. Now you go to sand excess off. You want to take only excess infill material off and not sand main blank. Then lay blank on flat surface. If it is bowed just slightly then when you do this 4 times it throws the inlay material alignment off because you are not cutting on the same angle each and every time. Hope this makes sense. As I mentioned I have learned not to clamp blank end to end when not cutting all the way through the blank. I do put more effort into making inlay material more exact to avoid voids. It has worked well for me. Again the quality of the cuts determine if there are minor imperfections because the smoother the cuts the better the or less of a glue line you will see. That is why I am not a fan of a bandsaw to do these especially if you are making multiple cuts to widen kerf. If you are doing a thin knot then one cut with blade on bandsaw works very well. Many examples on this forum. This is the knot I am working on now and I used the exact methods as I am telling you. But what I did was mix some white epoxy dye in the epoxy glue when I glued in the infill material. Now I had to cut the orange strips from a orange pen blank to make up the sandwich and I did that on my tablesaw. No drum sander needed. I did lightly sand the blade marks off using the flat glass method I described. I used same epoxy to glue white strips. Now I did have to just lightly sand the finished material some because with the epoxy it did make the material a tad thicker than the slot but again no huge problem and no drum sander needed.