First attempt at a section

Signed-In Members Don't See This Ad

FGarbrecht

Member
Joined
Aug 22, 2019
Messages
618
Location
NY
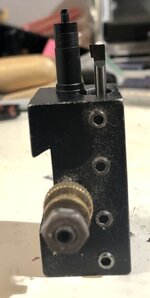
Tried my hand making a section for a Bock #5 feed/housing. I turned it on the metal lathe but had to do the drilling and tapping on the wood lathe because my Jacobs chuck / MT2 is a hair too long to fit on the mini-lathe, and I screwed up the internal threading for the feed. Actually, the threading was fine (although the fit with the Bock housing was very tight), but when I drilled out the other end to accommodate the smooth bore of the housing I went too far and ended up drilling out the internal threads that I had just tapped. Seems like I'm getting most of these lathe operations down OK but I still can't get the hang of drilling to a precise depth. I know it is (or sounds) trivial, but I have messed this up a bunch of times even though I measure twice and mark the depth on the drill bit with a sharpie.
So, I would mark this a partial success, and the section is usable if I glue in the feed instead of screwing it in, but I think I'll just keep practicing until I actually get it completely correct. Actually, not bad at all for a first try I guess.
 
  • Like
Reactions: DrD
Signed-In Members Don't See This Ad

eharri446

Member
Joined
Mar 17, 2016
Messages
1,035
Location
Marietta, GA
Try wrapping a piece of painters tape as a stop to indicate when you have reached the depth you want. If you leave a flap it will tell you that you are where you want to be.
 

frank123

Member
Joined
Feb 5, 2012
Messages
613
Location
Colorado
FWIW, I took the spindle out of my tailstock and chucked it in the chuck and cut light lines in it every 1/8th inch to use as a calibrated extension (depth) gauge when drilling. Easy and fast to do (a few minutes) and you can use whatever calibration distances you want.
 

Penultimate

Member
Joined
Aug 22, 2010
Messages
1,099
Location
Bartlett, IL 60103
I rigged a sheet metal bracket to my drill chuck. I have a dial indicator on a mag base that I attach to the tail stock and and set the plunger on the bracket. Works well enough for me to drill sections.
 

Fred Bruche

Member
Joined
Feb 11, 2018
Messages
972
Location
Philadelphia 19146
From what I understand of your writing it seems you have your steps backward, "the other end" should be drilled before doing the internal threading. Here's a video that I watched when I got started, I'm pretty much doing the same steps since
(you'll need to adjust the drill sizes and depth to your housing).
 

bmachin

Member
Joined
Jul 28, 2013
Messages
613
Location
Owensboro, KY
Maybe I'm misunderstanding what's going on but if your problem is that the taper on your chuck is too long for the tailstock on your metal lathe why not just cut it off. Sieg minilathes require short tapers in the tailstock in order to get full travel.

If I'm misreading the situation feel free to pay no attention to the man behind the curtain.

Bill
 

FGarbrecht

Member
Joined
Aug 22, 2019
Messages
618
Location
NY
From what I understand of your writing it seems you have your steps backward, "the other end" should be drilled before doing the internal threading. Here's a video that I watched when I got started, I'm pretty much doing the same steps since
(you'll need to adjust the drill sizes and depth to your housing).
Thanks Fred, video was very helpful. I was working from the tutorial on section making here but some steps were not clear. You're right, I did things a bit backwards. It really helps to see the complete process!
 

FGarbrecht

Member
Joined
Aug 22, 2019
Messages
618
Location
NY
Maybe I'm misunderstanding what's going on but if your problem is that the taper on your chuck is too long for the tailstock on your metal lathe why not just cut it off. Sieg minilathes require short tapers in the tailstock in order to get full travel.

If I'm misreading the situation feel free to pay no attention to the man behind the curtain.

Bill
My chuck and taper are chunky and long (they are the ones I use on the wood lathe). I ordered a mini-set for use on the metal lathe that is supposed to work on the 7x10.
 

FGarbrecht

Member
Joined
Aug 22, 2019
Messages
618
Location
NY
FWIW, I took the spindle out of my tailstock and chucked it in the chuck and cut light lines in it every 1/8th inch to use as a calibrated extension (depth) gauge when drilling. Easy and fast to do (a few minutes) and you can use whatever calibration distances you want.
The tailstock spindle I use on the wood lathe is marked but I haven't checked the calibration to see how accurate it is (which I will do, or at least add to the long list of stuff I need to take care of). The spindle on the minilathe isn't marked, but that's a great idea to chuck it up and put marks on it (will also add to the list).
Thanks
 

More4dan

Member
Joined
Mar 17, 2016
Messages
2,102
Location
Katy, TX
Just purchased this to add a DRO to my tailstock. At first I made go / no go gauges to check the depth of my holes for FP sections. I machined them out of aluminum to closely match the FP feed assembly but slightly smaller in diameter. I would drill, then check, then go a little deeper till I got it right.
IMG_0630.JPG


Sent from my iPad using Penturners.org mobile app
 

randyrls

Member
Joined
Feb 2, 2006
Messages
4,821
Location
Harrisburg, PA 17112
I turned it on the metal lathe but had to do the drilling and tapping on the wood lathe because my Jacobs chuck / MT2 is a hair too long to fit on the mini-lathe,

Frederick; The metal lathe may have a "short" MT2 taper in it or it may have a "tanged" MT2 socket. This keeps the chuck from spinning in the socket.
 
Last edited:

jalbert

Member
Joined
May 17, 2015
Messages
991
Location
Louisville, KY
You don't really need to measure the depth when boring out the section to accept the feed housing after tapping it. Just set up a boring bar in a tool holder like so, where it sticks out just to the area on the housing where the threads start.
 

Attachments

  • A53A0D18-E210-492C-9043-0C10FFD17361.jpeg
    A53A0D18-E210-492C-9043-0C10FFD17361.jpeg
    119.6 KB · Views: 236

More4dan

Member
Joined
Mar 17, 2016
Messages
2,102
Location
Katy, TX
You don't really need to measure the depth when boring out the section to accept the feed housing after tapping it. Just set up a boring bar in a tool holder like so, where it sticks out just to the area on the housing where the threads start.

John, where did you find such a small boring bar?

One could also mount their drill bit in a boring bar holder and use the compound to advance to a known depth. Set up time isn't so easy though.

Danny


Sent from my iPad using Penturners.org mobile app
 

jalbert

Member
Joined
May 17, 2015
Messages
991
Location
Louisville, KY
eBay. Micro 100. If you are dead set on using a drill bit, just get a set of collar style depth stops for the bit and set according to the same way I stated previously.
 

bmachin

Member
Joined
Jul 28, 2013
Messages
613
Location
Owensboro, KY
This appears to be the same tool from Amazon. Don't know how price compares to eBay:


Bill
 

jalbert

Member
Joined
May 17, 2015
Messages
991
Location
Louisville, KY
This appears to be the same tool from Amazon. Don't know how price compares to eBay:


Bill
It was about $30 if I remember correctly
 

FGarbrecht

Member
Joined
Aug 22, 2019
Messages
618
Location
NY
Second attempt at section using suggestions given here. Not perfect yet but better. The Bock housing fit is so tight that I can't get it out of the section (the nib and feed just pull out), so I have to work on tolerances. Also didn't drill deep enough to allow the converter to fit far enough in the back end to meet the feed, although a simple ink cartridge does fit. Those Schmidt converters are a PITA. The blank is a little piece of cast alumilite containing threads of 3d printing waste. I think it looks kind of pretty.
 

Attachments

  • section (1).jpg
    section (1).jpg
    113.7 KB · Views: 213

More4dan

Member
Joined
Mar 17, 2016
Messages
2,102
Location
Katy, TX
Congrats. Looks great! I did have to make a tapered stick to wedge in the feed housing to help unscrew it. The Bock is tight. You may have to go up a drill size. The material you used is pretty cool. Have you tried 3D printing the feed? You could finish the outside and thread with a tap.


Sent from my iPhone using Penturners.org mobile app
 

bmachin

Member
Joined
Jul 28, 2013
Messages
613
Location
Owensboro, KY
Have you tried 3D printing the feed?


Sent from my iPhone using Penturners.org mobile app

Undoubtedly you could 3D print a feed, but it would be a far from trivial exercise. Here's a link from a thread I started a couple of years ago to the website of a guy who designed feeds for pen manufacturers back in the 70's and 80's. Lots of real science and physics involved, but interesting if you want to spend the time.


Bill
 

FGarbrecht

Member
Joined
Aug 22, 2019
Messages
618
Location
NY
The material you used is pretty cool. Have you tried 3D printing the feed? You could finish the outside and thread with a tap.

Sent from my iPhone using Penturners.org mobile app
I have some cad files that I drew up in Fusion360 that I'm using to try to get a pen printed on my resin printer. There have been, shall we say, various technical factors that have prevented a successful print so far. I haven't tried to do this on my FDM printers but could be interesting as a proof of concept. One issue has been printing the threads, but it would be possible to print smooth surfaces and thread them after curing the print, which would solve a couple of problems regarding imprecision inherent in these cheap resin printers and the slicing software you have to use to prepare the design files for printing. If I actually every get something printed I'll post some pics here.
 

FGarbrecht

Member
Joined
Aug 22, 2019
Messages
618
Location
NY
Undoubtedly you could 3D print a feed, but it would be a far from trivial exercise. Here's a link from a thread I started a couple of years ago to the website of a guy who designed feeds for pen manufacturers back in the 70's and 80's. Lots of real science and physics involved, but interesting if you want to spend the time.


Bill
I thought about designing and printing a feed a while back but decided it was not a project for an amateur. I read the site you referenced and its fascinating and helpful but ultimately discouragin. Printing a section with the correct dimensions and tolerances is hard enough, but the thought of designing and printing the feed makes my head hurt.
 

FGarbrecht

Member
Joined
Aug 22, 2019
Messages
618
Location
NY
If not the Feed, maybe the front section. It would eliminate the drilling depth and ID problems. You could oversized the OD and turn to shape.


Sent from my iPad using Penturners.org mobile app
I have a cap, barrel and section printing right now, about 40% done and so far looking good. The design includes the cap and barrel threading (single start) as well as the Bock feed threading inside the section. Since it's a non-standard tap size I had to enter the thread dimensions in Fusion by hand, not an easy task. I should know tomorrow if things fit together or need more tweaking. The printer (Anycubic Photon) is pretty high resolution but unfortunately not very precise, so programmed dimensions for engineered parts don't necessarily work as intended. We'll see.
 

FGarbrecht

Member
Joined
Aug 22, 2019
Messages
618
Location
NY
You can always chase the threads with a tap. I hope you post results. Very interested.


Sent from my iPhone using Penturners.org mobile app
You're right, it would probably be a lot simpler to print the parts unthreaded and then go at them with taps and dies. Or I could use it as an opportunity to learn how to thread on the metal lathe. I'll definitely post a pic (unless of course its a total disaster in which case I'll probably spare myself the embarrassment).

BTW, I just got a little box from the little machine shop with a quick change tool post, some boring bars and other goodies. I picked up one of those tiny boring bars from Amazon that was mentioned here recently, anxious to see if it is useful for fixing things when my drill bit is just a tiny bit too small.
 

FGarbrecht

Member
Joined
Aug 22, 2019
Messages
618
Location
NY
Updates on a couple of things. The 3d resin pen printing project is on hold temporarily. Printed threads come out beautifully but they aren't tough enough to withstand repeated use. There some other resins available that are supposed to have more structural integrity so may have to experiment.

I'm on custom pen number two, taking copious notes this time. The section is good but the fit with the Bock #5 housing is too tight even with a slightly bigger (5.9 mm) bit. I'll try again with a 6 mm bit I guess. This is using black alumilite. I installed a tailstock DRO on the metal lathe which helps a lot with drilling out the section. Drilling out the cap and barrel is challenging on the metal lathe because of the tight fit between headstock and tailstock. I got a tiny boring bar which is great for making tiny adjustments where needed.

Pen number 1 is an urushi experiment and is looking pretty cool. I'm still applying lacquer layers and polishing but hope to have some pics soon. This is a frustrating process since it is mostly experimentation; finding useful info about how to actually do it is hopeless, it seems to be a closely guarded secret.
 

More4dan

Member
Joined
Mar 17, 2016
Messages
2,102
Location
Katy, TX
Updates on a couple of things. The 3d resin pen printing project is on hold temporarily. Printed threads come out beautifully but they aren't tough enough to withstand repeated use. There some other resins available that are supposed to have more structural integrity so may have to experiment.

I'm on custom pen number two, taking copious notes this time. The section is good but the fit with the Bock #5 housing is too tight even with a slightly bigger (5.9 mm) bit. I'll try again with a 6 mm bit I guess. This is using black alumilite. I installed a tailstock DRO on the metal lathe which helps a lot with drilling out the section. Drilling out the cap and barrel is challenging on the metal lathe because of the tight fit between headstock and tailstock. I got a tiny boring bar which is great for making tiny adjustments where needed.

Pen number 1 is an urushi experiment and is looking pretty cool. I'm still applying lacquer layers and polishing but hope to have some pics soon. This is a frustrating process since it is mostly experimentation; finding useful info about how to actually do it is hopeless, it seems to be a closely guarded secret.

The er32 chuck will help. You can recess the body and cap material into the headstock giving you more room to drill.

Before getting my collet chuck, I bored out my 3 jaw chuck to 0.730". Then I turn my material round between centers to just under 0.730". Then I could recess the material into the chuck and head stock to make room for drilling.

Danny


Sent from my iPhone using Penturners.org mobile app
 

FGarbrecht

Member
Joined
Aug 22, 2019
Messages
618
Location
NY
My er32 collets arrived already but the collet chuck is still somewhere in China :rolleyes:

I took the section and drilled it out with a 6 mm bit and ran the 6.4 mm tap a bunch of times. Still pretty tight. I would consider getting the matching 6.4 mm die to go over the housing threads but I'm too cheap to do that.
 

bmachin

Member
Joined
Jul 28, 2013
Messages
613
Location
Owensboro, KY
Fred:
A couple of suggestions.

First, I would be surprised if you removed any material at all with the 6mm drill. You probably just pushed it out of the way and it sprang right back. Urethanes have a lot of spring back under machining and I wouldn't be surprised if black is worse than clear. I would have a go at it with your boring bar.

Second, why not make a die for cleaning up the feed housing threads? If you don't want to go for steel, use aluminum. That for sure handle the plastic.

Finally, some screw machine (stubby) bits would come in handy with your short bed lathe, and in the larger diameters (around 1/2") would probably be long enough to complete a cap. A full length 1/2" bit on a 7x chinese lathe tailstock always looks to me like a disaster waiting to happen. In addition the stubbies are a lot more rigid. I use them whenever I can in all sizes. The only downside to them is that I don't believe that they exist in reduced shank versions so once you get over 1/2" (13mm?) you are out of luck.

FWIW,
Bill
 

More4dan

Member
Joined
Mar 17, 2016
Messages
2,102
Location
Katy, TX
Fred:
A couple of suggestions.

First, I would be surprised if you removed any material at all with the 6mm drill. You probably just pushed it out of the way and it sprang right back. Urethanes have a lot of spring back under machining and I wouldn't be surprised if black is worse than clear. I would have a go at it with your boring bar.

Second, why not make a die for cleaning up the feed housing threads? If you don't want to go for steel, use aluminum. That for sure handle the plastic.

Finally, some screw machine (stubby) bits would come in handy with your short bed lathe, and in the larger diameters (around 1/2") would probably be long enough to complete a cap. A full length 1/2" bit on a 7x chinese lathe tailstock always looks to me like a disaster waiting to happen. In addition the stubbies are a lot more rigid. I use them whenever I can in all sizes. The only downside to them is that I don't believe that they exist in reduced shank versions so once you get over 1/2" (13mm?) you are out of luck.

FWIW,
Bill

But with a metal lathe and good carbide you could probably tun down the shank of a large stubby to 1/2" to fit your chuck.


Sent from my iPad using Penturners.org mobile app
 

magpens

Member
Joined
Feb 2, 2011
Messages
15,913
Location
Canada
@More4dan

Dan, would you mind posting a photo of your tailstock DRO, .... please.

I have pondered the item you show in Post #11 and can't seem to figure out how to use it to make the DRO. :rolleyes:
 
Last edited:

FGarbrecht

Member
Joined
Aug 22, 2019
Messages
618
Location
NY
Fred:
A couple of suggestions.

First, I would be surprised if you removed any material at all with the 6mm drill. You probably just pushed it out of the way and it sprang right back. Urethanes have a lot of spring back under machining and I wouldn't be surprised if black is worse than clear. I would have a go at it with your boring bar.

Second, why not make a die for cleaning up the feed housing threads? If you don't want to go for steel, use aluminum. That for sure handle the plastic.

Finally, some screw machine (stubby) bits would come in handy with your short bed lathe, and in the larger diameters (around 1/2") would probably be long enough to complete a cap. A full length 1/2" bit on a 7x chinese lathe tailstock always looks to me like a disaster waiting to happen. In addition the stubbies are a lot more rigid. I use them whenever I can in all sizes. The only downside to them is that I don't believe that they exist in reduced shank versions so once you get over 1/2" (13mm?) you are out of luck.

FWIW,
Bill
How do you make a die? YouTube isn't helping me out here. The only way I can think to do it would be to take a slice of round aluminum, drill a 6 mm hole through the center and then use my existing 6.4 mm tap to cut threads in it. Then maybe cut some clearance channels through the die threads with a hacksaw blade. Does this sound right? Thanks
 

bmachin

Member
Joined
Jul 28, 2013
Messages
613
Location
Owensboro, KY
Fred,
See here:
and here:

I

If you google how to make a thread cutting die you will find numerous articles on machining forums.

Without a dividing head or mill you might need to use a little ingenuity.

I think somebody (More4dan?) did a post a couple of years back about making a field expedient die from a nut. If it's not on the site here, see this:

It won't cut new threads, but it should clean up old ones.

You can probably accomplish what you need by just making a fairly tight fitting nut to clean up the threads a little.

Bill
 

More4dan

Member
Joined
Mar 17, 2016
Messages
2,102
Location
Katy, TX
Updates on a couple of things. The 3d resin pen printing project is on hold temporarily. Printed threads come out beautifully but they aren't tough enough to withstand repeated use. There some other resins available that are supposed to have more structural integrity so may have to experiment.

I'm on custom pen number two, taking copious notes this time. The section is good but the fit with the Bock #5 housing is too tight even with a slightly bigger (5.9 mm) bit. I'll try again with a 6 mm bit I guess. This is using black alumilite. I installed a tailstock DRO on the metal lathe which helps a lot with drilling out the section. Drilling out the cap and barrel is challenging on the metal lathe because of the tight fit between headstock and tailstock. I got a tiny boring bar which is great for making tiny adjustments where needed.

Pen number 1 is an urushi experiment and is looking pretty cool. I'm still applying lacquer layers and polishing but hope to have some pics soon. This is a frustrating process since it is mostly experimentation; finding useful info about how to actually do it is hopeless, it seems to be a closely guarded secret.

Can you post a picture and info on your DRO? I'm working on installing mine this weekend. I'm thinking of attaching with Neodymium magnets to the tail stock and to the drill chuck. That way I can remove it and also use on my wood lathe easily. The quill on my large lathe has to be fully retracted to eject the drill chuck and doesn't leave room to attach a clamp on it for the DRO to attach. Same with some tools on my metal lathe with shorter MT2 shanks.


Sent from my iPad using Penturners.org mobile app
 

More4dan

Member
Joined
Mar 17, 2016
Messages
2,102
Location
Katy, TX
Very sleek design and unobtrusive. I plan to do something like this but attached with magnets. Cost will be better but not nearly as clean as the LMS DRO.
 

Attachments

  • 9CD055DA-0304-4C07-A3A8-1C2461CA69B1.jpeg
    9CD055DA-0304-4C07-A3A8-1C2461CA69B1.jpeg
    90.1 KB · Views: 178

bmachin

Member
Joined
Jul 28, 2013
Messages
613
Location
Owensboro, KY
Dan,

If you glue something 1/4" or so thick on the end of your short Morse tapers you won't need to fully retract the quill in order to eject the tooling. That will leave you room to attach a bracket.

Bill
 

More4dan

Member
Joined
Mar 17, 2016
Messages
2,102
Location
Katy, TX
Dan,

If you glue something 1/4" or so thick on the end of your short Morse tapers you won't need to fully retract the quill in order to eject the tooling. That will leave you room to attach a bracket.

Bill

Thanks Bill, great idea. The worst offender is my tap guide that requires access to the rear. I could toss in a ball bearing or just use a knockout bar.

Danny


Sent from my iPad using Penturners.org mobile app
 
Signed-In Members Don't See This Ad

FGarbrecht

Member
Joined
Aug 22, 2019
Messages
618
Location
NY
Didn't think of using magnets. I bought the LMS unit because I didn't want to be drilling into my tailstock. If you do the magnet thing post an update cause if it works I might try that on my wood lathe.
 
Top Bottom