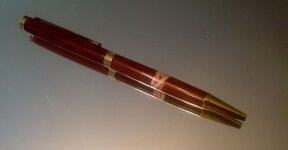
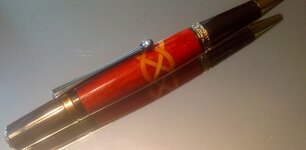
First and Second Celtic Knot pens and some questions...

Signed-In Members Don't See This Ad

Warren White

Member
Joined
Aug 27, 2014
Messages
500
Location
Livermore, CA
...again.

First an admission of my lack of visualization skills. How in the heck did someone figure out if you put four pieces of wood into four slots cut at an angle into a pen blank that the result would be a Celtic Knot? I just cannot wrap my mind around that one.

Now the questions: When I did the larger knot, I glued the inserts in with a 5-minute epoxy. Much less messy and anxiety-laden than the smaller one done with medium CA glue. However, when I removed the drill bit after drilling the center hole, the knot broke apart at the joint. It was a very clever pointed break, so it was very easy to put back together with CA glue. Then, while turning, the little voice in my head said "turn off the dust collection" and for once I listened. "Ping" and off came a small piece, again popping off at a glue joint, so it was easy to put back on. (Thankfully, I had watched a video on the inlayed blanks, so I just treated it as an inlay.)

So: What do you use for gluing the inserts? I assume CA or 5 minute epoxy are the choices. Would putting a very thin layer of 5-minute epoxy on the inserts and allowing it to harden before putting more on and doing the final insertion be of any help? I know that people use that when they are gluing end grain on other wood projects.
 

Attachments

  • PEN1.jpg
    PEN1.jpg
    100.5 KB · Views: 342
  • PEN2.jpg
    PEN2.jpg
    105.1 KB · Views: 333
Signed-In Members Don't See This Ad
I use 5-min epoxy. Sometimes they come apart.
However, I did learn to make sure all the surfaces are roughed up and dust free before gluing.
Give the glue plenty of time to cure.
And last but not least, when I switched to turning between centers I then was able to use a skew to turn down the blank. That solved much of the problems with tearing up the blanks and also the blank will stop when the skew catches.:)
For me, a skew catch when the stock is being driven with a chuck or spur center will just tear the stock apart, break the tool, hurt me or scare the crap out of me.....or all of the above!:eek:
 
Here is a tip. After drilling the hole in the segmented blank soak it with thin CA from the inside. It will make the wood stronger and help holding everything together from the inside. After letting the CA dry just run the drill bit through it again to get back to proper size. I also use Gorilla type glue to glue blanks to tubes with segmented work a lot of times. It expands and gives me good adhesion of glue to blank and tube. If you are worried about the blank you can always soak thin CA into it as you turn it near size.

I use a trim router mounted on my WoodWrite lathe to round all segmented blanks. Never had one come apart since I started doing this. Takes 30 seconds to get a round blank .030 over final size. WoodWrite lathes are a lot like a small metal lathe if you are wondering. Auto feed and fine control of cut. The trim router uses a straight bit to remove stock. Metal inserts never catch and the extra material is removed in almost a perfectly smooth fashion.
 
Warren I used medium CA for most of mine and the 5 minute epoxy for a few. When drilling heat is your enemy and can cause both glues to weaken. Drill slowly.

Your knots look great and I'm anxious to see you try a 6 strand knot. I made my first one at a 45 degree angle like your but have since switched to 60 degrees for a more stretched out look. Keep them coming...
 
Well....

I made a third, just like the larger of the two. It broke into about a jillion pieces, which I was able to find and put back in. Turned out just fine; except for my nerves trying to get all those pieces put back in.

I believe (as suggested) the problem is a starved glue joint. The glue going on the blank itself is essentially a butt-joint, and I know how that soaks up any glue.

Heat may certainly be the issue, at least during the drilling part. Afterwards, I put the blank in the fridge and then put the brass tube in. Then I waited until the next day to do the turning.

Both of the large knots were made with 5-minute epoxy. I think the next one will be with medium CA. I will consider being a bit more generous with the epoxy in the kerf. I didn't get any comments about putting a skim coat of CA on the inserts...any thoughts on that?

I really love this forum! Everyone is so helpful; I appreciate your willingness to share your expertise.
 
I have done the exact same inlays but use Tribond (original) wood glue. I make one cut and insert the inlay with the Tribond and clamp. At or above 70 degrees (F) the glue will set enough for the next cut in about 30 minutes. After I've done the four inlays I let the blank set up at least overnight (clamped). I have never had the inlay material come out on the lathe.

I am with you on the visualization of the design. Who the heck figured out that four Xs would equal a celtic knot?
 
Warren I used medium CA for most of mine and the 5 minute epoxy for a few. When drilling heat is your enemy and can cause both glues to weaken. Drill slowly.

Your knots look great and I'm anxious to see you try a 6 strand knot. I made my first one at a 45 degree angle like your but have since switched to 60 degrees for a more stretched out look. Keep them coming...

Dale have you switched these. I thought a 45 degree cut gave a taller knot and 60 gives a compact knot.

What are the cuts for a six strand and do you have a picture of that?
 
I have done the exact same inlays but use Tribond (original) wood glue. I make one cut and insert the inlay with the Tribond and clamp. At or above 70 degrees (F) the glue will set enough for the next cut in about 30 minutes. After I've done the four inlays I let the blank set up at least overnight (clamped). I have never had the inlay material come out on the lathe.

I am with you on the visualization of the design. Who the heck figured out that four Xs would equal a celtic knot?

OK, I will try the wood glue. I certainly can't go any more wrong with another method; that trying to find itty-bitty pieces on the floor is too hard on my anxiety gene. I will let you know how it turns out.

Glad to hear from someone else who is spatially challenged! :reface:


Again, thanks to all who responded. Now as soon as I can get back to the spinny side of life....

WW
 
Warren I used medium CA for most of mine and the 5 minute epoxy for a few. When drilling heat is your enemy and can cause both glues to weaken. Drill slowly.

Your knots look great and I'm anxious to see you try a 6 strand knot. I made my first one at a 45 degree angle like your but have since switched to 60 degrees for a more stretched out look. Keep them coming...

Dale have you switched these. I thought a 45 degree cut gave a taller knot and 60 gives a compact knot.

What are the cuts for a six strand and do you have a picture of that?

Ernest, it depends on which angle you measure...set an adjustable square to 30/60deg so you have a small angle and place the flat against the blank...you should draw a line which is longer then the line from a 45deg.

Creating more then four strands is easier with a round blank. Use a pie chart to create index marks around one end. Its works bet with numbers that divide into 360 evenly.
 
Dale have you switched these. I thought a 45 degree cut gave a taller knot and 60 gives a compact knot.

What are the cuts for a six strand and do you have a picture of that?[/QUOTE]

I want to be careful not to hijack this thread so I'll keep it brief.
Here is a link to my six strand knot I posted here some time back.
http://www.penturners.org/forum/f13/six-ring-celtic-knot-103837/

There is an article in the library on making these. It's been a while since I made one but I'm pretty sure I made it using the 60 degrees.
Dale
 
SUCCESS!! Well, sort of...

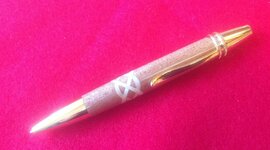
Thank you all for your suggestions. I made up 4 pen blanks with Maple inserts in Sapele. I used Titebond Original, and clamped each insert for 30 minutes and left them 24 hours before drilling and turning. I did the clamping in the house, where it was a bit warmer than my garage. I turned just one yesterday, but I expect all will turn out the same.

The turning went without incident. No parts flying around! The "sort of" in the title came when I put the pen together. It is a PSI Polaris Pen, and while the cartridge comes forward when I turn the cap, it doesn't retract when I turn it the other way. It seems like the spring is too weak. I called PSI, but their Technician is out sick. I left my name and phone number and I am sure he can offer a fix.

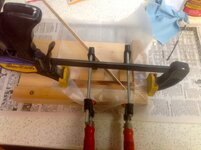
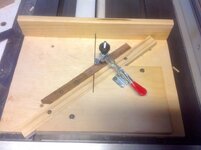
I have included a picture of the pen, the jig I put together to clamp the parts together, and the jig I use for cutting. You will see that they are nothing fancy; strictly utilitarian, but they work. I apologize for the quality of the photos, it is just me and my IPad.

Thanks one and all for the suggestions. I am on a steep learning curve and most ably assisted by all of you excellent teachers.

Thank you once again! I am a happy camper (turner).
 

Attachments

  • PEN4A.jpg
    PEN4A.jpg
    192.3 KB · Views: 161
  • CLAMP.jpg
    CLAMP.jpg
    225 KB · Views: 166
  • CUTTING.jpg
    CUTTING.jpg
    187.9 KB · Views: 160
Thank you for the encouragement!

I have several more blanks that I have prepared in the same manner. Now I just need to get some more pen kits and get turning.

Boy, this is fun!

Thanks for all who helped along the path.
 
Back
Top Bottom