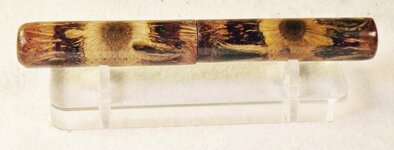
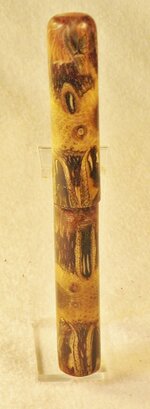
Sorry George !! (robutacion) I still can't find a pen kit worthy of your Hairy Banksia Pod blanks !!!! I did however find a quality pen nib and some ebonite to make a kitless pen for your blank. I'm not 100% satisfied with my contribution to the joint venture, but, I like it. I found that if I cut the blank where the two hairy parts come together in the mid point, that there was enough resin to drill and thread on the outside. I used a 9mm X .75 tap and die for the nib. I used a modified nib protector imbeded into the cap for the snap fit of the barrels. This elimitated the exposed threads on the pen when closed, there are no threads on the outside of the pen. I also counter boared the ends of the barrels and infilled them with metalic copper powder and CA to give the pen a little something without going overboard. I rounded the ends so it didn't look like a fancy turned stick, finished with 8 thick coats of CA to cover any exposed raw material, followed by One-Step Polish. Hope it does justice to your great casting of these blanks!! From Up Over, Jim S
G'day Jim,
Thank for for enlightening me of how you achieve these results, and as I stated on my previous comment, I have a good understanding on what is involved in trying to create a kitless pen out of such blanks.
It makes me wonder of some complains I got from people that never passed the drilling stage, for a normal kit pen and if over that, they destroyed the blanks within 5 seconds of turning...!
Make no mistake, these blanks are not something that a "beginner/little experience pen turner" want to tackle in the beginning, I have made that very clear, multiple times however, with such "warnings" the fear/insecurity to even try them, becomes a reality and that is exactly what I want to avoid.
There are hundreds of blanks that are made with all sorts of material combinations that can bring a fair challenge to any attempting to handle them, so far, I have improved the blanks' construction and performance/workability, considerably however, is only so much I can do with it, I will consider any possible improvements but for now, they are what they are...!
I have to take my hat to anyone that makes a kitless pen out of them, that isn't a easy task, at all, improving one's techniques to achieve it, is something only achieve by persisting with these blanks and find the way to strengthen its weak points, and in this case, that is no doubt, the density variations as Curly very correctly, identifies...!
One of the great advantages of these blanks, is the fact that, it is made of 2 identical pieces of pod cast together, this mean that, "blowing" one barrel to unrepairable status, doesn't affect/jeopardize the completion of the pen as, another half can be cut from another blank and continue on, without being concerned about the "matching" aspect...!
One thing that you folks may have not noticed yet is that, each blank is made with one pod piece slightly longer than the other, the average middle slices from the pod's center, wouldn't fit in the mold so, and because the pod is not totally cylindrical, from the pods center to each end, they tape slightly so, the slices are slightly shorter. there is not much of a difference but, for a 2 barrel pen where each barrel has a different length, I suggest to look at the blank carefully before cutting it and identify and mark which half in the longest, that will help to have the longest blank half in the longest pen kit tube/barrel and show on it, more of the pod material and less of the hairs...!
I like what you did, you are a brave man, keep on it and you will find the solutions to all the problems/less satisfactory results you feel, you had on this pen..!
Congrats..!
Cheers
George

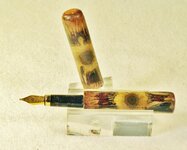
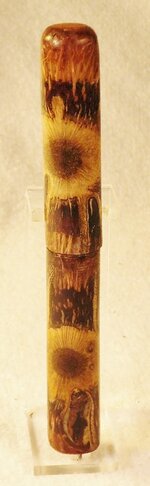
 George had only seen this pen in one photo in another thread, with no explanation as to how it was made, and was wondering if I realy tried to thread this blank, as the pods themselves are very fragile, and did I use consealed threads from a kit to hold the barrels together ? To answer his questions, there are no kit parts used in this pen. I started with a nib and the blank. I threaded the nib holder and blank to 9mm X .75 quite easily. The two barrels are held together buy a reworked nib protector inserted into the barrel and snaps over the nib end to hold it in place. This is the part of the pen I am not happy about. As the protector only holds the end of the nib, it makes for sideways movement at the joint and if not carefully straightened, makes the pen look out of round in the photos. As an extra note, I tried turning this blank on another lathe using normal turning tools because I wanted closed ends, and destroyed the end of the blank within 5 seconds !! I finished the blank on my mini metal lathe where I turn most of my pens. Hope this makes the process a little clearer to everyone !! Jim S