Let's see your lathe stands

Signed-In Members Don't See This Ad

Dan Masshardt

Member
Joined
Jan 30, 2013
Messages
4,815
Location
Mechanicsburg, PA
I'm getting a midi lathe and want to build a stand. I need some inspiration.

Anybody willing to post a picture of your shop made mini/midi lathe stand?

Thanks.
 
Signed-In Members Don't See This Ad
I use an old chemistry lab type table I found back in the day (mid 80's). Steel frame w/ 1 inch thick slate....Very heavy.....PITA if I have to move it!!!! Fits my mini with the extension.
 
Dan, I just purchased a Delta 46-460 last month. I needed a stand & decided to make do with what I had. I modified it to consolidate some of my equipment. Very plain jane, but it works for me. It make not look that sturdy but all I turn is pens, so it works ok for me.
 

Attachments

  • deltatable1800.jpg
    deltatable1800.jpg
    45.1 KB · Views: 1,832
  • deltatable2800.jpg
    deltatable2800.jpg
    43.5 KB · Views: 1,277
I used the one that came with my super cheap HF lathe. Covered the top with a scrap piece of subfloor. drilled holes to match my mini-jet, and had over half of the thing left for other stuff (mostly collecting shavings, dust and scraps of sandpaper....) Sadly, no photos at the moment...
 
I used the one that came with my super cheap HF lathe. Covered the top with a scrap piece of subfloor. drilled holes to match my mini-jet, and had over half of the thing left for other stuff (mostly collecting shavings, dust and scraps of sandpaper....) Sadly, no photos at the moment...

I'll just have to use my imagination. :-)
 
not much to lookat .. 2-2x4 8, 1 2x8 8
few 2 1/2 screws
 

Attachments

  • IMG_0466.jpg
    IMG_0466.jpg
    69.7 KB · Views: 1,055
  • IMG_0467.jpg
    IMG_0467.jpg
    62.5 KB · Views: 716
Things are a bit messy below deck but it's a simple table that I made a bit on the tall side so I don't have to hunch forward (I've had back surgery).

Edit- Got the picture to upload now :)
 

Attachments

  • Lathe 1a.jpg
    Lathe 1a.jpg
    70 KB · Views: 1,298
Last edited:
Here's mine. One of the few things that I've actually gotten right.

It is a basic flip top bench made with MDF and various scraps. It uses a pipe for the pivot and homemade pull pins to lock the top in place. On the top in the picture is the lathe and on the bottom is the belt sander and scroll saw which nest together very well. The drawer is full of lathe related stuff.

Sandy.
 

Attachments

  • lathe bench.jpg
    lathe bench.jpg
    55.1 KB · Views: 1,177
Dan, I just purchased a Delta 46-460 last month. I needed a stand & decided to make do with what I had. I modified it to consolidate some of my equipment. Very plain jane, but it works for me. It make not look that sturdy but all I turn is pens, so it works ok for me.

Nice stand Billy.....inspires me to build something better.

Dan, so what lathe are you going for?
 
Dan,

Here's a picture taken right after I made this one. No turning yet, that's why it looks so clean. Made of MDF. I got the plans from ShopSmith magazine. They can also be found at plansnow.com.

Weighs a lot and really dampens any vibrations.

Jake
 

Attachments

  • image.jpg
    image.jpg
    67.3 KB · Views: 1,387
Don't have pictures to share, but I took the metal base from an antique singer pedal sewing machine, put a wooden deck on it, and bolted my Jet to it. Works great...
 
Dan, I just purchased a Delta 46-460 last month. I needed a stand & decided to make do with what I had. I modified it to consolidate some of my equipment. Very plain jane, but it works for me. It make not look that sturdy but all I turn is pens, so it works ok for me.


Nice stand Billy, I like it. Looks very functional and appears that everything is at your arms reach.

I use an old office desk, metal frame with the top being metal also but with the wood look on top. About an inch short hieght wise, but it works....for now.
 
Got the idea from a google search on lathe bench. The short wall has 3 50 lbs sand bags. Nice thing is no legs sticking out the front to trip on. Top board is a 2x8.
 

Attachments

  • image-1483957004.jpg
    image-1483957004.jpg
    39.8 KB · Views: 795
  • image-2434009554.jpg
    image-2434009554.jpg
    51.4 KB · Views: 1,676
Mine isn't really worth a picture. My original design was a simple table on wheels, but it has 'evolved' over time.

I started with the support structure from an old gas grill. I bought a 2x6 that I cut into three pieces, and then edge-glued them to form a table top that I mounted on top of the grill base. I ripped a short length of 2x4 at an angle, and mounted it on the left edge, and then drilled holes to hold tools.

Later, I added a 3" strip of plywood on the back of the table with additional tool holes.

My latest 'enhancement' was to construct a holder for finishing bottles that I mounted on the side. This was an open-ended box - the top was a scrap of 1/2" particle board with 2 1/2" holes, the bottom was some 1/4" plywood, one side was some of that 1/2" particle board, while the other side was some 1/4". I left it open-ended so that I could more easily deal with the sawdust and wood chips that will accumulate in the box over time.

It's ugly and flimsy - but it's adequate for my minilathe, and it fits in my shop.
 
I'm getting a midi lathe and want to build a stand. I need some inspiration.

Anybody willing to post a picture of your shop made mini/midi lathe stand?

Thanks.


I used the steel cart that Sears sells as a base unit,and made some mods.It's a good unit,and the brakes on the casters are nice


Steve.
 

Attachments

  • IMG_4591.JPG
    IMG_4591.JPG
    129.1 KB · Views: 1,271
I don't have any pics and the stand I made has been repurposed.
It's basically a Sawhorse on steroids.
Instead of a 2X4 sawhorse, I made mine using a straight grained board of douglas fir milled square to 2" X 10" X about 60" long.
The leg stretchers are 2X6's and are connected using half-lap joints.
If you do any woodwork, it'd take about 3-4 hours to make.
I looks like the typical stand the older Grizzly G1067Z had only made with heavy wood rather than bent sheet metal.
The top of each "A" which forms each side of the sawhorse is flat and far enough apart
(connected using a half-lapped 2X6 on edge) so the top is bolted to the 2X6.
The lathe then bolts to the top.
 
You need to get that set up dirty!!!
I'm getting a midi lathe and want to build a stand. I need some inspiration.

Anybody willing to post a picture of your shop made mini/midi lathe stand?

Thanks.


I used the steel cart that Sears sells as a base unit,and made some mods.It's a good unit,and the brakes on the casters are nice


Steve.
 
I'm getting a midi lathe and want to build a stand. I need some inspiration.

Anybody willing to post a picture of your shop made mini/midi lathe stand?

Thanks.

I used the steel cart that Sears sells as a base unit,and made some mods.It's a good unit,and the brakes on the casters are nice

Steve.

Nice cart Steve! Nice job of consolidating everything.
 
Last edited:


Used 2x10 pine ... glued end pieces together ... stretchers between ends held against ends with mortise & tenon joint plus removable bench bolts. Lower stretcher assembly is ~10 high and holds couple of bags of sand for extra ballast.

Tom


Wow,what a beautifully designed/made stand!


Steve
 
If you know someone with a welder, here's something to think about. I made it so I can disassemble it. It has a tool holder, and later added a lamp. I also put a 2" x 1/4" peice of flat steel across the back a 1/4" off the back so I can mount my dust collector and a holder for live and dead centers.
 

Attachments

  • 0911111814.jpg
    0911111814.jpg
    85.4 KB · Views: 657
  • IMG_0340.jpg
    IMG_0340.jpg
    84.3 KB · Views: 427
  • IMG_0341.jpg
    IMG_0341.jpg
    73 KB · Views: 388
  • IMG_0342.jpg
    IMG_0342.jpg
    67.8 KB · Views: 411
This is what I use,the only change is the lathe. I now use a Delta.
Considering a set of caster to become a bit more mobile.
 

Attachments

  • Steel City.JPG
    Steel City.JPG
    51.3 KB · Views: 477

This pic was before I finished it. I have since added a drawer just underneath the top. Still haven't finished "flooring" the bottom with 2 x 4s...
 
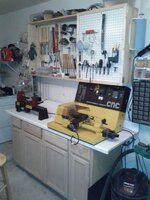
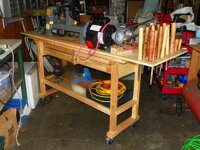
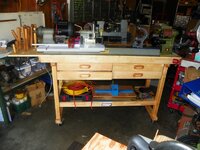
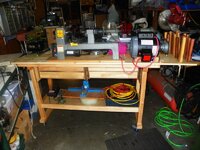
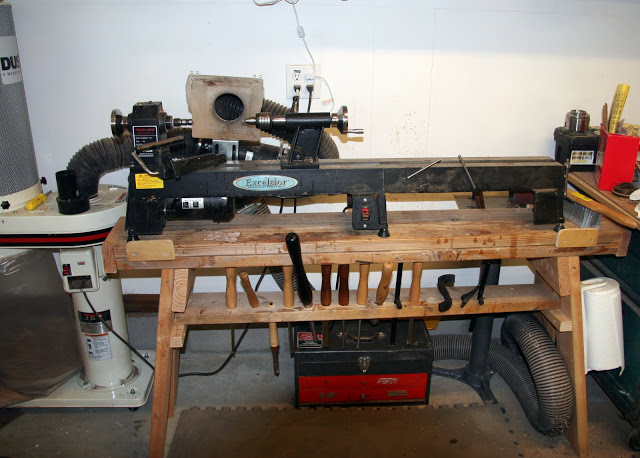
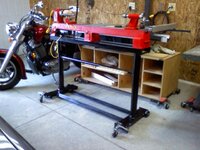
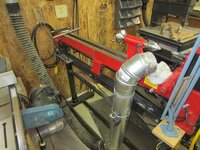
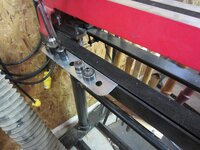
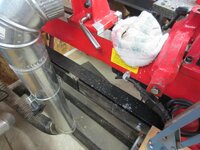
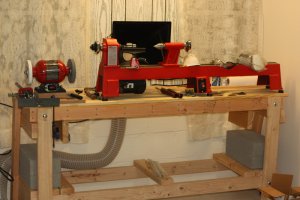
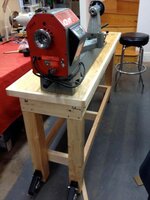
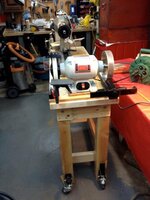
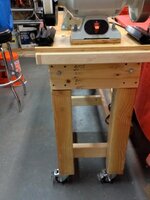
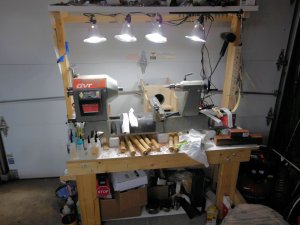
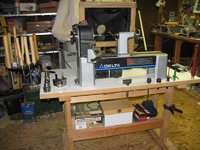
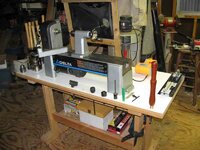
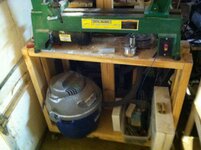
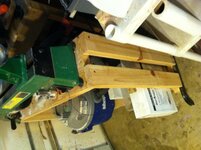
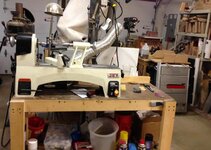
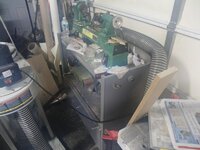
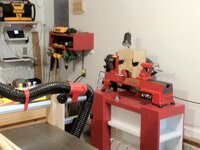
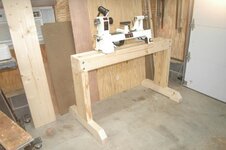
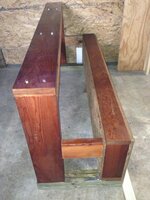
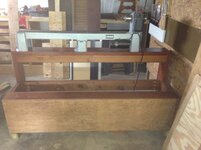
Here are some pics of my bench. They show a progression from when I first attached the lathe, to having attached the grinder and Wolverine jig (good decision!), to the final caster setup. With regard to the last, because my shop is "intimate", I needed to be able to move the lathe, but wanted it to be steady when in place. I first tried retractible casters from Rockwell which you can see in two of the photos. They were a very BAD idea, since they are engaged one at a time and the lathe is mounted off-center for easy access. I had to be VERY careful to engage the heavier side of the bench first, then the lighter side. Otherwise, there was a real danger of the whole business tipping over. After awhile, I discovered that there is a type of caster called "Total Lock". Also sold by Rockler and others. To use them, in this case, I had to remove the equipment from the bench, cut about 4" off the bottom of the legs, and mount the caster permanently to the underside. When engaged, they put a "brake" on each wheel to prevent rolling, but ALSO have two sets of gear teeth that engage and prevent the caster from swiveling. I found that, maneuvering the bench so that the casters all face to one side or the other before locking, the bench is about as sturdy as if it were resting on its own legs. This was a wonderful discovery, and I highly recommend it if you need portability. Russ
 

Attachments

  • IMG_1113.jpg
    IMG_1113.jpg
    35.3 KB · Views: 787
  • IMG_1120.jpg
    IMG_1120.jpg
    38.1 KB · Views: 493
  • IMG_1268.jpg
    IMG_1268.jpg
    33 KB · Views: 481
Dan; This is my lathe stand. On top is a shelf for tools and turning items. Under the shelf are several lights to light the work and a magnetic strip to hold bushings. In the back you can see a dust collection hood to keep shavings and dust in the dust collector. The shelf underneath is for heavy objects like chucks and etc. On the left is sandpaper strips in order for sanding blanks. On the right is a drilling size chart, tool rest, hex key for chuck, and centering gauge. At the rear is a power strip where everything plugs in. Below the table top is an emergency stop switch. The lathe is raised up on 2" blocks to allow for easy cleaning and to store turning tools during turning. Casters are on removable arms that make it more stable during moves.
 
I used an old 6 drawer bedroom dresser for my first real lathe, a Rockler Excelsior with extension. I screwed blocks down on top to seat the end frames from the inside to keep it from creeping off. The 6 drawers were really handy for storing tools, parts and supplies.
 
Signed-In Members Don't See This Ad
One more thing. You can buy an LED light at Lowes for $20 that will clamp onto whatever you want. I have it clamped to my tailstock. It has rubber(?) jaws that are not that sticky. I got some "waffle anti-rug slide stuff" that my wife had, cut a couple of pieces, and attached them to the jaws of the clamp with double-side carpet tape. The glue on the tape is inclined to weep, so I put a piece of plastic between the jaws until things settled. Anyway, on my Nova DVR, there is a great place to clamp it to the tailstock so that the headlamp is directly over whatever I am turning. And, if there is an "incident" there is nothing to shatter. Not too bad for $20, I think. Russ
 
Back
Top Bottom