
First I would like thank all of you that voted for my pen in the Freestyle contest.
I thought I would share with all of you the making of the pen.
Like most of my pens its starts as a doodle. I draw it a couple or more times tweaking it, changing it back. redrawing it, until I have the concept down to where I want it. I then take and draw it in my cad program. I draw it flat and then have the program wrap it around the diameter tube I want to make.

The drawing is then ran through a Cad Program and then cut on a cnc mill in wax. Now if you were to think I dont have a failures you would be wrong. The first wax was cut off axis. I didnt get it pathed right in the program. Back to the computer and do it again. The second wax I tried to drill out after it was properly cut.
OOPS!
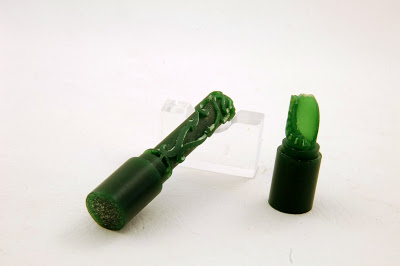
I had to pre drill the wax and put a brass tube in it to support the wax before I cut the pattern onto it with the mill. I thought I had taken a picture of the completed waxes but if I did I cant find them. I then remove the brass tube and cast the waxes in to silver. IF the casting fails I have to start all over and the waxes take a full day to cut.
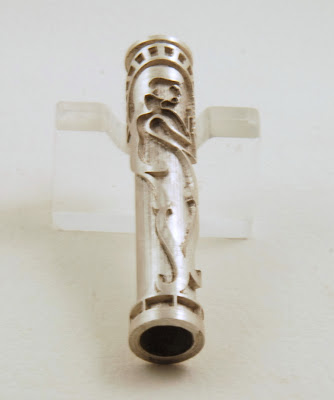
Fortunatly I have a bit of practice casting and we have no problems with the casting. Here is the cap cast in silver

and the bottom
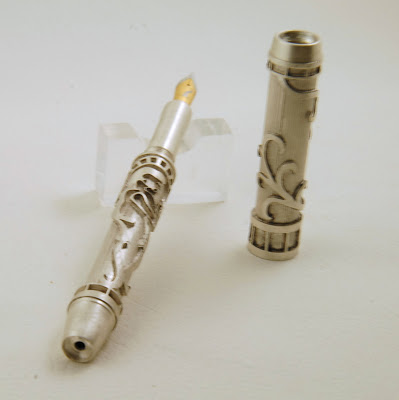
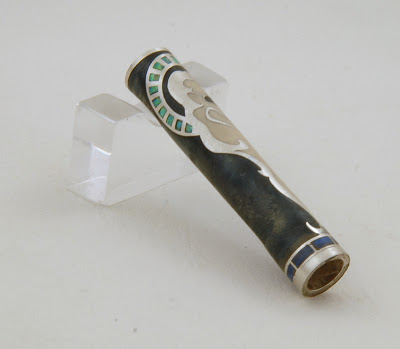
Next I make the cap Finials and front section and make sure everything fits

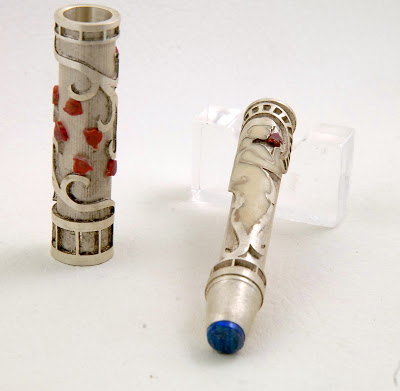
I then start cutting the red flowers on the cnc mill out of synthetic opal. I have to cut the chunks of material into the proper thickness slabs about 1.5mm (.060) thick
I took the first one and with a jewelers saw cut the slit to fit her hand into. THe one that she is holding. I was originally going to use a blue opal for the flowers on the rest of the pen but they were designed to small and didnt tie in to the one she is holding so I made them all red flowers. As I cut them I started epoxying them in place. I made the blue end pieces and glue them in. WHile Im cutting the small squares for the halo and the rest of the pieces I mix up some resin and apply it with toothpick to the body of the girl. I used antique white rather than a pure white and let it cure.

Next I start the meticulous job of fitting all the small pieces into the hallo. They all need just a little trimming to fit. Next I make and fit all the blue opal into the rings at the center band and ends of the silver tubes.
I owe the next step to Ed (Parkland Turner and BradG) their discussion on applying the resin while rotating allowed me to figure out how to get the resin on. However I ran into a problem. I intended to have a dark green base at the bottom and have it transform into blue as it went up the pen and then finally to a lighter blue at the cap top. Well this was my first attempt ever at rotary applications of PR. The rotary apparatus I built evidently wasnt quite level. All the green ran from the bottom to the other end mixing in with the blue and making it the ugliest combo of almost black blue-green yo have ever seen.
Pictures of the disaster.
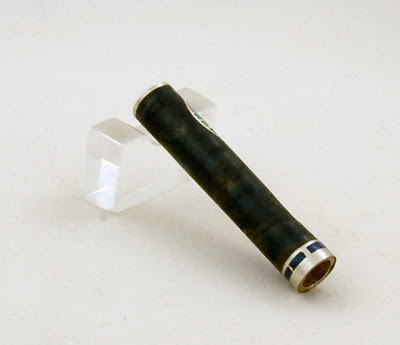
I had to take a ball burr and cut all the resin back off the pen. Sorry for the blurred picture of the blank after I removed all the resin.
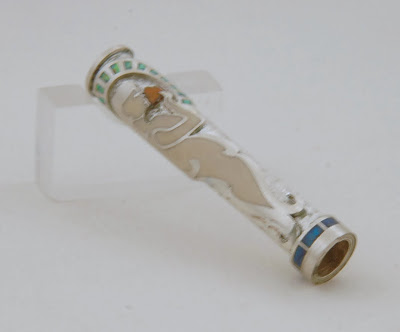
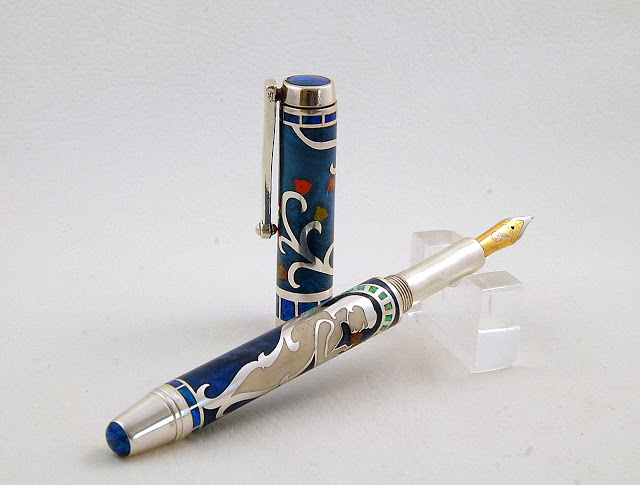
I then re applied the resin using a dark blue. There is a technique to the application that helps if you can vary the rotational speed of the piece. I globbed the resin on let it dry and then mounted them and turned them down to size. The opal matrix will dull a HSS cutter in nothing flat. I used a carbide cutter to trim it to size. It is then sanded and polished along normal lines using MM and Novus scratch polish. I made a delrin Insert for the cap that you cant see and threaded it m10x.75. I finished the pen up in record time for me and actually had 3 hours left before the entry time would expire. The red opal shows red or gold depending on the angle you look at it.
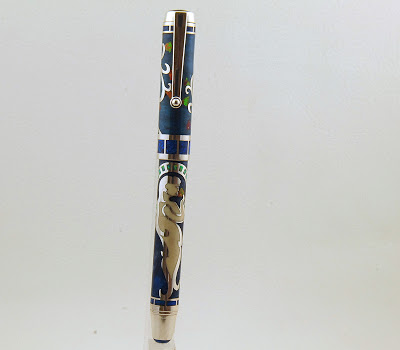
Some pretty pictures of the pen.


I realize I should have taken a few more pictures to help illustrate the processes but I was pretty busy at the time I had to get it done. I had good intentions.
Comments, Questions ? All are welcome.
I thought I would share with all of you the making of the pen.
Like most of my pens its starts as a doodle. I draw it a couple or more times tweaking it, changing it back. redrawing it, until I have the concept down to where I want it. I then take and draw it in my cad program. I draw it flat and then have the program wrap it around the diameter tube I want to make.
The drawing is then ran through a Cad Program and then cut on a cnc mill in wax. Now if you were to think I dont have a failures you would be wrong. The first wax was cut off axis. I didnt get it pathed right in the program. Back to the computer and do it again. The second wax I tried to drill out after it was properly cut.
OOPS!
I had to pre drill the wax and put a brass tube in it to support the wax before I cut the pattern onto it with the mill. I thought I had taken a picture of the completed waxes but if I did I cant find them. I then remove the brass tube and cast the waxes in to silver. IF the casting fails I have to start all over and the waxes take a full day to cut.
Fortunatly I have a bit of practice casting and we have no problems with the casting. Here is the cap cast in silver
and the bottom
Next I make the cap Finials and front section and make sure everything fits
I then start cutting the red flowers on the cnc mill out of synthetic opal. I have to cut the chunks of material into the proper thickness slabs about 1.5mm (.060) thick
I took the first one and with a jewelers saw cut the slit to fit her hand into. THe one that she is holding. I was originally going to use a blue opal for the flowers on the rest of the pen but they were designed to small and didnt tie in to the one she is holding so I made them all red flowers. As I cut them I started epoxying them in place. I made the blue end pieces and glue them in. WHile Im cutting the small squares for the halo and the rest of the pieces I mix up some resin and apply it with toothpick to the body of the girl. I used antique white rather than a pure white and let it cure.
Next I start the meticulous job of fitting all the small pieces into the hallo. They all need just a little trimming to fit. Next I make and fit all the blue opal into the rings at the center band and ends of the silver tubes.
I owe the next step to Ed (Parkland Turner and BradG) their discussion on applying the resin while rotating allowed me to figure out how to get the resin on. However I ran into a problem. I intended to have a dark green base at the bottom and have it transform into blue as it went up the pen and then finally to a lighter blue at the cap top. Well this was my first attempt ever at rotary applications of PR. The rotary apparatus I built evidently wasnt quite level. All the green ran from the bottom to the other end mixing in with the blue and making it the ugliest combo of almost black blue-green yo have ever seen.
Pictures of the disaster.
I had to take a ball burr and cut all the resin back off the pen. Sorry for the blurred picture of the blank after I removed all the resin.
I then re applied the resin using a dark blue. There is a technique to the application that helps if you can vary the rotational speed of the piece. I globbed the resin on let it dry and then mounted them and turned them down to size. The opal matrix will dull a HSS cutter in nothing flat. I used a carbide cutter to trim it to size. It is then sanded and polished along normal lines using MM and Novus scratch polish. I made a delrin Insert for the cap that you cant see and threaded it m10x.75. I finished the pen up in record time for me and actually had 3 hours left before the entry time would expire. The red opal shows red or gold depending on the angle you look at it.
Some pretty pictures of the pen.
I realize I should have taken a few more pictures to help illustrate the processes but I was pretty busy at the time I had to get it done. I had good intentions.
Comments, Questions ? All are welcome.


