First time turning bowls.

Signed-In Members Don't See This Ad
See more from Fay Prozora

Fay Prozora

Member
Joined
Jul 20, 2014
Messages
469
Location
Port Angeles, Wa
I started these 2 bowls and I had fun doing it too. I was so afraid the wood would fly off the lathe and hit me in the head, but I think I did a great job on what I have done so far. THe wood is green so right now the bowls are in the drying process so I will put them back on the lathe when they are ready and then I will finish the bowls and put a finish on them. Enjoy Fay
 

Attachments

  • Bowl # 1-1 (640x480).jpg
    Bowl # 1-1 (640x480).jpg
    300.3 KB · Views: 169
  • Bowl hollowing out-1 (640x480).jpg
    Bowl hollowing out-1 (640x480).jpg
    329.3 KB · Views: 170
  • Bowl holling -2 (640x480).jpg
    Bowl holling -2 (640x480).jpg
    316.3 KB · Views: 189
  • The 2 bowls together-1 (640x480).jpg
    The 2 bowls together-1 (640x480).jpg
    265.7 KB · Views: 198
  • Bottoms of the 2 bowls-2 (640x480).jpg
    Bottoms of the 2 bowls-2 (640x480).jpg
    249.9 KB · Views: 188
Signed-In Members Don't See This Ad

robutacion

Member
Joined
Aug 6, 2009
Messages
6,514
Location
Australia - SA Adelaide Hills
I started these 2 bowls and I had fun doing it too. I was so afraid the wood would fly off the lathe and hit me in the head, but I think I did a great job on what I have done so far. THe wood is green so right now the bowls are in the drying process so I will put them back on the lathe when they are ready and then I will finish the bowls and put a finish on them. Enjoy Fay

Congrats on your first...!

They look good so far and yes, the risk you were concern about was minimized when you decided to make a "contraction" connection between the blanks and the chuck and not the "expansion" method.

Even though, there seems to be a lot of "meat" in the blanks for a expansion connection, this can force the wood to crack/open, particularly if the blanks already has some deep cracks in it.

There will be times where the expansion method will need to be used and with a correct angles recess, the attachment will be very firm, and may never come appart, this method works better for when the piece has lost most of its wood volume/mass however, if the piece is this walled, excessive pressure on the expansion jaws, can open the wood up and make the whole thing to become flying objects...!

These are just some things I though in mentioning in your bowl making learning curve...!:wink::biggrin:

Cheers
George
 

plantman

Member
Joined
Jan 2, 2012
Messages
3,437
Location
Green Bay, Wi
Very nice beginning in bowl turning Fay !! The lathe has always been the tool I feared the most, with the shaper comming in a close second. When turning any large object I always wear a full face shield. Keep the learning curve going forward. Jim S
 
Joined
Feb 25, 2010
Messages
1,801
Location
webberville, mi
Fay - good work. Curious as to the wood species.

Also - for your future reference, the "rule of thumb" is to leave the wall thickness at about 10% of the diameter of the bowl. So, for example, if the bowl is about 8" in diameter, the green wall thickness should be about 3/4".

I've had good success by wrapping the green bowl in newspaper, placing it in a paper shopping bag and hanging everything in the rafters of the shop for about 4 months or so. Weigh it weekly. When the bowl stops losing weight (water) then it is safe to remove it and finish turn.

Good luck!
 

mark james

IAP Collection, Curator
Joined
Sep 6, 2012
Messages
12,787
Location
Medina, Ohio
Hi Fay! I'm about at your skill set for this!!! WELL DONE! :good::good::good:

Q: Did you wax/seal the endgrains? The basic shape looks textbook perfect with 1/2-1" approx thickness to dry.

I have some home cut spalted maple bowls drying; and some cherry bowls that have sat for 4-5 years. All ready to finish turning. Those that split will see a heavy dose of inlayed coral, and colored sand and embossing filler! Splits mean an opportunity to me!

Looks great from here.

Mark
 

Fay Prozora

Member
Joined
Jul 20, 2014
Messages
469
Location
Port Angeles, Wa
Thank you for al the nice comments on my bowls. Yes it is a learning curve so if these bowls don't turn out then it is some thing to learn on and work up from and all depending on how well they turn out. I know during the drying process, they can change shape and crack and such. I did wrap the bowls in newspaper and when I got home today I changed the newspaper as it seemed damp and put the bowls back in the bag. The walls of the bowls are close to a half inch and the outside shaping isn't that great but hopefully I will get that down pat also. It was fun to try it as I have wanted to try if for some time. I was too chicken to try it but finally got up the nerve to give it a whirl. The wood is rosewood yucatan or some thing like that. I bought two 6 x 6 x 2" blanks. The blanks were already waxed and I'm guessing it is to help prevent any cracking and such. The whole blank was waxed so I left the wax on the bottom and the edge of the blanks. I used a 3/8" bowl gouge and a scraper that Uncle Dick had made before he passed and it is my new favorite tool. I plan on getting a good scraper as Uncle Dicks is a round shank on the tool and it is flat at the end. The handle on his is short but it was easy to handle and it did a great job. Thanks again for all the comments,, Fay
 

Bob Wemm

Member
Joined
Mar 9, 2012
Messages
1,994
Location
Kalbarri, Western Australia
Hi Fay, Congratulations on this step of the fun machine. Great job on these bowls, and as said you will develop shapes as you go.
Might I suggest that you leave your walls a bit thicker when using green wood. Depending on the type of wood used you can get about 1/2in out of round and if the wall is only 1/2in thick you could have a problem. I usually leave mine at least 3/4in thick and for a big bowl (12 - 15in dia) then I leave about 1in thickness. There is no problem shaving that off when dry, so it is better to be safe than sorry.
HAPPY NEW YEAR.

Bob.
 

nativewooder

Member
Joined
Feb 26, 2009
Messages
1,193
Location
Fort Pierce, Fl 34982
Have a SAFE and Happy New Year and turn all the bowls you want SAFELY by wearing a full face shield! We have had quite a few serious injuries and deaths in the last few years, unfortunately the victims were "experienced"!:frown:
 

Fay Prozora

Member
Joined
Jul 20, 2014
Messages
469
Location
Port Angeles, Wa
Thanks every one for all the comments. I will use safety while turning bowls, but these bowls are small ones, but they can still fly off and hurt you plenty bad and if you get hit in the right place, you could see a coffin sized bedroom... LOL! Any way, I'm sure I will learn a lot by doing this. I do wear a face shield but you can still get hurt so I try to be as careful as possible... Fay
 
Joined
Sep 24, 2006
Messages
8,206
Location
Tellico Plains, Tennessee, USA.
Fay,
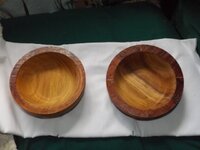
Your bowls are coming along nicely... as for the fear that it can come off the lathe and smack you in the mouth is a good and real fear... don't ever let that fear completely die...and if the lathe is on, so should your face shield be.... I'm working from experience here. Somewhere on this forum there is a picture of me with a mouse under one eye and half my face black from a bowl jumping out of a Longworth chuck, careening off my left cheek bone, cutting me under the eye and giving me something to lie to my friends about for having a black eye...:biggrin::biggrin:

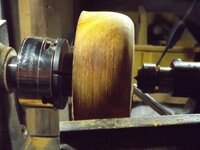
Keep in mind that you are standing in front of a piece of wood that is spinning at a high rate of speed, TOWARDS you.

On the drying part, I take a different tact and in no way am implying it to be the correct way... it's just my way.... more often than not, I'll turn my bowls to finish size and if they warp, they warp... but if they are especially green and I don't want the warp, I'll leave them a little thicker, run them through the microwave until I'm satisfied with the level of dryness ... I've just this week purchased a moisture meter so now I can actually check them for moisture content... before I used either the postal scale method or the old close enough for government work adage... if it felt dry, close enough.... and I think it was Bill Grumbine that said "Turn them to size and let'm warp"....

I've tried the %'age of the finished size, let'm dry for 2-4 weeks and return and find that I'm not all that comfortable working on the back side of the bowl to return to true... I can do the inside okay, but the back side feels awkward to me, so I rarely use this method. Again, this is just my comfort level and nothing set in stone.
 

Fay Prozora

Member
Joined
Jul 20, 2014
Messages
469
Location
Port Angeles, Wa
I was watching some vids last night as I could not get to sleep. I learned that letting the bowls dry slow is better as they can crack and warp big time if you try to go too fast as far as the drying process goes. So I plan on checking my bowls at least on a weekly basis and see how well they dry out. So I will not order any more bowl blanks until I see how well these bowls turn out. So my bowls will be drying in a slow manner. Will post the finished bowls after they are finished. Fay
 

Gary Beasley

Member
Joined
Sep 18, 2009
Messages
1,326
Location
Marietta, Ga. USA
If the bowls are small enough to completely submerge there is the technique of boiling the wood to relieve stresses then allowing to dry. I tried it once and noted some of the color was lost. I assume some of the sap is removed in this process, maybe that helps the drying a bit.
 

Fay Prozora

Member
Joined
Jul 20, 2014
Messages
469
Location
Port Angeles, Wa
Thanks Gary. I think I will just let them be until I'm ready to put them back on the lathe. I have other things lined up to do in the mean time. Let's see. I have a mantle for Sis to build yet and a few pens to work on and another ice cream scoop and such to make and some scroll saw projects I can do once I get to the breaker box to flip the switch for the power at the other end of the shop. Thanks for the idea but I don't want to lose the color of the wood, but I'm sure that a new finish on the wood will make them look great. Fay
 

alankulwicki7

Member
Joined
Jul 28, 2010
Messages
1,644
Location
Vadnais Heights, MN
Fay,
Usually the wood blanks you buy at Rockler and Woodcraft have the wax to prevent cracking while drying. Sometimes those blanks are still green but sometimes they are pretty dry. It all depends on how thick the wax is and how long ago they were waxed.
If you are looking for perfectly round bowls than it's best to twice turn them like you are doing ( or turn dry wood from the start).

Many bowl turners (me included) will turn straight from green to finished bowl. Sometimes the bowl will warp a lot but sometimes it will stay pretty round. I personally like to turn to finished bowl because I like the natural look you get.

Do some experimenting and see what you think!
 

Fay Prozora

Member
Joined
Jul 20, 2014
Messages
469
Location
Port Angeles, Wa
I'll do that. I got these blanks from Amazon and they were sent by Rockler. I figured the wax was for the cracking and such. I will try different things. Thanks all for the comments.. Fay
 

Gary Beasley

Member
Joined
Sep 18, 2009
Messages
1,326
Location
Marietta, Ga. USA
Look for interesting pieces from folks doing yardwork, trimming trees and digging up shrubs. A cleaned up rootball can make a very interesting bowl, even one from a long dead woody plant. I pick up branches from my cherry trees and others in my yard and turn pens from them after a good drying. My favorite is the ones I find that are a step away from rotting out with good colors from the decomposition setting in. If I'm lucky I find a branch in that state big enough for a bowl.
Be thourough in cleaning those rootballs, they tend to grow around rocks and stuff in the dirt.
 

Fay Prozora

Member
Joined
Jul 20, 2014
Messages
469
Location
Port Angeles, Wa
Sis lives out in the woods and there are lots of old branches and stuff out there. I found a small box of pieces that Uncle Dick had sitting under his old lathe and they have cracks in them. Not sure if I will use them or not but I could get a few pens out of them. Maybe a goblet or two also. That wood is pretty dry. Thanks for all the ideas on finding wood..
 
Top Bottom