Customer Pen Instructions?

Signed-In Members Don't See This Ad

jttheclockman

Member
Joined
Feb 22, 2005
Messages
19,178
Location
NJ, USA.
This question is basically for those that sell pens both on line and at shows and also those that give them away. One of those things I started thinking about because I have a person who is pushing me to sell my pens on line. I really do no want to do it but the thought is out there.

I believe fountain pens are very easy when it comes to changing refills or adding inks because usually a fountain pen buyer is familiar how they work with the various feed systems. Correct me if I am wrong. But I think this question is geared more toward the ink refills as well as rollerball refills and refills in general. There are so many different kits out there today and many ways that refills are replaced after the pen is assembled. Weather the nib unscrews, the barrel needs to be pulled apart and tranny unscrewed, or cap pulled off and so on. So my question is do you and if you do, how do you relay this information to your customers? Do you include some sort of instruction sheet or photograph? Mostly if you sell on line but can be applied to in person selling also. What I do is show the customer at my show what needs to be done. If I give the pen away it usually someone I know so I also can show or just tell them to give it to me to replace refill. So what method do you use to relay how a refill is replaced. Thanks.
 
Signed-In Members Don't See This Ad

Lew

Member
Joined
Oct 28, 2020
Messages
427
Location
Fair Oaks Ranch, Texas
John, I write out a 3x5 card with details about the pen such as the name of the blank and how it can be taken apart and what refill fits it. I also include instructions on how to use the pen, eg: don't pull the pen apart, the top and bottom screw together. I have shown how a pen works to a relative only to have them ask if I can repair it after they have torn it apart by pulling instead of screwing it together. Since then, I always write out instructions. If you are mass producing a particular type of pen, you might have something printed up. Good luck with whatever you decide.
 

rixstix

Member
Joined
Jan 10, 2007
Messages
653
Location
Canistota, SD USA
Using a name brand refill that has identifiable printing instead of a no-name generic refill will help ensure a better replacement experience.

Based upon how I can save and locate small instructions when I need them months after the purchase, things need to be as idiot-proof as possible.
 

egnald

Member
Joined
Jun 9, 2017
Messages
3,192
Location
Columbus, Nebraska, USA
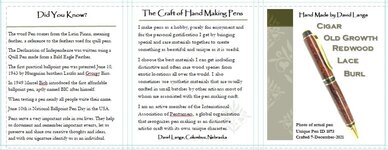
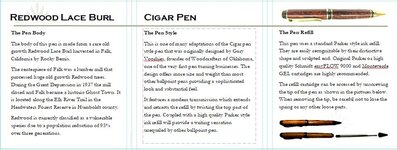
I make up little tri-fold brochures for each of my pens to tell about them. In addition to pictures of the pen, I include a very brief explanation of how to change the refill. It's not much and it's not very detailed, but at least it helps give the recipient a fighting chance. I have posted a screen capture of the front and back of one of the brochures. - Dave

Click on Images to Zoom-In
Capture1.jpg

Capture2.jpg
 

jttheclockman

Member
Joined
Feb 22, 2005
Messages
19,178
Location
NJ, USA.
I like that alot David. Not sure I like the idea of making so many different wood and detailed descriptions. That is alot of work. But it does make it more personal.
 

mmayo

Member
Joined
Jan 12, 2013
Messages
2,966
Location
Tehachapi, CA
I have a pdf for each pen I can email to customers with questions on changing refills. I have paper copies too. High end pens come with a packet that includes instructions.
 

DesertCanyon

Member
Joined
Aug 25, 2019
Messages
72
Location
Texas
I typed out the instructions on 1 x 2-5/8 Avery label stickers and affix them to the back of my business card. I write the type of wood by hand underneath the sticker.
 

RDHals

Member
Joined
May 19, 2020
Messages
118
Location
North West Arkansas
On my website I have a link to the directions for refill type and replacement in the description of each pen on the website. I also include a copy of the appropriate directions for the pen in the package with the pen. Multiple pens purchased mean multiple directions.
Sample: Knurl twist: To replace the ink well simply unscrew the tip of the pen from the body. Once you have the tip off the refill and the spring should just fall out. The pen takes a Parker style pen refill; these are available in most big box stores. To reassemble the pen just follow the reverse procedure, don't forget the spring. Check for function.
 

egnald

Member
Joined
Jun 9, 2017
Messages
3,192
Location
Columbus, Nebraska, USA
I like that alot David. Not sure I like the idea of making so many different wood and detailed descriptions. That is alot of work. But it does make it more personal.
Thanks John,

I have a template in Microsoft Publisher with text blocks and then I have another "library" file that contains text blocks for all of the various blank materials and pen style information including the ink refill stuff. All I do to make one up is to paste in the pictures and update the Title, ID Number, and Date. The descriptions are a simple copy and paste of text blocks from the "library" file into the template.

Dave
 

jttheclockman

Member
Joined
Feb 22, 2005
Messages
19,178
Location
NJ, USA.
Thanks John,

I have a template in Microsoft Publisher with text blocks and then I have another "library" file that contains text blocks for all of the various blank materials and pen style information including the ink refill stuff. All I do to make one up is to paste in the pictures and update the Title, ID Number, and Date. The descriptions are a simple copy and paste of text blocks from the "library" file into the template.

Dave
That is good and looks like easy for you. For me I do not make many wood pens unless they are extreme nice. I make lots of acrylics because I found over the years people love color over bland wood. Also I do lots of segmenting and watch parts pens and things like this so that part I will leave out and just probably attach a # to it with an index for me. I can make small cards with instructions for each kit and that is easily copied. Thanks for the ideas.
 
Top Bottom