Cue Blanks - yet another method

Signed-In Members Don't See This Ad

skiprat

Passed Away Mar 22, 2022
In Memoriam
Joined
Oct 19, 2006
Messages
7,812
Location
In a Skip in Wales
Hi all
I've been playing in my toybox again :biggrin:
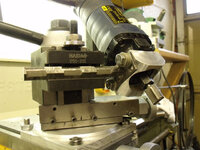
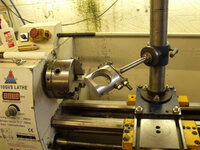
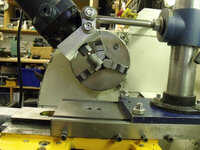
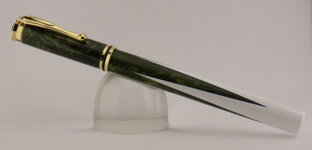
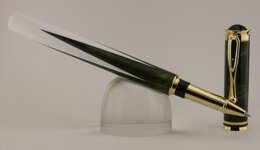
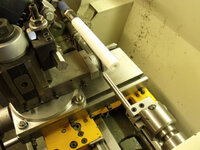
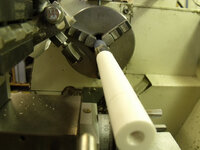
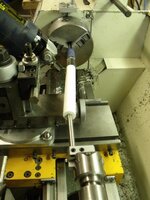
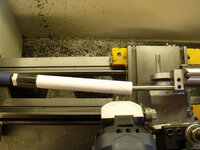
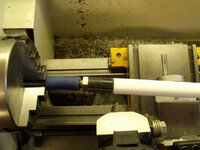
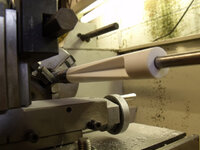
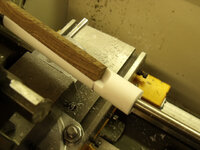
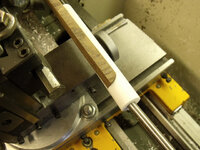
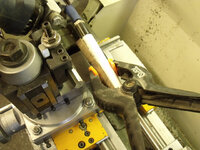
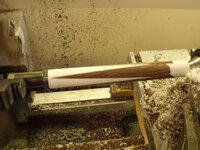
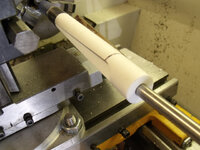
I've shown how I made these blanks with sharp points before, but I never really liked the 'ramp' method and think this method is much simpler and potentially far more accurate.

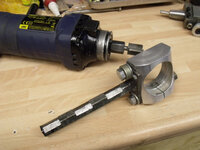
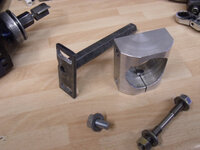
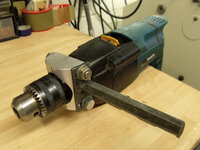
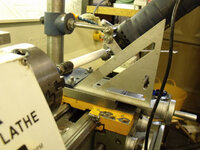
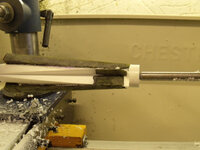
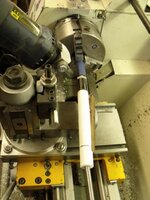
I think the pics are self explanitory, but there are a few points worth making. Instead of offsetting the tailstock ( a pain to reset ) I used a Boring Head with a pointed length of rod as a dead centre. The other end has a flexible joint that is nothing more than a bolt and a bit of high pressure hose.

Instead of me writing an essay, please just ask if you want clarification on something. :wink:

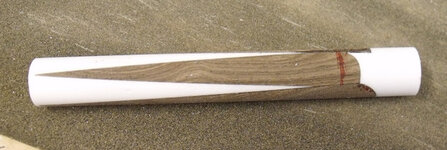
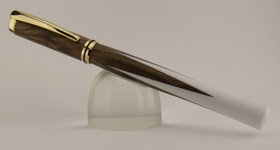
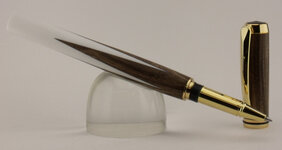
The end result here is a closed ended Baron II with white PR and Walnut
Hope you like and also that someone finds the pics useful:wink:
 

Attachments

  • WC2.jpg
    WC2.jpg
    115.8 KB · Views: 934
  • WC3.jpg
    WC3.jpg
    85.1 KB · Views: 746
  • WC4.jpg
    WC4.jpg
    40.2 KB · Views: 909
  • WC5.jpg
    WC5.jpg
    110.6 KB · Views: 900
  • WC1.jpg
    WC1.jpg
    121.8 KB · Views: 1,194
  • WC6.jpg
    WC6.jpg
    102.2 KB · Views: 865
  • WC7.jpg
    WC7.jpg
    89.5 KB · Views: 1,525
  • WC9.jpg
    WC9.jpg
    102.5 KB · Views: 946
  • WC10.jpg
    WC10.jpg
    111.9 KB · Views: 855
  • WC11.jpg
    WC11.jpg
    129.7 KB · Views: 859
  • WC18.jpg
    WC18.jpg
    65.6 KB · Views: 835
  • WC21.jpg
    WC21.jpg
    33.9 KB · Views: 926
  • WC17.jpg
    WC17.jpg
    138.8 KB · Views: 867
  • WC13.jpg
    WC13.jpg
    104.8 KB · Views: 838
  • WC12.jpg
    WC12.jpg
    41.9 KB · Views: 806
  • WC22.jpg
    WC22.jpg
    39.2 KB · Views: 798
  • CueSwivel.jpg
    CueSwivel.jpg
    35.2 KB · Views: 848
Last edited:
Signed-In Members Don't See This Ad

Curly

Member
Joined
Nov 20, 2010
Messages
4,851
Location
Saskatoon SK., Canada.
Thanks for the pictures. They all make perfect sense to me. I assume you index by the gears at the back of the spindle.

Pen looks good too!

Pete
 

skiprat

Passed Away Mar 22, 2022
In Memoriam
Joined
Oct 19, 2006
Messages
7,812
Location
In a Skip in Wales
Hans / Pete
There are 4 flutes ( indexed off the chuck )
The white PR was CA'd to the sacrificial piece of PR that is also CA'd to the bolt. It's actually stupidly simple to ensure that both are perfectly aligned when glueing together, but it took me a while to figure out how:redface:
 

ctubbs

Member
Joined
Sep 12, 2010
Messages
3,588
Location
Murray, Kentucky
The pics are fully explanatory except for one thing for my feeble mind. I understand the recess on the drive end for the drive to fit, but where did all the extra white PR past the pointed end of the walnut come from?

This tut is very good and thanks so very much for taking the time and effort to produce it for us. That gorgeous pen makes me want to sell my first born and buy a good metal lathe. Any offers?
Charles
 

skiprat

Passed Away Mar 22, 2022
In Memoriam
Joined
Oct 19, 2006
Messages
7,812
Location
In a Skip in Wales
........... but where did all the extra white PR past the pointed end of the walnut come from?
................

:biggrin: LOL, it was there all the time:wink: Remember that the wood inserts are extremely tapered, so as the blank is turned down, they get shorter and thus reveal more of the white that was underneath them.:wink:
 

hilltopper46

Member
Joined
Jun 28, 2006
Messages
2,401
Location
East Troy, Wisconsin, USA.
Uh, oh .... when you make things so simple I can understand them it always ends up costing me money, and time.

Thanks for posting - very nice pictorial that is indeed understandable.
 

robutacion

Member
Joined
Aug 6, 2009
Messages
6,514
Location
Australia - SA Adelaide Hills
Talking about "thinking out of the box"...!!!!:eek:

Pictures always worth a thousand words, even for someone like me...!:wink: and your demonstration opens a big "can of worms" or should I say "ideas/possibilities...!"

We have a very dedicated and ingenuous "mob" of guys and gals in here that have the brain and ability to copy anything and come up with stuff on their own too, what I'm trying to say is that, challenges/ideas like this, are pure honey for our bears, starting the fluids to run wild...!

Sharing secrets in here...??? big mistake so, if you ever want to see you many ways these people can skin YOUR cat, there is, reproduce your idea/design, work it up side down, back to front and anything in between, bring it here..!:wink::biggrin:

This subject has been flogged to death many times before but I never had the opportunity to say that, all this is a good thing, and certainly an acknowledgement of the talent found on IAP.

I, on the other hand, and unable to try this technique as I don't have a metal lathe and all its accessories, I would certainly tackle the design buy cutting the wood into shape and then cast the remaining area with PR, the end result would be "identical" but, is not the end result that is in question here, I believe, but the ingeniality some people have to created new things...!

Good stuff...!:wink:

Cheers
George
 

lorbay

Member
Joined
Jul 2, 2009
Messages
3,384
Location
BC. Canada
Skip do you have a picture of the holder used to hold the lamanate trimmer in your quick change tool post.??

Lin
 

alphageek

Former Moderator
Joined
Jul 19, 2007
Messages
5,120
Location
Green Bay, WI, USA.
Oh, my head hurts just looking at the pictures. :)

The pictures help understand your methods.. But its the thought of repositioning to exactly the right place that gives me headaches!
 

Papa Bear

Member
Joined
Nov 2, 2008
Messages
150
Location
Burleson,Texas
That's pretty cool!I think this would be a little easier than the other set-up,I just wish my toy box had some of the same toys!!
 

Curly

Member
Joined
Nov 20, 2010
Messages
4,851
Location
Saskatoon SK., Canada.
.......if you ever want to see you many ways these people can skin YOUR cat.....

I, on the other hand, and unable to try this technique as I don't have a metal lathe and all its accessories,

Well in this case we would be skinning a rat. :wink: :)

You wouldn't need a metal lathe George.
>The headstock end could be done with a spur drive and the blank end cross sawn to allow the wood to "tip" away from the normal axis of rotation.
>The tail end could be nothing more than a big spike, hose clamped to the side of your live centre or the side of the tailstock with shims to get the desired offset.
>The router held at the correct angle, in a plywood sled riding on the lathe bed with a stop to limit the travel.
>Since most lathes have basic indexing holes, locking the blank in the correct position is a given.

There, the rat skinned on a budget. If I ever decide to try if I will use much the same method as skiprat since I have a metal lathe.

The right resin cast would look good.

skiprat I saw the 3 jaw and didn't realize the chuck or backing plate was drilled. Even without, a four jaw would work. Come to think of it an independent four jaw chuck, depending on size could provide the offset too. :)

Pete
 

skiprat

Passed Away Mar 22, 2022
In Memoriam
Joined
Oct 19, 2006
Messages
7,812
Location
In a Skip in Wales
Skip do you have a picture of the holder used to hold the lamanate trimmer in your quick change tool post.??

Lin

Sure Lin,

It's really very basic and something I cobbled up years ago. In some of the previous pics, you could see several washers on one of the bolts. This was pure laziness on my part. :redface: I have now just cut the bolt shorter.:biggrin:

The combination of the flats on the hex shaft and the slotted holes in the bracket allow for just about any angle. The big hole in the aluminium block is standard DIN pattern size, so many other machines can be clamped.

Of course, sometimes getting the cutter at the required height isn't always possible using either the QCTP or even the old toolpost. I have another contraption to hold the machine then but it still uses the same aluminium block.

The eagle eyed may have also seen that the compound ( or top ) slide is facing backwards in the previous pics. I swung it around just to give me a bit more room between the tool and the workpiece.
 

Attachments

  • RouterClamp.jpg
    RouterClamp.jpg
    116.6 KB · Views: 313
  • RouterClamp2.jpg
    RouterClamp2.jpg
    105.6 KB · Views: 442
  • RouterClamp3.jpg
    RouterClamp3.jpg
    97.9 KB · Views: 292
  • RouterClamp4.jpg
    RouterClamp4.jpg
    103.1 KB · Views: 296

lorbay

Member
Joined
Jul 2, 2009
Messages
3,384
Location
BC. Canada
Skip do you have a picture of the holder used to hold the lamanate trimmer in your quick change tool post.??

Lin

Sure Lin,


It's really very basic and something I cobbled up years ago. In some of the previous pics, you could see several washers on one of the bolts. This was pure laziness on my part. :redface: I have now just cut the bolt shorter.:biggrin:

The combination of the flats on the hex shaft and the slotted holes in the bracket allow for just about any angle. The big hole in the aluminium block is standard DIN pattern size, so many other machines can be clamped.

Of course, sometimes getting the cutter at the required height isn't always possible using either the QCTP or even the old toolpost. I have another contraption to hold the machine then but it still uses the same aluminium block.

The eagle eyed may have also seen that the compound ( or top ) slide is facing backwards in the previous pics. I swung it around just to give me a bit more room between the tool and the workpiece.

Perfect, Thanks a bunch Skip.

Lin.
 

Texatdurango

Member
Joined
Apr 23, 2007
Messages
4,649
Location
Show Low, Arizona
Skip, I love your style! Rather than a 10 page step-by-step tutorial, you cut right to the chase with a few photos!

I've been wanting to make some sort of an adapter to hold either my dremel or foredom tool on my lathe. I actually made a holder but didn't like the results so tossed it out. Now, after looking at the photo below I realized that I could make good use of a block of aluminum I have and make a circular clamp as you did, one for my trim router and another for the dremel and foredom and all three could use the same mounting rod that would clamp into the tool holder.

It appears that you set your cutter to where it meets the blank at 45 degrees, right?

Thanks for sharing your ideas!

attachment.php
 

skiprat

Passed Away Mar 22, 2022
In Memoriam
Joined
Oct 19, 2006
Messages
7,812
Location
In a Skip in Wales
George, try LMS for those holders. I could be wrong but I think I've seen them there. But of course there is no fun in that, so here is Version Eleventyfour. It uses the pillar from an old drill press. I welded up the universal swivel arm ages ago. It can swing to absolutely ANY angle, but just takes a bit longer to set up.

The end result here is a big dissapointment. Technically the pen is fine but:redface: Senility is setting in early and I forgot to paint the inside of the PR Avocado blank once I drilled it.
I painted the cap and I even painted the 4 pieces before I glued them into the white. But completely forgot to re-paint after drilling. It looks worse in real life than in the pic.
 

Attachments

  • CueStand.jpg
    CueStand.jpg
    128.2 KB · Views: 280
  • CueStandOnCentre.jpg
    CueStandOnCentre.jpg
    124.3 KB · Views: 293
  • ReadyToCut.jpg
    ReadyToCut.jpg
    118.9 KB · Views: 297
  • 4thCut.jpg
    4thCut.jpg
    98 KB · Views: 303
  • CEAvoCueClosed.jpg
    CEAvoCueClosed.jpg
    32.6 KB · Views: 270
  • CEAvoCueOpen.jpg
    CEAvoCueOpen.jpg
    42.8 KB · Views: 256

kreissb

Member
Joined
Dec 4, 2014
Messages
1
Location
MI
I am curious if I can raise the bar for a dumb question... What is white PR? curious to know the material and have no idea.
 

MarkD

Member
Joined
Jan 24, 2011
Messages
2,293
Location
Sayre, PA
Wow...you dug up a 4 year old link!
PR is Polyester Resin, it's a popular material to make pen blanks from. It's simply a blank made of Polyester Resin and colored with a white pigment.
 

KBs Pensnmore

Member
Joined
Oct 16, 2010
Messages
834
Location
Murray Bridge 5253 Australia
I did a similar thing as to Skips Pen, instead of using a metal lathe, I used my wood turning lathe that has a base for copying. The trimmer was set up with a V cutting router bit and a straight edge was clamped at an angle. I did make a tool that is adjustable that fits in the tailstock for offsetting work. The pen I did had the base, the V section then another V section with the same timber as the base. Can show pics if anyone wants.
Kryn
 

jttheclockman

Member
Joined
Feb 22, 2005
Messages
19,151
Location
NJ, USA.
I would like to see the pics.


Alan

I see you are looking to get into segmenting or want to expand. Did you check the segmenting forum here. Some good inf in there and also a little description of "My Jig" that I use with my lathe to make some segmented blanks. Look for that title when there.
 

designer

Member
Joined
Jan 23, 2011
Messages
380
Location
Washington, Michigan
I am actually just starting into the world of segmenting. I just read the thread on your jig. Well done and well explained. Even as bald as I am it should be easy to make the jig.

I usually watch the new posts but I can see that I need to read the segmenting forum a lot more now.

Thanks John
 

jttheclockman

Member
Joined
Feb 22, 2005
Messages
19,151
Location
NJ, USA.
Allan

I started that forum a couple years ago when I was a bit more active here. I really thought or had high hopes of it turning into something that could send pen blanks in a whole different direction but I may have overestimated it. But there are some good topics in there. Even though I pop in here on occasion if there is something I can help with you can PM me. I do get the message through my email system. Segmenting just a small canvas as a pen blank is challenging in its ways but that is what makes it so much fun and the sky is the limit. I mean that whole heartily. I am sure there are techniques that have not even been thought of yet. I do hope when someone comes up with an idea it is shared. Good luck.
 

skiprat

Passed Away Mar 22, 2022
In Memoriam
Joined
Oct 19, 2006
Messages
7,812
Location
In a Skip in Wales
John, I love the idea of that forum, you know that!! How about you be more active here and get the ball rolling a bit? ,sometimes things just need a little assistance from the Daddy, to get moving. I mean for example, Mikes segmenting thread 'No Comments..' is now one of the biggest threads on IAP ever, only topped by Bev's 'What do you look like?' thread or maybe Chuck's brothel thread......:biggrin:
 

jttheclockman

Member
Joined
Feb 22, 2005
Messages
19,151
Location
NJ, USA.
John, I love the idea of that forum, you know that!! How about you be more active here and get the ball rolling a bit? ,sometimes things just need a little assistance from the Daddy, to get moving. I mean for example, Mikes segmenting thread 'No Comments..' is now one of the biggest threads on IAP ever, only topped by Bev's 'What do you look like?' thread or maybe Chuck's brothel thread......:biggrin:


Skip, I am at this time unable to join my friends in the shop due to health reasons. In fact this past week things took on another twist so I do not know when that will be possible. There are plenty capable people here including yourself that can carry on and maybe even add some spark to the site.
 
Top Bottom