Brass tubes coming out after in tube casting

Signed-In Members Don't See This Ad

sdivot

Member
Joined
Apr 9, 2014
Messages
39
Location
Texas
I'm very new to in-tube casting, and now I am having a new problem...
I am attempting to make stamp castings and also the steampunk-type casts using aluminum and copper tape. After I have cast the pieces, I use a barrel trimmer on the ends. The last two I've done (both stamps and the aluminum/copper tapes) had the tubes come loose and spin inside the casting. The tube sticks to the barrel trimmer and sometimes comes right out on the trimmer. The barrel trimmer is a tight fit, but it is the correct size for the tubes. Even so, I don't think this should be happening.
Anyone have any idea why this is happening? The stamps I'm using are new ones, taken right off the sheet and stuck onto the tube. And of course the tape I'm using is just stuck to the tube as well.
Could it be the adhesive on these items will just not hold onto the tube well enough? If that's the case, any suggestions?
I wish I had marked the ones I've made with PR and the ones with Alumilite. I'm using both, and if I remember correctly, this is happening with both.
Any suggestions? Thanks
 
Signed-In Members Don't See This Ad

Jim Burr

Banned
Joined
Feb 23, 2010
Messages
3,060
Location
Reno, Nv
Couple options Steven...ream out the tube with a round file for a looser fit with the barrel trimmer. Or...use a disc sander to "trim" your tube...arguments on either side. I'd also look at your prep of the tube and if the blank cured completely.
Hope that helps!!
 

sdivot

Member
Joined
Apr 9, 2014
Messages
39
Location
Texas
Thanks for the reply Jim. I wonder if I should do something to the brass tube before sticking on my stamp/tapes. Maybe paint it and let it cure for several days. I do scuff them a bit, but perhaps the brass is too slick of a surface.

My other problem of course is bubbles. Very frustrating. I have a vacuum pot, but I think I should have bought a pressure pot instead. I've had a few successes, but more failures.
Using PR, I put it in the vacuum pot to get the bubbles out, then add the hardener, back into the vacuum for a bit, then pour into the mold and back into the vacuum. I'm still getting bubbles.
With Alumilite, I put both A and B into the vacuum, then I mix them, pour into the mold, and back to the vacuum. I'm still getting bubbles.
 

Jim Burr

Banned
Joined
Feb 23, 2010
Messages
3,060
Location
Reno, Nv
Rough that blank out..see what happens. Alumilite is pressure required, some great library stuff and Curtis has the final videos on youtube. Learn and post, then learn more!! I have some steam punk blanks in mold as we speak, so make stuff and learn!!
 

arkie

Member
Joined
Dec 7, 2008
Messages
304
Location
Siloam Springs, AR
I always paint the tubes before casting, and let cure at least 24 hours before proceeding. I've had good luck with the self adhesive stamps directly over that. I remove the adhesive from the old lick type stamps and use Mod Podge to glue them on. I also seal the stamps with Mod Podge before casting. Let dry 24 hours before casting.

I don't have vacuum or pressure and I've had good luck casting with PR without either. Make sure your edges are well sealed and use a toothpick or dental tool to separate any bubbles from the surface of the stamp. I'm using molds I got from ptownsubbie, but there are many other ways. If all else fails, try the 3 layer method advocated by Barry Gross.

And throw away your barrel trimmer for cast on tube blanks. Use a sander. make your own disc for your lathe, put a chuck in the tailstock and the right size transfer punch in it and you are all set.

Jim, aka arkie

Thanks for the reply Jim. I wonder if I should do something to the brass tube before sticking on my stamp/tapes. Maybe paint it and let it cure for several days. I do scuff them a bit, but perhaps the brass is too slick of a surface.

My other problem of course is bubbles. Very frustrating. I have a vacuum pot, but I think I should have bought a pressure pot instead. I've had a few successes, but more failures.
Using PR, I put it in the vacuum pot to get the bubbles out, then add the hardener, back into the vacuum for a bit, then pour into the mold and back into the vacuum. I'm still getting bubbles.
With Alumilite, I put both A and B into the vacuum, then I mix them, pour into the mold, and back to the vacuum. I'm still getting bubbles.
 

arkie

Member
Joined
Dec 7, 2008
Messages
304
Location
Siloam Springs, AR
Not exactly, though I can describe it. He has small square or rectangular molds. An ounce of resin fills it about a quarter inch deep. He ours one layer and lets sit until cured. Puts weights in the tubes and plugs the ends with stoppers, lays them on top and pours another ounce. Rolls them around picking out any bubbles then lets cure. Pours the third layer. Here's a link to his kit. Someone else may have more details.

Thanks Jim.
Can you direct me to Barry Gross' 3 layer method?
 

Marko50

Member
Joined
Oct 22, 2013
Messages
938
Location
Orem, UT
Hey Steven,

All the above information is excellent. I've never experienced your unique problem, but I can tell you what I avoid like the plague…barrel trimmers. They are way too rough on anything that is "Tube-in" cast. Get yourself set up with a sanding unit when you want to bring the blanks trimmed into square. You will avoid the tear out of the tube your having all together.

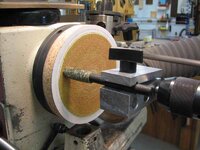
We are lucky on this forum to have our own "tooling expert" in Rick Herrell. Check out his Vendor Page and look at his offerings. Every single one of his tools are unique and made to order at extremely reasonable prices, including his "Offset Lathe Sanding Jig. Very affordable. Check it out here: http://www.penturners.org/forum/f172/custom-made-penturning-tools-accessories-92501/

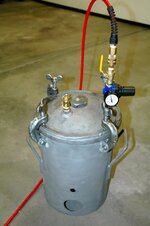
That one thing alone will save you hours of grief and wasted Alumilite Clear resin. As far as the bubbles go, pre-heat your molds to about 150 degrees, and get a good American made pressure pot. You can find them cheap on Ebay if your willing to do a bit of rehab on them. Here's a pic of one I found for $60.00. I just had to put in the pressure relief valve and the regulator. The other pic is that of Rick's Sanding Jig. They work!

Hope this all helps.:)
 

Attachments

  • DSC_9882.jpg
    DSC_9882.jpg
    161.1 KB · Views: 207
  • SandingJig.jpg
    SandingJig.jpg
    84.3 KB · Views: 336
Last edited:

sdivot

Member
Joined
Apr 9, 2014
Messages
39
Location
Texas
Thanks guys. I will dispense with the barrel trimmer for tube in casts. I have also painted a few brass tubes. I will let them cure a bit then see how they work with the stamps/tapes.
In terms of the bubbles, I think I've resigned myself to buying a pressure pot. I'm sure there are a number of ways to do the job, but I'm going to go ahead and get a pressure pot so I can have some assurance (at least in my mind...).
I'm going to get the Harbor Freight pressure pot, along with a pancake compressor.
I had a compressor, but some low life stole it right out of my garage a couple years ago. So of course I will have to spend more cash...
Thanks again folks.
Steve
 

sbell111

Member
Joined
Jan 16, 2008
Messages
3,465
Location
Franklin, TN
I wonder if your trimmer head is getting a bit dull. It might be catching the brass tube and spinning it instead of shaving it.
 

SantaEric

Member
Joined
Jun 15, 2011
Messages
43
Location
buford ga.
i realize this is an old thread but just in case...sand all your tubes then wipe them with vinegar off prior to painting with a primer...there is some kind of semi oilly gunge that will come off with the vinegar
 
Top Bottom