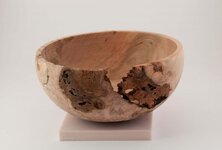
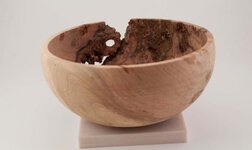
Wormy Cherry Burl Bowl. Got the wood from Jerry Sambrook a couple weeks ago. It fought tooth and nail to avoid being made into anything, but I was not in the mood to loose a fight with a piece of wood. I think this is my first attempt to turn something with such major voids. No finish at the moment, the wood is still a bit green. Around 6" (15 cm) across.

You are using an out of date browser. It may not display this or other websites correctly.
You should upgrade or use an alternative browser.
You should upgrade or use an alternative browser.
Battle of the Burl
- Thread starter holmqer
- Start date
Signed-In Members Don't See This Ad
See more from holmqer


Signed-In Members Don't See This Ad
ctubbs
Member
Talk about a steady hand! I would never had the nerve to try something with much trouble.
Charles
Charles
Toni
Member
Eric very nice bowl, love it!
seamus7227
Member
Wow, Eric I cant wait to see it with a finish on it!
Drstrangefart
Member
Wow. That's gonna be specTACular. Looks great now, but with a finish darkening it up a bit, oh yeah.
Woodlvr
Member
Beautiful bowl. I would have it in a thousand pieces trying to turn that. Next time make Jerry give you a "whole" piece of wood and save some of your nerves.:wink::biggrin:
Fred
Member
I have been using System 3 (Mirror Coat - Bar Top) material to repair a VERY checked, cracked, voids out the ying yang, T-One part of "A" to Two parts of B, and added 10 drops of transtent dye as I mixed the resins. I waited about 5-10 minutes before using the dyed mixture and have had absolutely no problems what so ever. The mixture flows like water and enters every crack, etc. with no problems.
I use a bamboo chopstick that I have flattened one the lower end of the thin end of the stick. The flat area holds more mixture which then dip into my cup of resin and carry several drops to the cracks. Since I am working on a bowl, I have to cover the holes with a small piece of tap prior to turning on to the next hole. I let it set overnight and in the morning I remove the tape. I have found that a resting period after tape removal of about 20-30 minutes really helps the resin to become a nit more workable.
The results are pleasing and extremely easy to turn down smooth with a very sharp skew. To finish the wood I sand with a cut 220 Norton strip until I like what I see, then I use Micro mesh using all the different grits.
Everything shines like glass when finished I might apply a friction finish to protect everything.
Eric ... You could do the same thing with your nice bowl. I would recommend that you tape the outside openenings, cracks, etc. and leave the bowl mounted on the lathe, Just put the hole at the bottom and drip in the resin you use, lightly lightly tape over the mount and turn the next hole down and repeat,
I have been using Blue Painters Tape and am quite pleaded with its strength and ease in removal.
Good luck to you and keep the rest of us informed of your progress. :biggrin:
pensbydesign
Member
nice work as always Erik