Adding a clip

Signed-In Members Don't See This Ad

Texatdurango

Member
Joined
Apr 23, 2007
Messages
4,649
Location
Show Low, Arizona
Quite a few members are posting their kitless creations but few are adding clips and I know why.... you think it's too hard!

Well, it's not really and to prove it, here is one way I do my clips. There are a number of tutorials in the library showing different methods but none show this way (I don't think) so here is a brief explanation and a few photos.

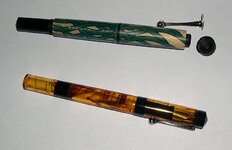
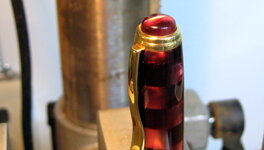
I use black finials that screw into the cap. I choose black because I like the contrast and they match the lower black finials as well and nothing looks sharper than a glossy black finial!

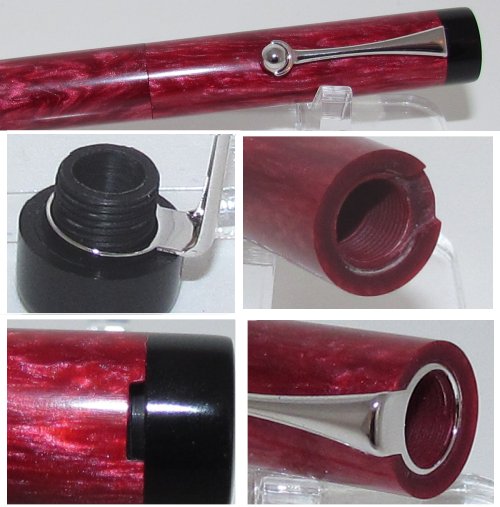
First I decide on the diameter of the caps I want then make my finials a handful at a time. I turn the tenons and cut the threads to where every finial is exactly the same and are all interchangeable. I personally chose 9mm x .75 threads which allow my chosen clip rings to fit snugly around the threads.

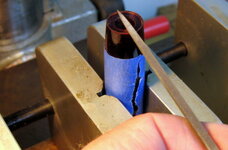
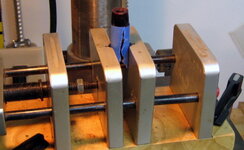
I chuck a round blank in my collet chuck and drill a "Q" hole all the way through. On the top end I use a 9mm x .75mm tap and thread the "Q" hole to allow the finial to screw in. I measure the diameter of the clip ring then cut the same diameter slot in the cap so the clip fits snugly when the finial is screwed on. Then it's just a matter of cutting a slot for the clip to sit in.

Not trying to convince anyone in changing their ways, this is just another way and is very quick and simple!

1_adding_a_clip.jpg
 
Last edited:
Signed-In Members Don't See This Ad

Gilrock

Member
Joined
Oct 18, 2011
Messages
560
Location
Tucson, AZ
Awesome George! I'm going use this info to try to make my first cap tonight. So if I wanted to make the finial out of the same material as the cap and match grains I'm thinking I would need to part off the finial from the cap as thin a cut as possible and glue a piece in for the tenon. I'm using cebloplast on this one so maybe I'll just forget about trying to line up grain for my first one. It shouldn't be that noticeable with that material.

Thanks,
Gil
 

Texatdurango

Member
Joined
Apr 23, 2007
Messages
4,649
Location
Show Low, Arizona
Awesome George! I'm going use this info to try to make my first cap tonight. So if I wanted to make the finial out of the same material as the cap and match grains I'm thinking I would need to part off the finial from the cap as thin a cut as possible and glue a piece in for the tenon. I'm using cebloplast on this one so maybe I'll just forget about trying to line up grain for my first one. It shouldn't be that noticeable with that material.

Thanks,
Gil

Anytime you cut a blank in two pieces you are going to loose some of the grain unless you use an ultra thin laser, and matching the two halves up again to where no would notice, is near impossible. I used to try to do this but realized that I was spending a LOT of time lining up the pattern again when I didn't need to.

The only way to have the solid color look is to cut a notch into the blank and insert a clip, and the library is full of variants showing how to "hide a clip". The method described here is for those who don't mind a mis-aligned pattern or a contrasting colored finial.
 

soligen

Member
Joined
May 11, 2010
Messages
1,085
Location
Sterling Heights, Michigan
George,

I hope you don't mind me jumping in here with an alternative.

I like the method you posed. I use both it, and this alternative too. They both have advantages and disadvantages and I like having both methods in my "tool box" to use whichever will be best - that us why I thought I'd share the alternative.

The alternative is to put the threaded tenon on the cap and notch the finial.

Normally I use your method, but I've use this inverted method for transparent blanks (so threads aren't visible) or delicate blanks where notching the blanks can cause slight warp-age from clip/finial stresses. THE pic shows examples of each of these .

Note: the green & blue pen is not complete yet- still needs final sizing/sanding/polishing. And, please pardon the poor pic - I didn't bother with the light tent.
 

Attachments

  • DSCN1608.JPG
    DSCN1608.JPG
    172.2 KB · Views: 315

redwd707

Member
Joined
Nov 19, 2011
Messages
111
Location
Humboldt County
Thanks, great post. That's a lot better than what I was doing. FWIW, if alignment is an issue, you could eliminate the threads and epoxy the finial/clip in place.:rolleyes:
 

turbowagon

Member
Joined
Sep 2, 2009
Messages
1,067
Location
Tucson, AZ
Any tips for filing the notch? That's the biggest PITA for me. Would love it if there were a power tool or something I can just "zip" the notch out with, instead of spending 10 minutes with a little file, getting a cramp in my shoulder.
 

Texatdurango

Member
Joined
Apr 23, 2007
Messages
4,649
Location
Show Low, Arizona
Any tips for filing the notch? That's the biggest PITA for me. Would love it if there were a power tool or something I can just "zip" the notch out with, instead of spending 10 minutes with a little file, getting a cramp in my shoulder.

Ten minutes :eek:, I can make three notches in 10 minutes!:biggrin:

I think it just comes down to technique and doing it a hundred times, after a while yu do it blindfolded!

I use three different jewlers files. I have a little "third hand" vice I picked up at Harbor freight to hold the blank while filing, that in itself saved a lot of tedious holding and filing, now it's just filing.

One day I set out to make an attachment to hold a dremel tool and mount it to my metal lathe to make quick notches but after a few hours of tinkering I got tired of fooling with it and just hand cut each one.
 

turbowagon

Member
Joined
Sep 2, 2009
Messages
1,067
Location
Tucson, AZ

BRobbins629

Passed Away Dec 28, 2021
In Memoriam
Joined
Mar 8, 2006
Messages
4,037
Location
Richmond, VA, USA.
Any tips for filing the notch? That's the biggest PITA for me. Would love it if there were a power tool or something I can just "zip" the notch out with, instead of spending 10 minutes with a little file, getting a cramp in my shoulder.
If you have a metal lathe with a quick change tool post, you can put an end mill sized to the width of the notch in the head stock and make a cap holder for the tool rest. Its a poor man's mill but works quite well. Use the height adjustment of the tool rest to center the cap and the cross feed to advance it through the end mill. I now do mine on my mill, but have done several on the lathe.

Alternatively you could mount the cap in the headstock, lock it in place and use a rotary tool in the tool post.
 
Last edited:

Texatdurango

Member
Joined
Apr 23, 2007
Messages
4,649
Location
Show Low, Arizona
Any tips for filing the notch? That's the biggest PITA for me. Would love it if there were a power tool or something I can just "zip" the notch out with, instead of spending 10 minutes with a little file, getting a cramp in my shoulder.
If you have a metal lathe with a quick change tool post, you can put an end mill sized to the width of the notch in the head stock and make a cap holder for the tool rest. Its a poor man's mill but works quite well. Use the height adjustment of the tool rest to center the cap and the cross feed to advance it through the end mill. I now do mine on my mill, but have done several on the lathe.

Alternatively you could mount the cap in the headstock, lock it in place and use a rotary tool in the tool post.

THIS is why I start these little threads........ I get lots of neat ideas!

Bruce you didn't answer my PM, who does your casting? My laptop died and had to be sent in for repair/replacement and along with it went all my bookmarks and I need to call the casting folks.
 

Texatdurango

Member
Joined
Apr 23, 2007
Messages
4,649
Location
Show Low, Arizona
I use three different jewlers files. I have a little "third hand" vice I picked up at Harbor freight to hold the blank while filing, that in itself saved a lot of tedious holding and filing, now it's just filing.

I think my file is the problem.... would a set like this do the trick?

Amazon.com: 6 Needle Files Jewelers Watchmakers Metal Filing Tool: Arts, Crafts & Sewing

Thanks for the nice write-up, by the way!

Here is what I use, note the little blue pack of tiny red handled files, I use one of them!

1_notch_files.jpg
 

BRobbins629

Passed Away Dec 28, 2021
In Memoriam
Joined
Mar 8, 2006
Messages
4,037
Location
Richmond, VA, USA.
Bruce you didn't answer my PM, who does your casting? My laptop died and had to be sent in for repair/replacement and along with it went all my bookmarks and I need to call the casting folks.

?? Didn't see a recent PM. Sure it was to me? - I still use Cranston Casting in RI
 

redwd707

Member
Joined
Nov 19, 2011
Messages
111
Location
Humboldt County
Thanks, great post. That's a lot better than what I was doing. FWIW, if alignment is an issue, you could eliminate the threads and epoxy the finial/clip in place.:rolleyes:

When a customer breaks or bends a clip and sends it back for repair, what do you do?

Yea, good point. I'd imagine bent clip is a fairly common occurance. I like your technique better for a number of reasons. I'd already resolved to try it on my next one. Thanks again,
John
 

Texatdurango

Member
Joined
Apr 23, 2007
Messages
4,649
Location
Show Low, Arizona
Bruce you didn't answer my PM, who does your casting? My laptop died and had to be sent in for repair/replacement and along with it went all my bookmarks and I need to call the casting folks.

?? Didn't see a recent PM. Sure it was to me? - I still use Cranston Casting in RI

Maybe I didn't hit the submit button. Thanks!

Maybe that's why doing a google search for casting companies in New Jersey didn't pop up any familiar names!:redface:
 

BigShed

Member
Joined
Feb 14, 2008
Messages
1,068
Location
Adelaide, SA, Australia.
Thanks for the tips George (and others). George I have been using your method with the notch but I hold the cap with a closed end mandrel which I also use for the final turning to shape and sanding and polishing.

I have made a closed end mandrel set for each of the 3 triple start tap and die stes I have, one for the barrel and one for the cap.
 

Stevej72

Member
Joined
Apr 30, 2006
Messages
1,603
Location
Billings, MT, USA.
Thank you George. This will come in real handy on my next project. My first kitless was also clipless. I wanted to add a clip to my next pen and will try this technique.
 

Dalecamino

Local Chapter Leader
Joined
Jan 2, 2008
Messages
14,573
Location
Indianapolis, In.
I thought this thread was worth a few more pictures. A picture is worth a thousand words. Right?

I wrap a piece of painters tape around the cap, and put it in my pen vice on my drill press, and adjust the height to where it is comfy, and I can see well. Works out pretty well for me.
 

Attachments

  • IMG_1144.JPG
    IMG_1144.JPG
    85.4 KB · Views: 195
  • IMG_1145.JPG
    IMG_1145.JPG
    89.3 KB · Views: 183
  • IMG_1146.JPG
    IMG_1146.JPG
    69.4 KB · Views: 185

Gilrock

Member
Joined
Oct 18, 2011
Messages
560
Location
Tucson, AZ
I thought this thread was worth a few more pictures. A picture is worth a thousand words. Right?

I wrap a piece of painters tape around the cap, and put it in my pen vice on my drill press, and adjust the height to where it is comfy, and I can see well. Works out pretty well for me.

Chuck,
Just curious in the first photo where it looks like you have a recess to hold the clip so where you are filing is a thin lip....do you cut that recess with a lathe tool or a drill bit? If it's a lathe tool I'd be worried one little slip and there goes my lip...

Gil
 

soligen

Member
Joined
May 11, 2010
Messages
1,085
Location
Sterling Heights, Michigan
I thought this thread was worth a few more pictures. A picture is worth a thousand words. Right?

I wrap a piece of painters tape around the cap, and put it in my pen vice on my drill press, and adjust the height to where it is comfy, and I can see well. Works out pretty well for me.

Chuck,
Just curious in the first photo where it looks like you have a recess to hold the clip so where you are filing is a thin lip....do you cut that recess with a lathe tool or a drill bit? If it's a lathe tool I'd be worried one little slip and there goes my lip...

Gil

Either will work. I've done both. I perfer a lathe tool for more control. I shaped by own custom little scaper for small end work getting inside small places like this. It is about 1/4" wide. Using a tool also makes the recess flat-bottomed.
 

Dalecamino

Local Chapter Leader
Joined
Jan 2, 2008
Messages
14,573
Location
Indianapolis, In.
I thought this thread was worth a few more pictures. A picture is worth a thousand words. Right?

I wrap a piece of painters tape around the cap, and put it in my pen vice on my drill press, and adjust the height to where it is comfy, and I can see well. Works out pretty well for me.

Chuck,
Just curious in the first photo where it looks like you have a recess to hold the clip so where you are filing is a thin lip....do you cut that recess with a lathe tool or a drill bit? If it's a lathe tool I'd be worried one little slip and there goes my lip...

Gil
I use an end mill, or a straight router bit, chucked in my tail stock. Mike Redburn, and Mike Roux taught me this trick among others.
 
Top Bottom