Yosegi zaiku

Signed-In Members Don't See This Ad
See more from Alan Morrison

Alan Morrison

Member
Joined
Jan 15, 2019
Messages
3,062
Location
N Ireland
Having watched Japanese craftsmen on youtube making veneers with absolute precision, I wondered if some of their technique could be incorporated into a pen blank. Here are my first stumblings, and since have just bought a thin kerf 60t blade to attempt more accuracy. Dealing with such small pieces is somewhat trying. Now am upgrading the original jigs as well. All critiques welcome.
 

Attachments

  • IMG_0937.jpg
    IMG_0937.jpg
    198.7 KB · Views: 243
Signed-In Members Don't See This Ad

jttheclockman

Member
Joined
Feb 22, 2005
Messages
19,082
Location
NJ, USA.
Absolutely love the idea. I have at one time been playing with the compass rose in flat work and thought about incorporating in a pen design somehow. You have given me encouragement. Thanks for showing and keep up the good work.
 

Alan Morrison

Member
Joined
Jan 15, 2019
Messages
3,062
Location
N Ireland
Absolutely love the idea. I have at one time been playing with the compass rose in flat work and thought about incorporating in a pen design somehow. You have given me encouragement. Thanks for showing and keep up the good work.
Thanks for your encouragement, John. I was ready to pull the plug on this but will keep on a while longer. One of the difficulties is having to cut the components so small to fit within the pen and the problems in making the cuts uniform. I have made a couple more jigs and will see how it goes.
Alan
 

jttheclockman

Member
Joined
Feb 22, 2005
Messages
19,082
Location
NJ, USA.
Thanks for your encouragement, John. I was ready to pull the plug on this but will keep on a while longer. One of the difficulties is having to cut the components so small to fit within the pen and the problems in making the cuts uniform. I have made a couple more jigs and will see how it goes.
Alan
Doublesided tape is your friend. Carrier boards work well along with jigs. If you had a scrollsaw then that could be a way also. That will be my avenue when I try them. I may also just use veneers and cut with a razor knife. Just some other ideas I have kicking around.
 

mark james

IAP Collection, Curator
Joined
Sep 6, 2012
Messages
12,720
Location
Medina, Ohio
I'm not at my house, so I cannot take any additional photos, but I may be able to assist.

I apologize for revisiting my past Chevron work, but getting designs into a useable block to cut the window insert is very workable.

1. We know the basics of the window, several methods, pick what works for you.
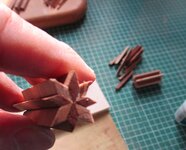
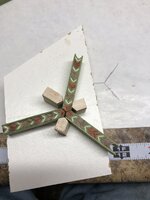
2. Alan's pattern concepts are excellent. Try the method I used for my Chevron finials. i.e., sanding the Chevron pieces down to the angle you want for the sides you want. (brush up on your geometry, google is your friend).
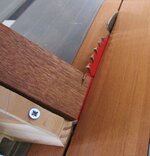
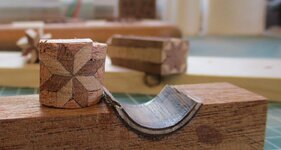
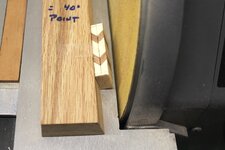
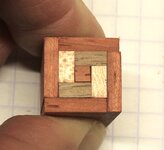
3. You will just need to get the assembled 'block' big enough to the cut the window insert (maybe 1.5" long by 1" wide by 1/2" thick). This will need to be tweaked for whatever you are doing.
Basically, instead of making the segmenting a 'finial' size (.5" OD and .5" long. Make it large enough for a 'window insert" - before cutting the oval.
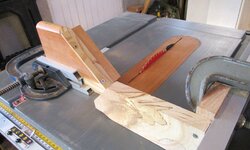
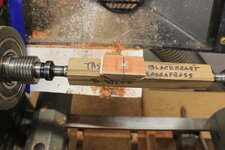
I sand fairly large sections on my disc sander with whatever angles I need for 3, 4, 5, 6+ sides. As John says, double sided tape is your friend. NOTE: Please be safe, I do not recommend this for those not willing for some excitement! When I sand segmented pieces this way, I never stand in front of the sander, and I always expect for some UFO's - about 10% of the time I am correct!

I hope this isn't too rambling, and I also wish I was in my shop.

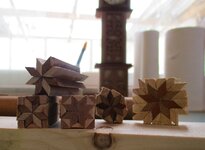
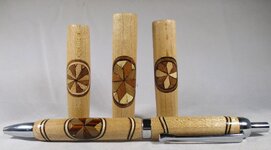
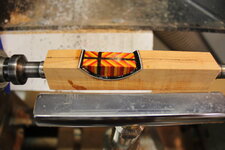
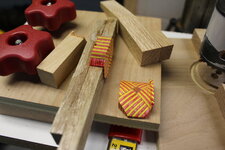
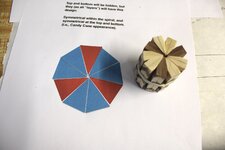
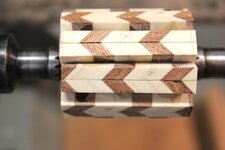
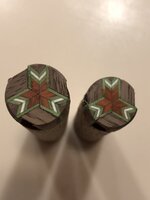
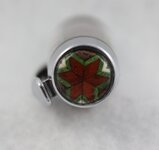
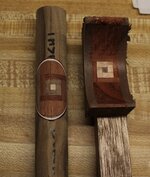
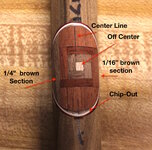
Oh, making a cool design the proper size for the window pane will not be the greatest challenge! Its getting it centered so that when turned down to final pen OD size it is where you want it to be. (Hank had an excellent phrase for this in another recent thread, a quote from Wayne Gretzky: Basically... It's not being where the puck is at, it's being where the puck will be. For us, it's not centering the pattern on the outside, its getting a techniques for centering the pattern on the inside, which we can't see until it's turned down). The final photos show one where it was not centered properly.

Have fun guys!
 

Attachments

  • 8A76EA37-FD0F-441F-ABD9-BA9C02BE96EB.jpeg
    8A76EA37-FD0F-441F-ABD9-BA9C02BE96EB.jpeg
    184.7 KB · Views: 140
  • CC104C27-9021-4A8C-A0A6-5FA63DDF242F.jpeg
    CC104C27-9021-4A8C-A0A6-5FA63DDF242F.jpeg
    234.5 KB · Views: 150
  • 40BE0855-0CB5-4086-967A-AFAAB3C92C81.jpeg
    40BE0855-0CB5-4086-967A-AFAAB3C92C81.jpeg
    258.6 KB · Views: 137
  • 2F382C96-B7D8-4CAF-BCF2-1D5F4725DB6C.jpeg
    2F382C96-B7D8-4CAF-BCF2-1D5F4725DB6C.jpeg
    100.6 KB · Views: 130
  • CC3578DD-5154-4E20-B32F-A1C9CDB62837_1_201_a.jpeg
    CC3578DD-5154-4E20-B32F-A1C9CDB62837_1_201_a.jpeg
    160.5 KB · Views: 131
  • 79CFD71D-E7D4-4A4F-B913-5ADB37718CA0_1_201_a.jpeg
    79CFD71D-E7D4-4A4F-B913-5ADB37718CA0_1_201_a.jpeg
    179.7 KB · Views: 137
  • BE3D99FE-C967-46E0-9528-85D4B04A8F71_1_201_a.jpeg
    BE3D99FE-C967-46E0-9528-85D4B04A8F71_1_201_a.jpeg
    217.8 KB · Views: 139
  • D95E0DE0-F7A1-4BE2-A615-D76B1F142207.jpeg
    D95E0DE0-F7A1-4BE2-A615-D76B1F142207.jpeg
    131.9 KB · Views: 140
  • 2AB244C2-D7FF-4A57-A394-4C1B402D0CFD.jpeg
    2AB244C2-D7FF-4A57-A394-4C1B402D0CFD.jpeg
    234.3 KB · Views: 131
  • 9DB6FA82-6A7B-4B53-982B-E098298BB70D_1_201_a.jpeg
    9DB6FA82-6A7B-4B53-982B-E098298BB70D_1_201_a.jpeg
    120.5 KB · Views: 141
  • E8E59B0B-6FC7-4624-8F3E-4465C08B07A2_1_105_c.jpeg
    E8E59B0B-6FC7-4624-8F3E-4465C08B07A2_1_105_c.jpeg
    167.6 KB · Views: 158
  • B3C6BCD3-B0B9-4C6B-B6A7-D8DF60E837C8_1_201_a.jpeg
    B3C6BCD3-B0B9-4C6B-B6A7-D8DF60E837C8_1_201_a.jpeg
    305.3 KB · Views: 154
  • 67A4DEF6-5B15-4219-A664-8F63A1C0653E.jpeg
    67A4DEF6-5B15-4219-A664-8F63A1C0653E.jpeg
    541.1 KB · Views: 158
Last edited:

Alan Morrison

Member
Joined
Jan 15, 2019
Messages
3,062
Location
N Ireland
Doublesided tape is your friend. Carrier boards work well along with jigs. If you had a scrollsaw then that could be a way also. That will be my avenue when I try them. I may also just use veneers and cut with a razor knife. Just some other ideas I have kicking around.
John, next time I'm making the 'compass' I will photograph my method , jigs etc and PM them to you if you don't mind. I would appreciate your feedback on how I am going about this, and see if you can suggest improvements, if that suits?
I have used my scroll saw on occasions to cut the material for the window but found that I was not as accurate as when using the hole saw, however at the expense of centering the 'compass' accurately.
Alan
 

jttheclockman

Member
Joined
Feb 22, 2005
Messages
19,082
Location
NJ, USA.
John, next time I'm making the 'compass' I will photograph my method , jigs etc and PM them to you if you don't mind. I would appreciate your feedback on how I am going about this, and see if you can suggest improvements, if that suits?
I have used my scroll saw on occasions to cut the material for the window but found that I was not as accurate as when using the hole saw, however at the expense of centering the 'compass' accurately.
Alan
If I can help I am always willing. Like I said I have not tried the compass on a pen. It is on my to do list though. But pretty far down the list:) Seems these days my list keeps growing with all these new ideas coming to light and I want to play too.
 

Dale Lynch

Member
Joined
Dec 12, 2011
Messages
1,819
Location
Hastings,NE
I was wondering if the design went all the way through or if was veneer marquetry.I was wrong either way.It was a window inlay.
 

Alan Morrison

Member
Joined
Jan 15, 2019
Messages
3,062
Location
N Ireland
I have done them all at once which is inaccurate and in fours and sanded the two halves level before glueing, which is a bit better.
I think that if they were bigger they would not be so troublesome.
 
Top Bottom