Ying Yang Panache

Signed-In Members Don't See This Ad
See more from jttheclockman

jttheclockman

Member
Joined
Feb 22, 2005
Messages
19,965
Location
NJ, USA.
I thought I would show this pen here being I used it in another forum here.

There maybe quite afew who have seen my latest pens on other sites, so I won't bore you with them but here is one that I made for the Panache kit which I have to say is quite abit different in feel then what we are used to.

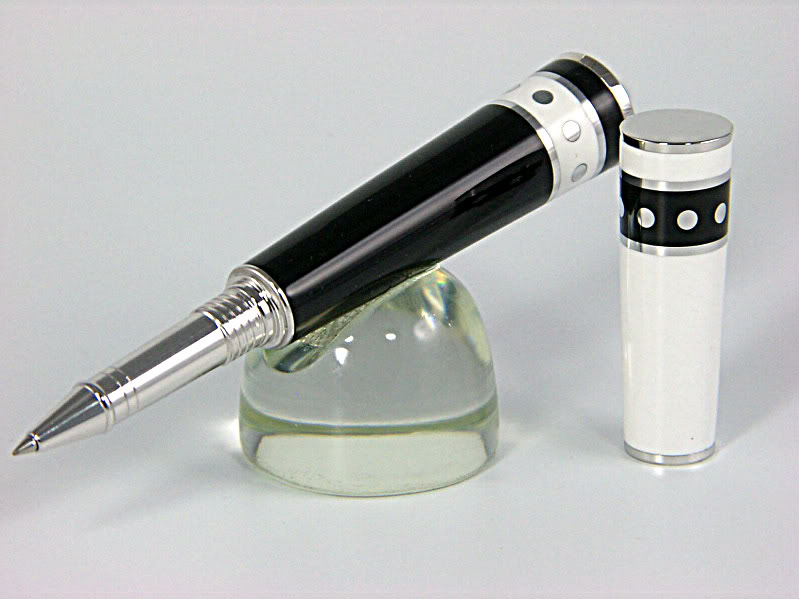
This was a first for me. It is a Panache rollerball in black and white acrylic with both some aluminum segmenting strips and dots. These were all just MM and polished to a high shine. Sort of my Ying and Yang of pens.

If you feel like commenting or have any questions I would be happy to answer. Thanks for looking.
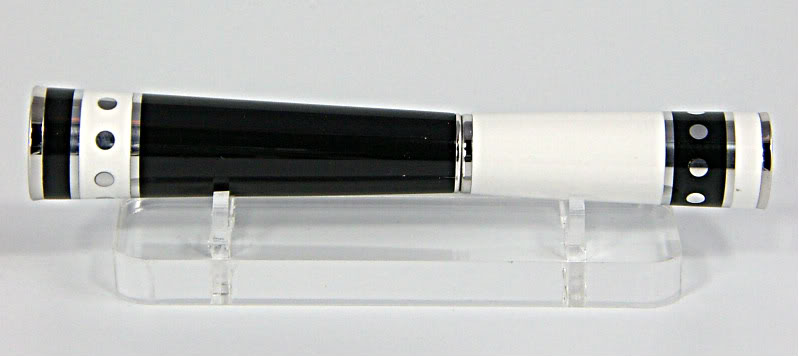


CopyofIMGP0937-1.jpg


CopyofIMGP0946.jpg
 
Signed-In Members Don't See This Ad
That Has Great WOW factor to it. I have made a few of these pens and you are right when you say they feel different. What did you use to polish the aluminum.
 
That Has Great WOW factor to it. I have made a few of these pens and you are right when you say they feel different. What did you use to polish the aluminum.

Just MM with the acrylic. Put a coat of plastic polish on it as I do with all my acrylic pens. I do use a carbide cutter so the pen is practiclly mint when turned so little polishing is needed.
 
That looks awesome!!!

Can you you tell us the process in the segmenting & the dots please? Someday,if I get better at this craft,I'd like to try some some segmenting with different materials.

That is a nice conversation piece,as in "How the heck did he do that?"

I've only made two Panaches,and I really like them,I was suprised how how well it fits my hand,I like writing with it.

Great work!

Steve
 
That is extremely striking and beautifully made John!!!. I love it !!

I like the look of your domed stand too:wink:
 
Show stopper!!!! I love the attention to detail with the segmenting. Love the pen... It belongs on the home page - featured photo. Great job
 
Very dynamic witha great look and balance in the design. Probably one of the best I've seen in a while on here. Great job and please feel free to fill everyone in on the details!
 
John, the panache is a kit that I've not been thrilled about the looks, but your take on it makes it not look like a kit pen at all. Your segmenting makes the kit look like an extension of your pen work. Very nice!
 
That is extremely striking and beautifully made John!!!. I love it !!

I like the look of your domed stand too:wink:

You should Steve. I stole the stand idea from you years ago:biggrin: Heck I even color them too. Goes to show you I pay attention to what you show my friend:biggrin:


Very dynamic witha great look and balance in the design. Probably one of the best I've seen in a while on here. Great job and please feel free to fill everyone in on the details!


Thanks for the kind words. Let me first say that my pen designs or blank designs come from observing what I have seen before through many forms of media so there is nothing earth shattering about what I make. I think many pen turners just need to think outside the box abit and observe things that they see. Use that and run with it. I only use a wood lathe which is either a Jet 1014vs or 1220vs. I use wood cutting tools and on projects like this I do use a carbide cutting tool which makes life a whole lot easier. Other than that anyone can make the pens I make.

The main tool used here to make the holes for the dots is an indexing wheel attached to my lathe and a wood trim router.

The materials used are 1/8" aluminum rod for the dots and 1/8" aluminum flat stock from Home Depot. The main body is just plain white and black solid acrylic. Drilled and finished like any ordinary acrylic pen.
 
Last edited:
Nice one John.

A fantastic pen.

You have give me some fresh ideas about a blank that I want to make.

Now all I need to do is to get some workshop time to channel that inspiration and turn it into reality.

Thanks for sharing

Timberbits.
 
When you say, "Different in feel"....what are you refering to? The way it balances in the users' hand, or perhaps something else?


Great segmenting!!! Definitely a ying-yang pen!


Scott (shes very purty) B
 
When you say, "Different in feel"....what are you refering to? The way it balances in the users' hand, or perhaps something else?


Great segmenting!!! Definitely a ying-yang pen!


Scott (shes very purty) B


Yes Scott. For me the taper of the pen body feels weird but I am sure someone could get used to it and it is a good pen for those with larger hands or poor gripping. You rest the body of the pen in the hand and it has abit more weight also.

Thanks for the kind words. You have seen my collection on other forums. :biggrin:
 
John, that is a fantastic look! How are you mounting the router?

The main tool used here to make the holes for the dots is an indexing wheel attached to my lathe and a wood trim router.

The materials used are 1/8" aluminum rod for the dots and 1/8" aluminum flat stock from Home Depot. The main body is just plain white and black solid acrylic. Drilled and finished like any ordinary acrylic pen.

It is just like a magic trick -- looks unbelievable when you see it, but after you know the trick, it seems ordinary.

Thanks for telling us the trick!:good:
Harry
 
Thanks for the kind words. Let me first say that my pen designs or blank designs come from observing what I have seen before through many forms of media so there is nothing earth shattering about what I make. I think many pen turners just need to think outside the box abit and observe things that they see. Use that and run with it. I only use a wood lathe which is either a Jet 1014vs or 1220vs. I use wood cutting tools and on projects like this I do use a carbide cutting tool which makes life a whole lot easier. Other than that anyone can make the pens I make.

The main tool used here to make the holes for the dots is an indexing wheel attached to my lathe and a wood trim router.

The materials used are 1/8" aluminum rod for the dots and 1/8" aluminum flat stock from Home Depot. The main body is just plain white and black solid acrylic. Drilled and finished like any ordinary acrylic pen.

This is a stunning pen John. What grade is the aluminum that you use and have you had any issues with oxidisation? Do you put a coat of CA over the aluminum to seal it?
 
John, that is a fantastic look! How are you mounting the router?

The main tool used here to make the holes for the dots is an indexing wheel attached to my lathe and a wood trim router.

The materials used are 1/8" aluminum rod for the dots and 1/8" aluminum flat stock from Home Depot. The main body is just plain white and black solid acrylic. Drilled and finished like any ordinary acrylic pen.

It is just like a magic trick -- looks unbelievable when you see it, but after you know the trick, it seems ordinary.

Thanks for telling us the trick!:good:
Harry


Harry, we will let that one sit for awhile. I do have another pen to show that uses this system. Thanks for the kind words.


Thanks for the kind words. Let me first say that my pen designs or blank designs come from observing what I have seen before through many forms of media so there is nothing earth shattering about what I make. I think many pen turners just need to think outside the box abit and observe things that they see. Use that and run with it. I only use a wood lathe which is either a Jet 1014vs or 1220vs. I use wood cutting tools and on projects like this I do use a carbide cutting tool which makes life a whole lot easier. Other than that anyone can make the pens I make.

The main tool used here to make the holes for the dots is an indexing wheel attached to my lathe and a wood trim router.

The materials used are 1/8" aluminum rod for the dots and 1/8" aluminum flat stock from Home Depot. The main body is just plain white and black solid acrylic. Drilled and finished like any ordinary acrylic pen.

This is a stunning pen John. What grade is the aluminum that you use and have you had any issues with oxidisation? Do you put a coat of CA over the aluminum to seal it?


No oxidation. Have not sold this one yet. As I mentioned the aluminum is from Home Depot. Not sure what they use. Works for me. I do not seal this one with anything except a coat of plastic wax which was mainly for the acrylic.
 
And ..... :biggrin: WOW :biggrin: !!!!! .... Thanks to Skip for reviving this thread !!!
 
Now this has wow. The layout is very well thought out as well as having a definite overall concept. Having a design in mind and being able to execute it to your vision is always a difficult process but this was done superbly.

Thanks for sharing.
 
Well I even have to say WoW only because I have not seen that pen for awhile. I had sold that pen some time ago. When I did have it, it did not oxidize or any other problems with it. It was as shiny as new when I sold it. The person tried it at my booth and fell in love with it. It was a male so I am thinking the larger hands were a good thing in feel for it. He said it was a perfect work desk pen.

I thank Skiprat for bringing it back to life. He has at many times told me how much he enjoyed looking at this design. I always tell him even a blind squirrel can get lucky once in awhile to. Compared to what he makes this is nothing but I do have to say it is somewhat of the thing I was trying to convey in my other thread. Taking that next step and thinking outside the box. We all have it in us.

Thanks for the new comments also. One thing I hope is if my work can inspire just one more person than it was well worth it plus the money is not bad either:smile:
 
Back
Top Bottom