Wrinkles

Signed-In Members Don't See This Ad

qquake

Member
Joined
Feb 8, 2004
Messages
5,007
Location
Northern California
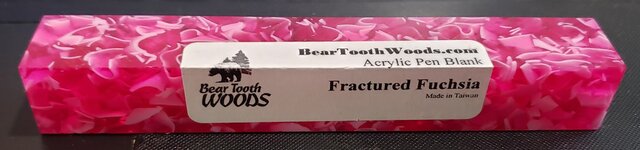
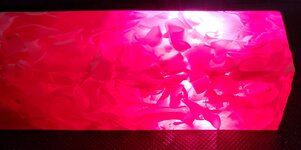
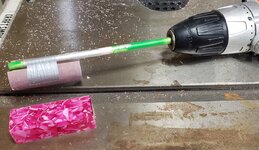
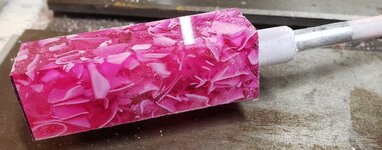
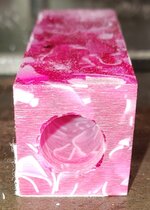
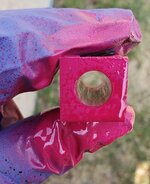
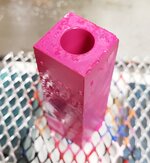
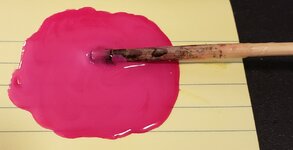
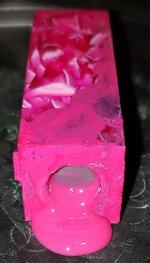
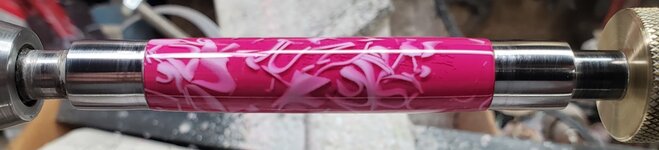
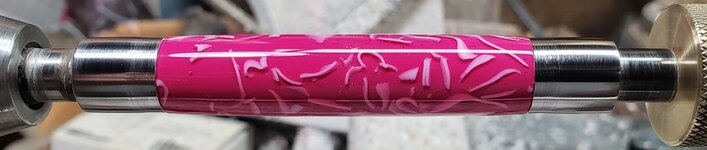
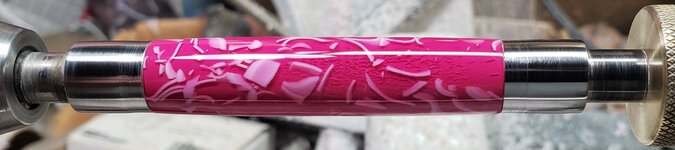
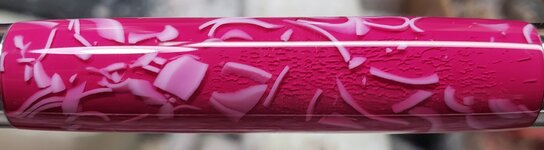
This blank is called Fractured Fuchsia from Bear Tooth Woods. It's more than translucent, it's actually see-through in places. So I sanded the inside with my patented sandpaper-on-a-stick, then painted and colored the epoxy. I wasn't taking any chances. It ended up very pretty after polishing, but can anyone tell me what the "wrinkles" are? I've seen them before in blanks, but have no idea what causes them.
 

Attachments

  • 003.jpg
    003.jpg
    134.5 KB · Views: 198
  • 008.jpg
    008.jpg
    161.9 KB · Views: 196
  • 020.jpg
    020.jpg
    474.1 KB · Views: 205
  • 021.jpg
    021.jpg
    276.4 KB · Views: 185
  • 022.jpg
    022.jpg
    405.2 KB · Views: 184
  • 023.jpg
    023.jpg
    328.8 KB · Views: 192
  • 024.jpg
    024.jpg
    385.8 KB · Views: 192
  • 026.jpg
    026.jpg
    302.9 KB · Views: 214
  • 028.jpg
    028.jpg
    211.1 KB · Views: 196
  • 031.jpg
    031.jpg
    157.7 KB · Views: 197
  • 033.jpg
    033.jpg
    222.4 KB · Views: 202
  • 056_205.jpg
    056_205.jpg
    562.8 KB · Views: 244
  • 057_205.jpg
    057_205.jpg
    118.6 KB · Views: 211
  • 058_205.jpg
    058_205.jpg
    120.4 KB · Views: 216
  • 059_205.jpg
    059_205.jpg
    128.5 KB · Views: 233
  • 060_wrinkles.jpg
    060_wrinkles.jpg
    136.2 KB · Views: 276
Signed-In Members Don't See This Ad

Curly

Member
Joined
Nov 20, 2010
Messages
4,828
Location
Saskatoon SK., Canada.
I agree with John. It is crazing. Fine cracks in the plastic that could be from heat during drilling, a solvent in a lubricant if used when drilling, solvent in the paint or glue or even chemicals like ammonia in cleaners if you washed the blank out after drilling.
 

SteveG

Member
Joined
Dec 21, 2009
Messages
2,985
Location
Eugene, Oregon 97404
My guess is the wrinkles are in the paint that you used. I do not know the reason, but suspect that the paint developed the texture as it dried. Something like an excess amount of paint with no place to go within the confines of the drilled hole. If I am correct, do I win a prize?
 

qquake

Member
Joined
Feb 8, 2004
Messages
5,007
Location
Northern California
I agree with John. It is crazing. Fine cracks in the plastic that could be from heat during drilling, a solvent in a lubricant if used when drilling, solvent in the paint or glue or even chemicals like ammonia in cleaners if you washed the blank out after drilling.
No lubricant or chemicals.
 

TonyL

Member
Joined
Mar 9, 2014
Messages
8,904
Location
Georgia
If they were drill marks, wouldn't they be perpendicular to the blank, and not parallel?
Your guess is as good as mine. I to get the same even when using sharp, high quality bits, lubricant and drill at 700 (maybe that is too fast - even used acetone to try to smooth it out.
I seldom use those types of translucent blanks unless the thickness of the Barrell wall is pretty significant. I tried polishing the insides, but I wound up expanding the dimensions. So, I just avoid them. Would love to hear what others do.
 

qquake

Member
Joined
Feb 8, 2004
Messages
5,007
Location
Northern California
My guess is the wrinkles are in the paint that you used. I do not know the reason, but suspect that the paint developed the texture as it dried. Something like an excess amount of paint with no place to go within the confines of the drilled hole. If I am correct, do I win a prize?
I stand blanks up on a piece of screen as they dry, so if there is excess paint it should drain out as it's drying. And yes, the prize is a wrinkled pen!
 

Attachments

  • 026.jpg
    026.jpg
    302.9 KB · Views: 114

qquake

Member
Joined
Feb 8, 2004
Messages
5,007
Location
Northern California
Your guess is as good as mine. I to get the same even when using sharp, high quality bits, lubricant and drill at 700 (maybe that is too fast - even used acetone to try to smooth it out.
I seldom use those types of translucent blanks unless the thickness of the Barrell wall is pretty significant. I tried polishing the insides, but I wound up expanding the dimensions. So, I just avoid them. Would love to hear what others do.
That's why I sanded the inside, to try to eliminate drill marks.
 

Gary Beasley

Member
Joined
Sep 18, 2009
Messages
1,326
Location
Marietta, Ga. USA
If that is crazing from heat you need to use some water in the hole as you drill and even go so far as wetting the sandpaper when sanding the inside. The heat builds up faster than you think.
 

JohnU

Member
Joined
Jan 31, 2008
Messages
4,923
Location
Ottawa, Illinois
Been there many times. From my experience, I believe it's the paint on the inside of the hole reacting to the heat of the curing epoxy on the tube. The epoxy heats up as it cures and the heat is trapped between the blank and tube and cooks the paint. I've had painted tubes do the same thing in clear resin where the heat in the curing resin wrinkles it.
 

qquake

Member
Joined
Feb 8, 2004
Messages
5,007
Location
Northern California
Been there many times. From my experience, I believe it's the paint on the inside of the hole reacting to the heat of the curing epoxy on the tube. The epoxy heats up as it cures and the heat is trapped between the blank and tube and cooks the paint. I've had painted tubes do the same thing in clear resin where the heat in the curing resin wrinkles it.
I knew curing resin generates some heat, but I didn't think it was that much.
 

magpens

Member
Joined
Feb 2, 2011
Messages
15,913
Location
Canada
Very annoying !
Very interesting !
I've experienced this.
I'm pretty blinkin' sure it is a heat phenomenon ... whether from drilling (I drill at about 250 RPM), or from epoxy curing and affecting the paint.
I am inclined to lean towards the latter.

Now, the challenge .... design an experiment with the express purpose of determining which it is !!!!

Of course, the crazing DOES NOT ALWAYS happen .... therein lies a big part of the challenge.

So ..... get multiple (20+) identical blanks, all prepared in identical fashion, paint half of them and leave half unpainted, and use the same glue on all of them ....... !!!!!

And then "analyze" the results ... BUT ... Obviously, an analysis should be done BEFORE the painting also ..... to try to determine the effect of drilling.

Anyone up to the task ??????? ... Quite a large undertaking.

We might need to enlist the help of the Australian CSIRO (Commonwealth Scientific and Industrial Research Organization), or similar body, to make this a truly International undertaking, in full keeping with the title of our dearly-beloved IAP.

Such are the joys of pen-making !!!

BTW, it is quite amazing that this topic has attracted so much attention so early in the morning of the start of this thread !!!
 

Penchant 4

Member
Joined
Jun 23, 2018
Messages
322
Location
Great Lakes Area
Did not see it above, but might have missed it. If so, my apologies.

How long is the paint allowed to cure before gluing the tube into the blank?
 

howsitwork

Member
Joined
Jul 9, 2016
Messages
2,299
Location
Thirsk
To me they look like minature stress fractures inside the blank? Could also be paint wrinkling as it dries and the solvent has evaporated unevenly, dried in some areas , not in others then as it dries is pulls the paint over causing wrinkles.

If it's stress fractures they will draw in the paint but of course you cant see that until you get the wall thickness down. when it shines through. Try slower speed drilling with a new drill, water lubrication and frequent withdrawal to prevent any clogging and friction whilst drilling.

I think it unlikely the epoxy would generate enough heat during cure to do that as the metal of the tube conducts the heat away but if you want to insure against that use a solid rod down the centre of the tube as it cures ( being careful it doesn't get stuck !). To prevent that use a tube longer than the blank so it sticks out both ends and then a solid rod to hold it on.

just a few suggestions
 

plano_harry

Member
Joined
Jan 12, 2012
Messages
1,959
Location
Plano, TX 75093
I don't know for sure, but at least several hours.
Don't know if it is the reason, but I cure paint overnight before gluing, sometimes 24 hrs. JohnU is probably right, but I am going with micro cracks caused by the drill. For a translucent blank, try drilling with water and a drop or two of dish soap.
 

mmayo

Member
Joined
Jan 12, 2013
Messages
2,958
Location
Tehachapi, CA
I just finished turning a fractured blue seam ripper. I was worried about getting your result but did not. I spray paint my tubes and use Testors paint for inside the blank. One thing to consider is that I always wait overnight to epoxy the tube to the blank.
 
Top Bottom