Working on another pen

Signed-In Members Don't See This Ad

mredburn

IAP Activities Manager
Staff member
Joined
Jul 5, 2009
Messages
8,753
Location
Fort Myers FL
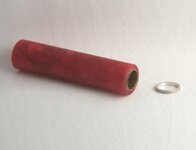
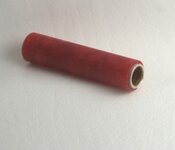
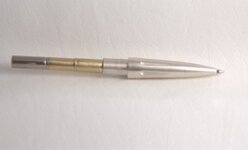
I made these parts to build a Customized Sierra style pen last year around the time of the 2009 PIth contest. One thing led to another and I never got the pen Made. I kept putting them aside muttering I need to get that pen made but ...... well I finally got around to it. I decided I wanted to extend the tube. The lower end is quite a lot of white/silver and I thought a longer tube would balance the design better. In the first 2 pictures I took a Standard Sierra/wallstreet tube (10.5mm) and cut it in half. I then took a cigar tube, (10mm) and cut it about an 1.125 long. I then soldered the tubes together extending the Sierra tube about 9/16 (14mm) It could have been just as easily epoxied or glued with CA. You can see the difference between the standard tube and the extended one.

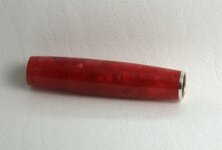
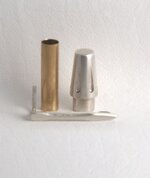
The third picture is of the lower unit Assembly. It is made up of 3 Silver pieces soldered together to form the lower end, an 8mm tube cut to length and in this case pressed in. From the tip of the nib to the end of the 8mm tube is 3.130 inches. An 8mm coupler from PSI pkmont kit, that has been trimmed down to match the tube was pressed in and the transmission and refill are in place. I can tap the lower parts and use a Sierra transmission but they are not available by themselves and the cost of the kits are more than the psi kits. This also eliminates the problems with the Sierra tranny unthreading so easily and getting stuck in the upper tube. The only drawback is that the Private Reserve refills wont go in the pen without peeling the sticker off the refill. the tolerances are so close the sticker is a no go.

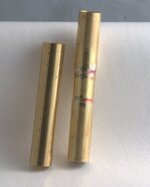
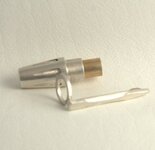
The last pictures are of the top cap with an 8mm tube that is cut to length and the epoxied into the the cap. This is the tube that grips the tranny. I still have to drill an indexing hole in the cap and clip. I will put a 20 gage wire in the cap that will keep the clip from spinning.

All I have left is to choose a blank, turn it to size and final finish
 

Attachments

  • exttube.jpg
    exttube.jpg
    34 KB · Views: 217
  • exttube2.jpg
    exttube2.jpg
    17.4 KB · Views: 223
  • extbottom1.jpg
    extbottom1.jpg
    23.9 KB · Views: 272
  • exttop1.jpg
    exttop1.jpg
    29.4 KB · Views: 238
  • exttop2.jpg
    exttop2.jpg
    14.4 KB · Views: 251
Signed-In Members Don't See This Ad

Mark

Member
Joined
Oct 12, 2009
Messages
2,536
Location
Pottstown PA
That's a unique looking Finial. I am really looking forward to your continued progress.

It looks awesome so far. Nicely Done...
 

Brooks803

Member
Joined
Sep 13, 2009
Messages
5,632
Location
Aiken, South Carolina
Looks awesome so far! Like others I can't wait to see the finished product. Also, it may be a little late but a local wood turning store I go to sells individual sierra transmissions if you're interested. www.woodzone.com they may not have it on their site but you can give them a call. I bought a couple the other week to use on my bullet cartridge pen.
 

mredburn

IAP Activities Manager
Staff member
Joined
Jul 5, 2009
Messages
8,753
Location
Fort Myers FL
I have found that I can locate one or two from kits that have been pulled apart for other pieces. THe psi Kits I can order from Woodnwhimsies and have the 8mm tubes I use in the rest of the pen. The transmissions are also not all the sme length in different Wallstreet Sierra kits, although the threads on the ones i used are all the same. 8.4mmx1mm
Mark, the bottom piece has flutes matching the top finial. It may not show up in the picture that well.

Mike

Mike
 

jbmauser

Member
Joined
Nov 16, 2008
Messages
55
Location
Roanoke, VA
It looks in the picture like your clip is soldered to the ring. Is this correct? and I am curious if it has spring tension and how you build that in. I am trying to get my brain around making my own clips for some off the reservation ideas.
 

mredburn

IAP Activities Manager
Staff member
Joined
Jul 5, 2009
Messages
8,753
Location
Fort Myers FL
JB Yes the ring is soldered to the clip. I cast the washers and then turn them to fit the pen im makeiing. This allows me to make the washer as concentric as possible. It also allows me to Mix asnd match different clips with different sized washers for different tube sizes. Theirs is not much spring tension after soldering, but you can tumble the clip and washer in steel shot to polish and work harden the pieces. YOu can cast the clip and washer as one piece but there are too many ways for the washer to be out of round and you would have to hand finish it or live with just getting it close enough.

Mike
 

ldb2000

Member
Joined
Sep 11, 2007
Messages
5,381
Location
Laurence Harbor, NJ, USA.
Looking great Mike , it should look awesome when you get a blank on it . With the clip , I've never cast Silver so I'm not sure it would work but when I cast my Pewter clips I make a smaller ring with a small tail out of tinned brass and cast it with the clip . I place the clip ring in the mold and cast , the Pewter bonds great to the clip rings tail and then I make a hollow ring that I turn with the pen and solder in the tinned clip ring after . I use .032 brass so it gives nice flex to the clip but it don't bend easily .
It works great with Pewter but at the higher temperatures with the Silver you would have to solder it together after casting but it would still give you the flex a clip needs to work well . It might be worth the extra effort .
 

mredburn

IAP Activities Manager
Staff member
Joined
Jul 5, 2009
Messages
8,753
Location
Fort Myers FL
I hard solder my clips and washers with silver solder. Tempetures range from 1100 to 1400 degrees +- , that anneals the brass and would make it just as soft. Even casting the clip and washer joined together when theyare still wax leaves them soft right out of the casting process. You can help the problem by using a thicker washer but there is a limit to how thick before you start impacting the design of the pen.

One of the reasons I extended the tube was to show by example for those people who want long 10.5mm tubes an option by making them themselves.
 

mredburn

IAP Activities Manager
Staff member
Joined
Jul 5, 2009
Messages
8,753
Location
Fort Myers FL
One of the other things I'm going to do is to turn the shoulder of the lower unit where the brass tube is fitted in, down in diameter to fit inside a cigar tube. I would have to turn the cigar coupler down to exactly the diameter of the tube to fit inside the Sierra tube. It would however allow me top use the better refills, the cigar tubes couplers and trannys are available in quantity without buying and destroying whole kits, plus the trannys are double twist. I think thats my next step.

Edit in: P.S. Butch this was the pen I wanted the Red crushed Velvet look for.:frown: sigh
 
Last edited:

mredburn

IAP Activities Manager
Staff member
Joined
Jul 5, 2009
Messages
8,753
Location
Fort Myers FL
I use one of the silver nontarnishing casting grains when I cast. It comes out of the casting process cleaner than regular silver. It adds about $4.00 an ounce to the cost
 

ldb2000

Member
Joined
Sep 11, 2007
Messages
5,381
Location
Laurence Harbor, NJ, USA.
I use allot of cigar transmissions (well over a hundred) and have had so many double twists bounce back that I will now only use the single twist transmissions . Even the cheapest single twists hold up better then the double twists .
 

DurocShark

Member
Joined
Jul 26, 2008
Messages
3,622
Location
Anaheim, CA
If you don't want to finish that pen, I'd be happy to turn that pile of worthless parts into a pen. ;)

I love those custom parts you make. I need to break down and buy some...
 

mredburn

IAP Activities Manager
Staff member
Joined
Jul 5, 2009
Messages
8,753
Location
Fort Myers FL
Thank you Butch I will keep that in mind. Theres no sense in using something that isnt going to hold up.

Duroshark if I drop it thats all it will be is a useless pile of parts.:eek:
 

mredburn

IAP Activities Manager
Staff member
Joined
Jul 5, 2009
Messages
8,753
Location
Fort Myers FL
Here we have the pictures of the blank I chose, a Ruby from our Local Woodcraft store.
In the first picture I have turned it drilled it on the lathe squared off the ends and have cut a small tenon on the end that will match up with the lower unit. The silver washer is turned to just snap on over the tube. I have slightly beveled the inside of the hole on the side that will fit up against the blank, giving the glue someplace to go. The tenon is not cut as deep as the washer is thick, this gives an edge to finish by polishing. I used med CA putting a drop on a scrap and applying it with a toothpick.

Second picture is the washer glued in place. I turn the blank with the washer glued on leaving no gaps or voids

3rd is the finished blank. Micro meshed to 12000. It is redder than the pictures indicate not orangeish as it seems in the pictures, my lighting tonight is done in a hurry.

I will finish polishing and do the final fit tomorrow, I will then post it in the SOYP forum.

Thanks for looking, any questions or comments feel free to post them.

Mike
 

Attachments

  • rubytube1.jpg
    rubytube1.jpg
    31.9 KB · Views: 142
  • rubytuebe2.jpg
    rubytuebe2.jpg
    27.9 KB · Views: 139
  • rubytube4.jpg
    rubytube4.jpg
    32.4 KB · Views: 158
Top Bottom