So I'm fixin to build my workbenches. I decided to do one 4'x8' bench for all my small power tools, sanders, buffer, vice, etc.. I'm gonna build a separate 4'x4' for working on and it will also be used for an extension of my tablesaw. I went to a local sawmill and they don't cut anything over 4'. So my only option is the big box stores. Was gonna go with treated wood, but they were out! Ugghh So I bought some 2"x12"x8' pine boards. Actual size of course is 1 1/2" x11 1/4" x8'. What an ordeal it was to find straight boards! Lol Do you think this will be thick enough to handle the weight over time? It will have 4x4 legs, will cut out for the 8' 2x4 supports and bolt to the 2x4's. Gonna put 2x4 supports under the top at 18" spacing. Lumber is sooo high but still want this to last. I looked at plywood, ridiculously priced for sanded. 23/32" was $55 a sheet. Ouch!!!! Mdf looked like crap. Lol

You are using an out of date browser. It may not display this or other websites correctly.
You should upgrade or use an alternative browser.
You should upgrade or use an alternative browser.
Workbench top material?
- Thread starter bsshog40
- Start date
Signed-In Members Don't See This Ad
Signed-In Members Don't See This Ad
gbpens
Member
When I did a 3 X 11 foot bench I used red oak flooring on top of 2 X 2's after I did all the wiring in conduit beneath. Over built YES! But it will outlast me. With todays' prices I probably could not afford it. This was done in a basement in the middle of the floor. Electric was brought to the bench by running conduit down a steel post to a junction box with a hose clamp. When I need power I just plug in the whip. No combination of machines will be too heavy for your bench.
Ya, my bench, for now, will set in the middle of my shop. I don't have any way of supporting conduit down from the ceiling. Gonna just mount a power strip under the top of the bench and run an extension cord to power when I need it. Once the tools are mounted, I plan on drilling holes behind each tool to run the plugins under the benchtop. Will probably fill around the holes with spray foam to keep sawdust from falling to the shelf below.
Curly
Member
I would skip the lumber tops altogether and buy 3 sheets of MDF, moisture resistant if you have any worries of dampness making them swell. Cut one in two and glue it together and do the same with the other two. The small one will be about 100 pounds or so and the big one double that. A few screws, say a one foot grid will hold them together while the glue dries. Put them on the bottom and not where you will be cutting miter slots. Remove them if you like. They will be flatter and more dimensionally stable than the lumber. If you really want to make the tops smoother then glue a sheet of hardboard or tempered masonite on top. Weights will hold until the glue dries.
MedWoodWorx
Member
What about marine grade plywood? I ve made my bench top from two pieces of plywood glued and screwed together. Total thickness about 4 cm (~1.5 inches).So I'm fixin to build my workbenches. I decided to do one 4'x8' bench for all my small power tools, sanders, buffer, vice, etc.. I'm gonna build a separate 4'x4' for working on and it will also be used for an extension of my tablesaw. I went to a local sawmill and they don't cut anything over 4'. So my only option is the big box stores. Was gonna go with treated wood, but they were out! Ugghh So I bought some 2"x12"x8' pine boards. Actual size of course is 1 1/2" x11 1/4" x8'. What an ordeal it was to find straight boards! Lol Do you think this will be thick enough to handle the weight over time? It will have 4x4 legs, will cut out for the 8' 2x4 supports and bolt to the 2x4's. Gonna put 2x4 supports under the top at 18" spacing. Lumber is sooo high but still want this to last. I looked at plywood, ridiculously priced for sanded. 23/32" was $55 a sheet. Ouch!!!! Mdf looked like crap. Lol
SabertoothBunny
Member
I am building a new workbench right now with the top being oak laminated together. I was thinking to use mostly oak for the legs and frame but may switch to pine due to it being cheaper. Don't think I have enough oak for the whole job and don't want to mix pine with oak for building. Only using oak for the top because I had a lot of boards from a lot of wood I purchased on the cheap.
All that to say that pine is acceptable for legs/frame. Not ideal for a table top but at the same time it is cost effective to replace if needed for table top. You could build tabletop frame out of pine and use hardwood plywood for the surface which would be really easy to replace as needed. $55 for a plywood top is cheaper that taking apart a different style tabletop and a lot of other options. Don't rule out the plywood top.
All that to say that pine is acceptable for legs/frame. Not ideal for a table top but at the same time it is cost effective to replace if needed for table top. You could build tabletop frame out of pine and use hardwood plywood for the surface which would be really easy to replace as needed. $55 for a plywood top is cheaper that taking apart a different style tabletop and a lot of other options. Don't rule out the plywood top.
pssherman
Member
I would go with 6 legs for the 8 ft long workbench.I'm also debating whether 4 4x4 legs will be enough or will I need 6.
I looked at the mdf and I'm not a big fan of that stuff. The 2x12's I bought are #2 and good looking smooth boards. Not worried about moisture. I'm either going to teak oil and beeswax or oil stain and beeswax the top anyway. As for plywood, the cheap stuff is $25 a sheet for 15/32", and it would have to be sanded for a decent top. I think my best bet is the 2x12's right now. My only concern was strength over time. I may also look at a sheet of sanded plywood over the boards but funds will be a factor there also.
mnerland
Member
I would be concerned that the 2 x 12 lumber might "cup" over time. I would recommend ripping the 2 x12s down the middle and use them as 2 X 6s. Or return them to the big box store and buy 2 x 6s. Then cover with a 1/4" masonite sheet. You can replace the masonite as it gets worn. This has been my work bench top for about 17 years. Very solid. Good Luck!
egnald
Member
I've been happy with mine, made as Peter (Curly) suggested. For the heft I use a double layer of MDF glued together fastened to the base with countersunk screws. I like MDF because of it's dimensional stability (when kept dry).
On one bench I topped it with a layer of some leftover interlocking laminate flooring - which is hard enough to dull even carbide blades. Instead of miter slots as Curly suggested, I routed "T" slots to accept all sorts of clamps and hold-downs.
On the other bench I topped it with a 1/4-inch piece of hardboard also held in place with countersunk screws so it could be removed and replaced easily when it gets buggered up by scraping off glue, being cut with hobby knife blades, etc.
Regards,
Dave
Keep in mind, this workbench is only going to be used as a all-in-one station for my small power tools, sanders, buffer, grinder, etc.... I will not be doing projects on this bench. It will have a bottom shelf to store other tools and stuff. Will be making a separate one for a dedicated actual workbench.
Last edited:
jttheclockman
Member
When I built my shop some 45 years ago I had gotten a couple solid oak wood doors from a job I was on that they were throwing away because they over ordered. Could not let them get away. I cut them to make my workbench. I used 2x4 doubled up for legs. and only have 4. put casters on and a outlet strip and shelf on bottom to store all my tabletop tools that I do not use alot. I added T slots for hold down clamps and when I work on messy projects use a piece of masonite that I can easily replace. Works well for me and is strong and heavy.
My counter tops on top of my cabinets I used the same oak doors but I used a laminate as the top surface. Easy to clean and again used so t tracks when needed.

.jpg")
My counter tops on top of my cabinets I used the same oak doors but I used a laminate as the top surface. Easy to clean and again used so t tracks when needed.
Ya, I looked for some solid doors on craigslist. Lol None to be found.When I built my shop some 45 years ago I had gotten a couple solid oak wood doors from a job I was on that they were throwing away because they over ordered. Could not let them get away. I cut them to make my workbench. I used 2x4 doubled up for legs. and only have 4. put casters on and a outlet strip and shelf on bottom to store all my tabletop tools that I do not use alot. I added T slots for hold down clamps and when I work on messy projects use a piece of masonite that I can easily replace. Works well for me and is strong and heavy.
My counter tops on top of my cabinets I used the same oak doors but I used a laminate as the top surface. Easy to clean and again used so t tracks when needed.
View attachment 352673View attachment 352674
monophoto
Member
My workbench is made from 2x12 construction lumber. There is no evidence of cupping, and its not new - the previous owner of our first house left it behind, so I've had it for 50 years, and I suspect its 60-70 years old, and perhaps even older.
The problem with 2x12s is that they are so expensive. Making the bench from narrower lumber would cost a lot less.
I agree that cupping might be a concern with 1-by lumber or with green timber.
I made my lathe bench from 2x6 construction lumber. I wanted a solid surface, so I ripped about 1/4" off each side to eliminate the factory roundover, and then edge-glued the boards using biscuits to create a solid top.
4x4 legs would be more than adequate. I agree with Paul that for a 4x8' bench you will want six legs, but you might be able to get away with 2x4 legs in the middle and 4x4s on the corner. I would put an apron around the top, probably 2x4s. It would less expensive, to glue 2x4's together to make the 4x4 legs, and that would be easier since you could cut the 2x4s to the lengths necessary to leave a mortise for the aprons rather than having to actually cut mortises in 4x4 timbers. I think 18" spacing might be a bit of overkill for cross bracing - 24" might be more than sufficient. And I would probably include at least one shelf, and maybe two. The shelf could be made from either 1x lumber or even inexpensive sheet stock such as OSB.
You didn't talk about your shop. If the shop has a concrete flood slab that is poured on grade, you might want to worry a little about moisture penetrating through the concrete and wicking into the bottom of the legs. Using pressure-treated timber for the legs would avoid that problem, but a much cheaper fix would be to use ordinary construction pine, but make them about 1" shorter than called for in your plan, and then adding a 1" thick 'foot' made from water resistant material. You could probably find some scraps of composite decking (ie, Trex) that would be ideal for that purpose. Composites don't have much tensile strength, and construction pine would be a better choice to make the legs, but it does have excellent strength in compression and would be fine if its used only as a foot at the bottom of each leg. You could attach the decking material to the end of the 4x4 legs using polyurethane glue, and if you want a stronger joint, you could reinforce it using dowels turned from scraps of the same decking material.
I had a project a few weeks ago that I thought marine grade plywood would work for, until I looked up the local price and it was just under 300 bucks a sheet. I went another route . I got curious and just checked the price for 3/4 marine grade locally, it's down to $233.00 a sheet .What about marine grade plywood? I ve made my bench top from two pieces of plywood glued and screwed together. Total thickness about 4 cm (~1.5 inches).
Last edited:
Ted iin Michigan
Member
I figured there would be lots of answers to this one, but .. wow. Impressive
My "solution" - I used hardboard over MDF and recessed it into the top with some 3/4 edge banding so it's all flush. I didn't glue it so if it gets too worn out I can just lift it out (hole drilled in the substrate) and replace it. See the pic.

My "solution" - I used hardboard over MDF and recessed it into the top with some 3/4 edge banding so it's all flush. I didn't glue it so if it gets too worn out I can just lift it out (hole drilled in the substrate) and replace it. See the pic.
So I already bought my lumber before this post. The 2x12's just had me curious as to durabilty and the reason I was asking for opinions. I have treated 4x4's for the legs plus I'll be putting galvanized metal over the bottoms. Mainly to prevent wear on the legs in case I move this thing around eventually. My shop has a brand new concrete floor. I'm still going to mortise the 4x4's for extra support of the side 2x4's. I will have a bottom shelf for misc stuff. I did buy a sheet of sanded plywood for that.
howsitwork
Member
Slightly off topic but relevant to your wiring point- just get some foam eg packing foam and stuff that in the wiring holes to stop dust / shavings dropping down . Then easy to remove with a curved scriber if you need to retire / move some thing. less messy than the expanding foam you are considering
jttheclockman
Member
To address the 4x4 legs, do as I did make the frame of the table less than the top. I came in about 18" No need to have the legs at the very edge of the table. I wish I had a better photo but those shop photos were actual pictures transfered to computer many years ago and that is why they are so small.
Jim Smith
Member
I used an old actual 3' x 6' butcherblock table for my benchtop with 6x8" legs and it would easily hold up a Mac truck. That said, depending on how far you live from Dallas, you might consider buying some reclaimed Bowling Alley wood. It's not cheap, but it will make a beautiful benchtop that will take forever. Just a thought... https://www.repurposedmaterialsinc.com/bowling-alley-wood-inventorySo I'm fixin to build my workbenches. I decided to do one 4'x8' bench for all my small power tools, sanders, buffer, vice, etc.. I'm gonna build a separate 4'x4' for working on and it will also be used for an extension of my tablesaw. I went to a local sawmill and they don't cut anything over 4'. So my only option is the big box stores. Was gonna go with treated wood, but they were out! Ugghh So I bought some 2"x12"x8' pine boards. Actual size of course is 1 1/2" x11 1/4" x8'. What an ordeal it was to find straight boards! Lol Do you think this will be thick enough to handle the weight over time? It will have 4x4 legs, will cut out for the 8' 2x4 supports and bolt to the 2x4's. Gonna put 2x4 supports under the top at 18" spacing. Lumber is sooo high but still want this to last. I looked at plywood, ridiculously priced for sanded. 23/32" was $55 a sheet. Ouch!!!! Mdf looked like crap. Lol
Attachments
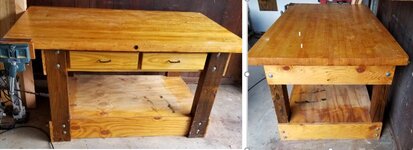
Ok, so I have the frame made. Still have to put 2x4 supports on the bottom for a shelf and under the top. I just set the top boards on top to see how it will look. After the top supports go in, I really can't see why just the 2x12's won't work. They seem pretty stout to me, especially just for a bunch of small power tools. I'm still kicking around how I want to secure the top boards down. Was thinking just inset screws. Maybe bolt screws in the corners into the 4x4's, but would have to be off-center due to the bolts in the sides.

Last edited:
jttheclockman
Member
That is not going anywhere. Land a plane on it. To screw the boards together get some angle iron and cut 3 or 4 pieces and screw them from underneath and into the end boards. Screw the end boards down from the top into your rails. You could also put biscuits in the boards to keep them from cupping and give it support and making it a solid piece. Along with some angle iron underneath it will good for a long time and out live you. I would alternate the growth rings on the boards to help keep it stable too.
I don't have any angle iron. I do have a bunch of very solid L-brackets. I could possibly space those out around the edges. I am going to swap around the top boards as one has a small warp at one end. I'll watch for the growth rings also when I swap them around. I don't have any type of tools to apply biscuits tho. Thanks JT!That is not going anywhere. Land a plane on it. To screw the boards together get some angle iron and cut 3 or 4 pieces and screw them from underneath and into the end boards. Screw the end boards down from the top into your rails. You could also put biscuits in the boards to keep them from cupping and give it support and making it a solid piece. Along with some angle iron underneath it will good for a long time and out live you. I would alternate the growth rings on the boards to help keep it stable too.
jttheclockman
Member
You can get angle iron at home depot. My thought was if you space 3 to 4 pieces across the bottom of the boards from end to end width wise this would help keep the boards from cupping because they will cup. If you used strapping or any other wood product it would just cup with the boards. With angle iron it will not pull it. You could use the angle brackets if you want on the underside to secure the end boards to your frame. Just my thoughts.I don't have any angle iron. I do have a bunch of very solid L-brackets. I could possibly space those out around the edges. I am going to swap around the top boards as one has a small warp at one end. I'll watch for the growth rings also when I swap them around. I don't have any type of tools to apply biscuits tho. Thanks JT!
Funds are a little tight. I'll see what they have. I planned on rubbing the top down with beeswax also. Will this help? Thanks for the help JT!You can get angle iron at home depot. My thought was if you space 3 to 4 pieces across the bottom of the boards from end to end width wise this would help keep the boards from cupping because they will cup. If you used strapping or any other wood product it would just cup with the boards. With angle iron it will not pull it. You could use the angle brackets if you want on the underside to secure the end boards to your frame. Just my thoughts.
Last edited:
jttheclockman
Member
no not really.Funds are a little tight. I'll see what they have. I planned on rubbing the top down with beeswax also. Will this help? Thanks for the help JT!
MedWoodWorx
Member
I had a project a few weeks ago that I thought marine grade plywood would work for, until I looked up the local price and it was just under 300 bucks a sheet. I went another route . I got curious and just checked the price for 3/4 marine grade locally, it's down to $233.00 a sheet .
Is that so? i bought a sheet of plywood 1.25m x 2.5m (~4.1 feet x 8.2 feet) for about 125 euros (about 130 $). I cannot believe that anything but sardines and tomatoes is cheaper in Greece than the US.
monophoto
Member
I thought the objective in taking on projects like this was to create an excuse to buy the tools you haven't gotten around to acquiring yet.I don't have any type of tools to apply biscuits tho.
monophoto
Member
When I first got into turning, I made up a mixture of BLO and beeswax that I use on tool handles, jigs and fixtures. One day a few years later, having nothing better to do, I cleaned off the work bench, sanded the top, and wiped on some of that BLO+ wax blend. It made the top much smoother and also resisted spills.I planned on rubbing the top down with beeswax also.
I used ordinary paste wax that I dissolved in turpentine, and then added the BLO. Shake, and rub in with a rag. Smells nice.
My lathe bench is finished with water-based poly floor finish. That's fine, but the BLO+wax treatment is better.
The plywood I was looking at was 3/4 thickIs that so? i bought a sheet of plywood 1.25m x 2.5m (~4.1 feet x 8.2 feet) for about 125 euros (about 130 $). I cannot believe that anything but sardines and tomatoes is cheaper in Greece than the US.
cl1237
Member
I have used Ted's idea before with hardboard over MDF. My current bench is used for everything from a tool stand to assembly and as a table saw outfeed table…I used melamine because it's slick and wood glue doesn't stick to it
Well any new tools are really not feasible right now, especially ones that will only be used once. I don't normally make/build anything that requires a biscuit joiner. Lol I will have to look around for some metal to go around the edges of my top. I still plan on building a smaller bench, maybe 4x4 or 3x5 for a combination workbench/tablesaw extention. I built this workbench at 37 1/2" high also which is level with my tablesaw in case I change things up down the road. As some of you may remember, my shop is basically a glorified carport. It has 3" tubing supports and those are spaced 52" - 54" apart. So it will be a while before I can insulate and build walls to be able to do any shelving or fixed benches against them. So lets get on the subject of finishing the workbench top. I planned on staining the top boards and putting a beeswax finish on them. I searched our big box stores and no one carried any paste wax. Never have been able to find BLO either, just basic oils, teak, danish, etc... My other idea was to poly over the stain but thinking it might be too slick when working. I would like it to look good but be efficient also. Thoughts???
Last edited:
RoxnDox
Member
I bought my workbench off Craigslist for $75. The legs are 4x4, the top is 2x4 glued together to give a 4" thickness. More 2x4 bracing and a plywood shelf underneath that I added, along with a DIY set of wheels that can raise or lower. For the cost, it's perfect. I use a salvaged desk for my power tools, and built a stand for the lathe using scraps on hand.
So I got 2 pieces of angle iron as JT had suggested. I have them mounted under the 2 ends as of now. I stained the bench also. I'm gonna let that dry for a good day and then try and decide what to coat it with. Put a level all across the top and sits nice and flat. My square looks good in all corners too. Lucky me!! Lmao I also bought some 1x2 boards so I can cap both ends.

jttheclockman
Member
Did you stain the bottom also?? Always a good idea to whatever you do on top is to match it on the bottom. The angle iron will help keep it flat.
That's only part I didn't get to as my back started bothing me. I figured I would let that dry overnight and then I can flip it on it's side and finish the rest tomorrow or just unscrew one board at a time. Be a little easier that way. Lol I had decided to stain it after I had secured the angle iron. LolDid you stain the bottom also?? Always a good idea to whatever you do on top is to match it on the bottom. The angle iron will help keep it flat.
Last edited:
MedWoodWorx
Member
Same here, about 2 cm thick. I suppose its a matter of quality, maybe you are talking about top quality birch plywood while i bought some mediocre stuff, i cannot explain it otherwise.The plywood I was looking at was 3/4 thick
Ya, I walked by a piece of birch plywood. Maybe 1/2" and it was $90.Same here, about 2 cm thick. I suppose its a matter of quality, maybe you are talking about top quality birch plywood while i bought some mediocre stuff, i cannot explain it otherwise.

Signed-In Members Don't See This Ad
SteveG
Member
When you cap the ends, consider attaching in a way that allows for wood movement. Look up "Breadboard" ends. The bench top will expand/contract with the seasons. The bread board cap helps keep the slab flat while allowing for wood movement. If you secure the cap pieces hard and fast, you will end up with the long boards splitting at the cross-grain joint. Don't do that to your nice workbench!